23.1.23

ORANGE BUTTERNUT SQUASH MUFFINS

We have been eating it as a vegetable and often. We are now into baking with it. Keeping in mind ‘Everything tends towards disorder’, I stepped up using up the small crateful of butternut squash I still have from last year’s garden. This is the first muffin I made from it and we shall try no other muffin recipe. It’s ‘the cat's miaow’ as they say and at the first try no less. A blend of several recipes going all the way back to my amazing blueberry muffins, but I digress. 

A small to medium sized butternut squash will produce sufficient amount of puree for the recipe. These muffins are worth baking a squash for. It is that good. I was never as enamored with squash as much as my darling, but pairing squash with orange was a brilliant idea I picked up from the Hungarian web. 

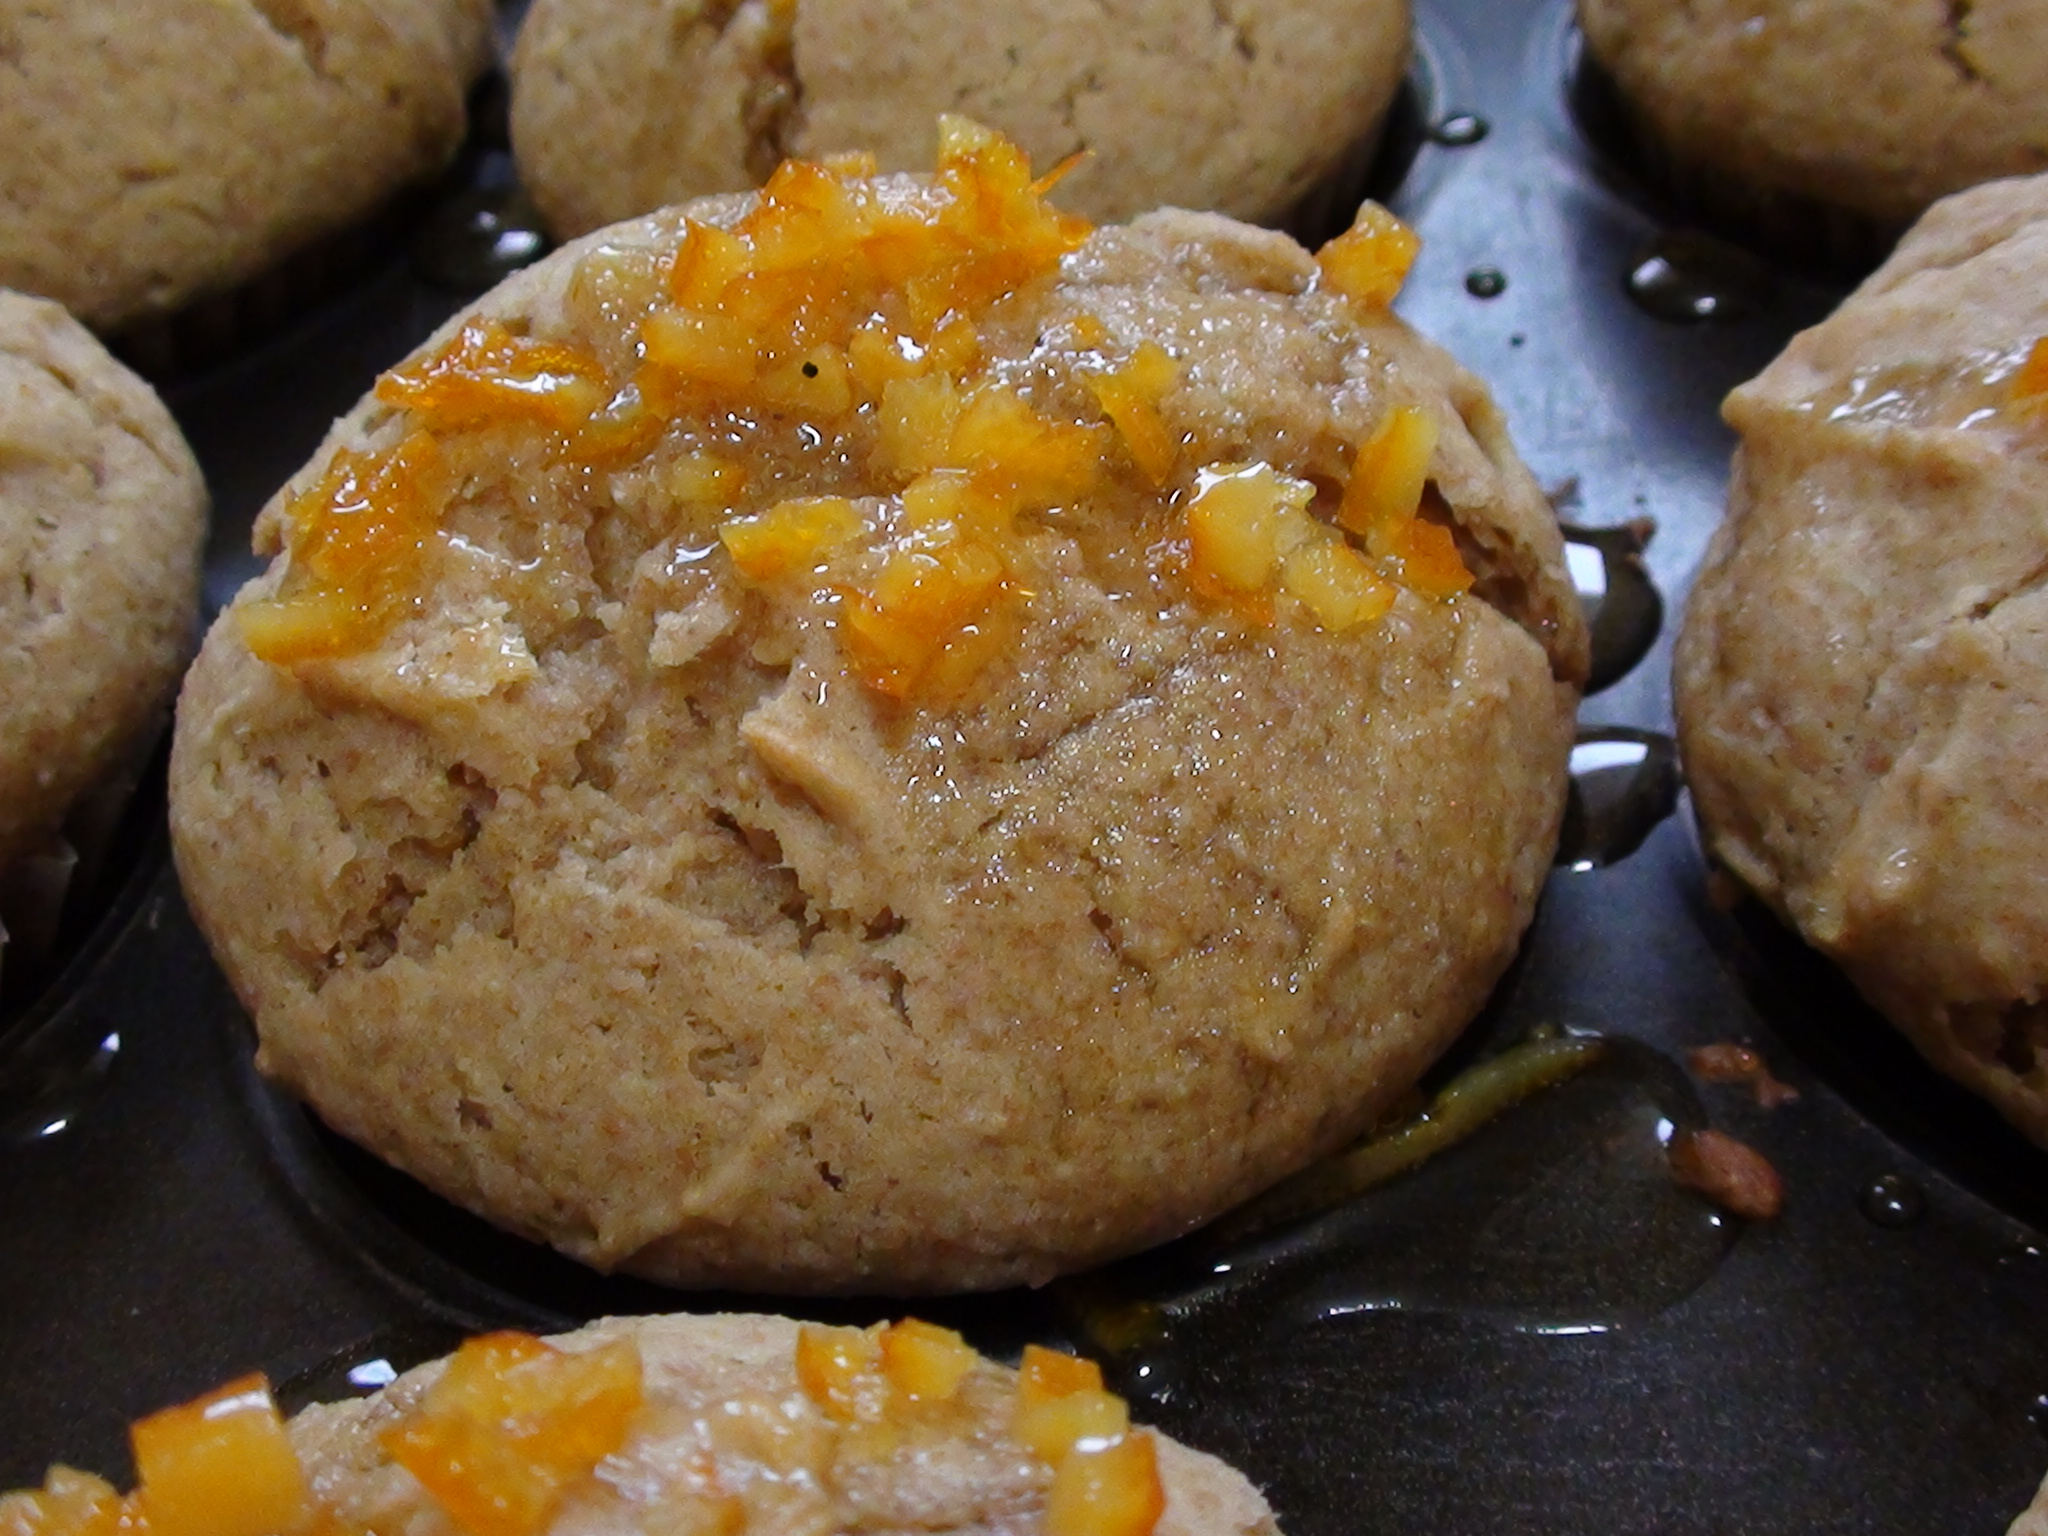
Orange Butternut Squash Muffins 
1 1/2 cups of the butternut squash puree [from a small butternut squash] 
1/2 cup vegetable oil 
1/2 cup sugar 
1/2 cup brown sugar 
1 1/2 tsp baking powder 
1 tsp baking soda 
1/4 tsp ground nutmeg 
1/2 cup 3.25% buttermilk 
2 tsp orange extract 
3 large eggs 
1 cup whole wheat flour [I used whole spelt] 
up to 2 cups of all purpose flour 
Orange Syrup: 
1/2 cup sugar 
1/2 cup water 
1 navel orange 

 The Puree: 
• Fist make the butternut squash puree. 
• It doesn’t matter how you slice the squash open, crosswise or lengthwise, it will be pureed anyway. 
• Scoop out and toss the seeds and the stringy mush. 
• Place the squash cut side up in a parchment lined baking pan. 
• Roast for an hour at 350F. 
• Remove the squash from the oven and let it cool for 10 minutes. 
• Scoop the flesh into a food processor. 
• Puree smooth. 

The Muffins: 
• Preheat oven to 375F. 
• Line a large 12 muffin tray with parchment liners. 
• Place 1 1/2 cups of butternut squash puree, oil, sugar, brown sugar, ground nutmeg, baking powder, baking soda, buttermilk, orange extract in a beater bowl and beat to combine. 
• One by one add the eggs beating well after each addition. 
• Gradually stir in the whole wheat flour and just beat to combine. 
• Begin to add the all purpose flour. Add it gradually. This is where you have to use your intuition if you need to add all or a bit less. Keep in mind muffin batter should be slightly more robust than cupcake batter. The variations can result anywhere from different measuring technique to the size of the eggs. 
• Spoon the batter into the lined muffin pans. 
• Bake in the preheated oven until a sharp knife inserted into one of the middle muffins comes out clean. 
• While the muffins bake make the orange syrup. 

The Orange Syrup: 
• Wash and dry a navel orange. 
• Using a small paring knife, peel off the rind avoiding the white pit. 
• Slice the rind into very thin strips and then cut into small squares. 
• Place the sugar and water in a small saucepan over medium heat. 
• Cut the peeled orange in half and squeeze all its juices into the pot. 
• Bring it all to boil and add the orange rinds. 
• Cook stirring the mixture continuously until syrup consistency. Syrup will bubble up. 
• When the muffins are done, move them to a tray. 
• With the paring knife cut 4 holes into each muffin, 
• Spoon the orange syrup over the muffins. 
• Slide the parchment liners off and enjoy.


22.1.23

DEEP FRIED VEGETABLE SLAW

It’s an easy snack in summer or any time. Bits of thinly sliced and chopped vegetables, in minute amounts, add an egg yolk, mix in some flour and fry it up. What is required maybe in your fridge and pantry already? You need only small amounts of each vegetable. Eat your vegetables! 

Deep Fried Vegetable Slaw 
thin slice of green cabbage 
a very small red potato 
small segment of zucchini 
thin carrot 
couple of slices of red onion 
quarter of a red pepper 
3 yellow wax beans 
a 2 inch segment of parsnip 
and even a few twigs of flat leaf parley because why not! 
1 egg yolk 
1/4 cup flour 
oil for deep frying 
salt 

• Cut the vegetables very thin and the same diameter to ensure even cooking. The length does not matter. 
• Add them all to a large mixing bowl. 
• Add the oil to your frying pot. Mine is a deep, wide bottomed heavy pot. An inch and a half of oil is sufficient for deep frying. 
• Start heating the oil. 
• Meanwhile mix an egg yolk into the vegetables. 
• Add the flour and toss. 
• When the oil is ready, ~350F, take a small handful of vegetables, as in the picture, and plunge it into the hot oil. 
• Repeat until there is no room left in the pot. 
• As soon as the last handful is dropped into the hot oil begin to take out the first clusters with a wire strainer. 
• Transfer them to paper towels and continue the same processes until the last handful of vegetables are fried. 
• Season with salt and serve immediately.

21.1.23

ROASTING RAW SAUSAGE

I have yet to find a raw supermarket sausage I like. The flavor is generally disagreeable and the texture is course. Not to mention the plastic casings! On the other hand, the local deli has wonderful raw sausages. Garry’s has been on the same spot forever and next to a Safeway no less. Yesterday I brought home some pork and Italian bratwurst. The Italian had a slight kick to it and the pork bratwurst was mellow; both were wonderful. 

The seemingly simple task, cooking raw sausages, can be a vexing experience. Aside from the lackluster appearance of a burst sausage, fat splattering can turn the oven into a mess. I am not sure the reason cooking blogs repeat the ‘400F for 30 minutes’ mantra without taking into consideration the type, the size or the collective volume of sausages. And that’s a big problem because eating partially cooked meat poses serious health risks. The other blunder is poking the sausage with a fork. 

Roasting Raw Sausage 
3 raw sausages 

• Line a high walled baking pan with parchment paper. 
• Lay the sausage on parchment, leaving space between. If crowded, sausage will stick together and burst. 
• Add a small amount of water to the pan, about 1/2 cup so the sausage won't stick to the surface. The water will be cooked off by the time the sausage begins to sizzle. 
• You can add a couple of tablespoons of lard to the pan, but good quality sausage does not require additional fat. 
• Cover the pan with aluminum foil. 
• Place the baking pan in a cold or lukewarm oven. You don’t want to shock the sausage with sudden heat; it will crack and burst. 
• Now turn the heat to 325F and bake it for an hour from the time the indicator light is off. 
• I don’t pierce raw sausage; I want the juice inside and not in the pan. 
• Check after an hour. If the sausage needs it, remove the aluminum foil and turn the temperature up to 350F, checking it at 10 minute intervals until the sausage gets a slight color. Don’t let it dry out though. 
• To make sure the sausage is fully cooked, insert a meat thermometer. The internal temperature should read between 155–165F.


20.1.23

FRESH BERRY TARTS

The inspiration came from two large lonely strawberries and some pie pastry scraps. I rolled out the pastry and cooked up a low sugar jam from half a cup of sugar and a cup of frozen raspberries. The tarts tasted fresh and well… on the “tart” side. Dear reader if you haven’t tried my pie pastry before, you out to try it once. You may not want to go back to traditional pie pastry making. What is tradition anyway? Tradition is flux; the world is in a constant state of change. Which is a good thing don’t you think? Not every tradition is worth hanging onto. 

Note: Don’t use regular jam or it will be just a jam tart. 
 
Fresh Berry Tarts 
~ 1/4 batch of pie pastry 
2 large or 4 smaller fresh strawberries 
1 cup of frozen or fresh raspberries 
1/2 cup sugar  

• If using frozen berries, let them thaw somewhat. 
• Make the pastry as needed. 
• Roll the pastry out and cut 12 rounds, about 4 inch diameter, the pastry will shrink during baking. 
• Place the pastry rounds inside the muffin tin. 
• When the berries softened up, crush them and pour them into a medium sized non stick fry pan. 
• Add the sugar, stirring often, slow simmer until the mixture thickens. 
• Divide the fresh jam between the twelve tins. 
• Cut the strawberries into 12 pieces and place a piece inside every tart. 
• Bake in the preheated oven until the tarts are golden colour.

19.1.23

EGG WHITE COOKIES

Originally called almond cookies, but this recipe's greatest asset is the 3 egg whites. Hungarian recipes often call for only egg yolks and this presents a challenge to make use of the accumulated egg whites. I used to just add them to a plastic container I kept in the upstairs freezer thinking I will make another pavlova, but as much as we LOVE pavlova, there is a limit to how many we want to eat. It is much easier to freeze the egg whites individually in tiny plastic containers and once frozen transfer them to a larger container. Sometimes I take out a cube to thaw, that is… when I remember, and add it to something that day. From time to time I would just say “eh!” and pour an egg white down the drain. But the guilt is strong after several egg whites. In this recipe, hurrah, I can use up three egg whites! This is a delightful cookie and also one of the simplest to make. 

Hint: Best with sweet unsalted butter. Flavorings would spoil the delicate flavor. 

Egg White Cookies 
3 egg whites 
1/2 cup soft unsalted butter 
1/2 cup sugar 
3/4 cup flour 
pinch of salt 
1/2 cup sliced or chopped nuts 

• Preheat the oven to 350F. 
• Line a large baking sheet with parchment paper. 
• Beat the butter and sugar until fluffy. 
• One by one add and beat in the egg whites. 
• Then gradually add the flour and beat to combine. 
• Using only a teaspoon, scoop up some batter and ease it onto the prepared baking sheet at 1 inch apart. The cookies will spread. 
• Place in the preheated oven and bake for 3 minutes. 
• Take the pan out of the oven and sprinkle the cookie tops with sliced almonds or some other chopped nut. 
• Return cookies to the oven and bake for 10 more minutes.

18.1.23

PUFF PASTRY PEAR TARTLETS

There are two types of frozen puff pastry on the market where I live. One is already rolled and the other comes in a block. These four tartlets come from half a block pastry, and as you can see as thin as I rolled it, the edges puffed up quite well. Pastry is my downfall. Tim Hortons lost a costumer when they stopped making maple pecan danish. Adapted from ‘mom’s dish’, because I only need four pastries and once a recipe is adapted I don’t have to think about it. 

Puff Pastry Pear Tartlets 
1/2 block of frozen puff pastry defrosted 
2 pears 
Fruitfresh 
sugar 
small egg 

• Put the frozen pastry in the fridge for overnight. Hurry at your peril. 
• The following day preheat the oven to 415F. 
• On a lightly floured board roll out half the puff pastry, wrap and return the rest to the freezer. 
• Cut four 4 inch rectangles. 
• Place the pastry squares on the pan. No need to line the pan for puff pastry. 
• Score each rectangle around the perimeter about half an inch from the edge without letting the knife go through. 
• Core and cut the pears into halves. 
• Put them in a medium bowl and sprinkle with Fruitfresh and toss. This will keep the pears from oxidizing. 
• Slice the pears halves across, not lengthwise, thinly. 
• Scoop one up without separating the slices and place them inside the scored area on the pastry square. 
• Repeat with the rest. 
• Whisk the egg and using a pastry brush, brush the pear and the pastry generously. 
• Sprinkle each pear with sugar. 
• Place the pan in the preheated oven and bake for 15 minutes or until the pastry is puffed up and golden.


15.1.23

PUMPKIN MUFFINS WITH RUM

We all know what a muffin looks like, but what’s inside matters most. Generously liquored as well, but the dark rum has to be left to the imagination. Imagine biting into one of these… it is pure pleasure. 

Note: make sure the pumpkin puree has no added ingredients, such as water or spices. 

Pumpkin Muffins with Rum 
1/4 cup dark rum 
1/4 cup water 
1 cup raisins 
1-1/2 cups flour 
1 cup sugar 
1/2 Tbsp cinnamon 
1 tsp baking powder 
1 tsp baking soda 
1/2 tsp salt 
2 eggs 
3/4 cup oil 
3/4 + 1/8 cup pumpkin puree 
2 squares of white chocolate, chopped 

• Heat the dark rum and the water until very hot. 
• Pour over the raisins and let them soak overnight. 
• Preheat the oven to 375F. 
• Line a muffin tin with parchment liners and set it aside. 
• Whisk together the dry ingredients in a large bowl. 
• In a smaller bowl whisk the eggs, oil and the pumpkin until well combined. Please don't add vanilla to this.
• Add the pumpkin mixture to the dry mixture and stir to combine. 
• Fold the chopped white chocolate and the drained raisins into the batter. 
• Fill the prepared muffin tins almost full. 
• Bake in the preheated oven for 20 minutes. 
• Makes 10 large fluffy muffins.

14.1.23

SOFT STRAWBERRY COOKIES

The only sane thing to do when strawberries are in season is to eat them. Out of season strawberries call for different strategies: roll them in sugar, bake them with or make them into sauce or jam. I have seen a similar online recipe with oil. In fact there is an increased amount of cookie recipe with oil, but I am not a  fan! A few years ago I left the oldest bakery in town when the new owners switched from using butter to oil. If your dietary regime dictates to leave off the butter, replace it with shortening. Shortening softens cookies but leaves no oily aftertaste.  For softer cookies you can always increase oven temperatures, from 350F to 375F. In that case don’t forget to reduce the baking time. But the fresh fruit does an ample job here. These cookies are soft and delicious.

Soft Strawberry Cookies 
1/2 cup soft butter 
1/2 cup sugar 
1 egg 
1 tsp vanilla 
1 3/4 cups flour 
 1 1/2 tsp baking powder 
greated rind of 1 lemon 
1 cup chopped strawberries 
2 Tbsp flour 

• Preheat oven to 350F and line a cookie sheet with parchment paper. 
• Beat the butter and the sugar until very fluffy. 
• Add the egg, vanilla and beat to combine. 
• Set aside 2 tablespoons from the flour for use later. 
• Add the remaining flour, baking powder and the grated rind of a lemon. 
• Beat for a short spurt just to combine. 
• Roll the strawberries into the flour you set aside earlier and gently mix it into the cookie batter. 
• Form into balls and arrange them on the prepared cookie sheet. 
• Bake in the preheated oven until the cookie edge gets a deep golden colour, though don’t let them brown. 
 • Let the cookies solidify and cool down before handling.

12.1.23

BUTTERNUT SQUASH OVEN FRIES


Cutting the fries is not easy, especially the hard shelled, round variety we grow, though I try to cut them as uniform in size and thickness as possible. If you want them crispy, baked vegetable fries require high temperatures. But beware there is a fine line between just right and burnt. Butternut squash tends to be mushy and needs an additional trick called cornstarch. Not flour, flour would only harden the fries. Embrace the squash flavor. It is so overpowering, unless you completely obliterate it with insanely hot spices, any attempt at seasoning falls short and just ends up muddying the flavors.

Butternut Squash Oven Fries 
1 butternut squash 
extra virgin olive oil 
salt 
cornstarch 

Amounts required depends on the size of your squash, I go by feel. It is true in this case that adding less gradually is better than throwing in too much. These fries require small amounts of ingredients; you just want a light coating on every fry. 

• Preheat oven to 450F. 
• Line a large baking sheet with parchment paper. 
• Wrestle the squash down to half, I find a clever works well. Be careful and try to avoid the ER. I wasn't.
• Cut the squash into workable segments and peel off all the outer shell. 
• Slice the pieces as uniform as possible. 
• Add olive oil, salt and cornstarch in that order, tossing after each addition. You want everything evenly distributed. If you don’t want your skin cells ending up in the mix, use a pair of plastic gloves, but do dig in, you can’t do it justice with a pair of utensils. 
• Scatter the fries on the prepared baking sheet. 
• Place in the preheated oven for 20 to 30 minutes. 
• Turn the fries over after 15 minutes. 
• Keep a close eye on it after this. At this temperature there is a fine line between done and burnt. 
• Serve the fries as soon as they come out of the oven.

8.1.23

BROWN BUTTER CARROT LOAF


Don’t let the lame photo fool you. I forgot to take a picture until the best of it was packed up. We both ate a thin slice moaning with pleasure and the rest went to Olivia while her parents were away. I made some amazing carrot loaves in my time, but this takes the cake. This truly is the best carrot loaf… ever. 

Butter makes everything taste better. Browning it may seem superfluous, but it will deepen the flavor and elevate your baking to an entirely different sphere. Once you master it, browning butter is easy. In the meantime have some extra butter on hand, in case your first attempt burns. So don’t walk away and don’t stop stirring… 

There is a loss of moisture as some of the liquid evaporates during the cooking process. So to replace butter with browned butter in a recipe, make sure the browned butter is the same amount as the recipe calls for. 

This is an uncomplicated recipe. Aside from browning the butter, which literally takes only minutes, all you do is whisk and fold. 

Brown Butter Carrot Loaf
1/2 cup browned butter 
2 1/4 cups flour 
3/4 cup sugar 
1 tsp baking soda 
1/2 tsp salt 
3/4 tsp ground cinnamon 
3/4 tsp ground ginger 
1/2 tsp grated nutmeg 
3 eggs 
 1 tsp pure vanilla extract 
1/2 cup full fat buttermilk 
1 1/2 cup finely grated carrots 

FROSTING 
3 Tbsp unsalted soft butter 
1 1/2 cups icing sugar 
pinch of salt 
2 – 3 Tbsp whipping cream 

• Preheat the oven to 350F. 
• Butter and fully line a 9×5-inch loaf pan. 
• Measure and set out all the ingredients. 
• Grate the carrots. I prefer to use the food processor over a mandolin. 
• Next make the browned butter. 
• Place a saucepan on medium heat. 
• Add the butter. 
• The butter will foam and crackle as it melts. 
• After the crackling the butter will start to brown. Stay with it and swirl the pan a few times. 
• When it starts to smell nutty remove pan from heat. 
• Pour the hot butter into a small heatproof bowl and set it aside to cool. 
• In a large mixing bowl, whisk together the flour, sugar, baking soda, salt, cinnamon, ginger, and nutmeg. 
• Stir in the grated carrots.
• In a medium bowl, whisk together the eggs, vanilla extract, and the buttermilk. 
• Last add and whisk in the cool, browned butter. 
• Combine the wet ingredients with the dry, gently folding. Do not beat or stir vigorously, but make sure no flour pockets remain. 
• Transfer the batter to the prepared pan and bake for 45 to 50 minutes. 
• Test for doneness inserting a sharp knife in the middle. If it comes out clean, the loaf is done. 
• Remove loaf from the oven and place it on a wire rack to cool. 
• When the pan is safe to handle, remove loaf from the pan and place it on the wire rack to cool completely. 
• To make the frosting, place ingredients in a beating bowl and beat until fluffy. 
• Spread the frosting over the completely cooled loaf.


4.1.23

PASTA SUTA

I have this fuzzy memory watching a former neighbour making it once. I asked her what is that thing and she said “don’t you know anything, it’s pasta suta.” It was Brenner néni from the 1st floor who had a daughter in Italy. That is as far the authenticity will stretch. I was just editing our digitized wedding photos. You know those vaguely arranged group shots when you come out of the church and the photographer says “all smile”. Lots of people should not have made it onto the group shot. But they felt important enough to plant themselves in front of my parents and closest relations. One of them was Brenner néni… I made her pasta suta last week and it was a hit. 

Pasta Suta 
spaghetti pasta for two 
1 cup homemade quick tomato sauce 
1/4 cup Grana Padano cheese, grated 

Note: The cheese has to be hard cheese, preferably freshly grated. Never Mozzarella! And this could be a sacrilege, but my preference is Grana Padano. There are way too many Parmesan wannabe’s especially in granulated form. 

• Cook the pasta in salted boiling water a tad longer than al dante, just a bit. 
• Drain and stir in the homemade tomato sauce and the grated cheese. 
• Serve immediately.

3.1.23

QUICK TOMATO SAUCE

From fresh tomatoes it is preferable to leave the skins on and to put it through the food processor first. But since I used frozen tomatoes and the skins have toughened up, I had to remove them. Simply run hot tap water over each frozen tomato and the skin will pull off like magic. If you still want to put it through the food processor you will have to wait for the tomatoes to thaw a bit first. I just went ahead with making the sauce.
Quick Tomato Sauce 
2 cups tomatoes 
extra virgin olive oil 
1/2 onion, chopped 
2 cloves garlic, minced 
salt to taste 
dried oregano to taste 
sugar to taste 

• Cover the inside bottom of a large sauté pan with olive oil. 
• Add the chopped onions and sauté on medium heat until translucent. 
• Add the tomatoes and the garlic. 
• If you are using frozen tomatoes add a bit of water, maybe 1/4 cup so the tomatoes won’t burn before breaking down. 
• Omit this step if you use fresh crushed tomatoes. 
• Add the salt, the minced garlic and the dried oregano. 
• Cover with a lid and slow simmer for 10-15 minutes. 
• Remove lid and continue to simmer. 
• Once your liquid has reduced to the perfect consistency adjust the salt and add sugar to taste. 
• Sauce keeps for 4 days in the fridge or for 3 months in the freezer. 
• I use the sauce for pizza, pasta suta or it could be served with small meatballs.

2.1.23

RED CURRANT MERINGUE CAKE BARS - HABOS RIBIZLIS SÜTI

Ah the wonders of July. Could have been the last year for these mouth puckering little berries I love so much… Thinking of putting the garden to rest… Time passes and we can’t keep up with the work anymore. 

Red Currant Meringue Cake Bars 
2 cups flour 
2 tsp baking powder 
1 packet vanilla sugar 
3 egg yolks 
3 Tbsp hot water 
3/4 cup sugar 
1/4 cup butter, melted 
100 ml milk 

Meringue topping 
3 egg whites 
pinch of salt 
1 cup sugar 
2 cups red currants 

  • Pluck the currants off of the stem with one movement by running a fork down the stem. 
  • Wash and drain and set aside.
  • Preheat oven to 375F.
  • Fully line a rectangular pan with parchment paper.
  • Melt the butter and set it aside.
  • In a medium bowl whisk together the baking powder with the flour and set it aside.
  • In a beater bowl beat the egg yolks with 3 tbsp of hot water until frothy.
  • Gradually add 3/4 cup of sugar, vanilla sugar and the melted butter.
  • Alternating add the flour mixture and the milk to the egg mixture.
  • Transfer cake batter to the prepared baking pan.
  • Place cake in the preheated oven for 15 minutes.
  • Meanwhile prepare the foam topping.
  • Roll the red currants into a couple of tablespoons from the sugar.
  • In a clean beating bowl, beat the egg whites with a pinch of salt to soft peaks.
  • Gradually add the remaining sugar and continue beating until stiff peaks form.
  • Gently fold in the sugared currants.
  • Spread the foam over the hot cake, return to the oven and bake for 20 minutes longer.
  • Let it cool before slicing.
  • Privacy & Cookies

    This site uses cookies. By continuing to use this website, you agree to their use. To find out more, including how to control cookies, see here: Cookie Policy

    Translate

    me

    My photo
    It began with posting a few recipes on line for the family. "zsuzsa is in the kitchen" has more than 1000 Hungarian and International recipes. What started out as a private project turned into a well visited blog. The number of visitors long passed the two million mark. I organized the recipes into an on-line cookbook. On top of the page click on "ZSUZSA'S COOKBOOK". From there click on any of the chapters to access the recipes. For the archive just scroll to the bottom of the page. I am not profiting from my blog, so visitors are not harassed with advertising or flashy gadgets. The recipes are not broken up with photos at every step. Where needed the photos are placed following the recipe. Feel free to cut and paste my recipes for your own use. Publication is permitted as long as it is in your own words and with your own photographs. However, I would ask you for an acknowledgement and link-back to my blog. Happy cooking!