30.3.13

BAKED SALMON

Back in the days when my dad was an altar boy. Apa ran an errand for the local bishop on Good Friday. The bishop was just about to have his böjti ebéd [fasting dinner] when my dad arrived, so the bishop asked my dad to dinner. Apa was ushered into a formal dining room where a rich spread lay with a huge fish swimming in butter sauce. My dad took one look at the meal, thanked the bishop and made his excuse he didn’t want to get into trouble with his mother; they were fasting on bread and water until Saturday night. “God will bless you my son” said the bishop and sat down to eat his meal.
 
Adopted from pagan religions, fasting and monasticism is not an original Judeo-Christian concept. When I was younger I used to have an intellectual struggle with fasting particularly on Ash Wednesday and Good Friday. An all out fasting or fasting from certain foods without a health reason, in my opinion, makes a mockery out of people who have to go hungry all of the time. “I desired mercy, and not sacrifice” [Hosea 6:6] had a poignant message for me. Why starve if you don’t have to? Will it make you a better person or nicer to be around? Instead why not give and share and forgive? And anyway it makes no sense reserving good deeds for Lent alone; one should be giving and be merciful all the time. ~~~~Let us turn to fish.

BAKED SALMON
1.25 kg whole wild spring salmon, gutted and head cut off
salt and pepper to taste
1 lemon, thinly sliced
few sprigs of dill
1/4 cup dry white wine
aluminum foil
cooking spray 
For Garnish:
1 lemon, sliced
sprigs of fresh herbs: dill, parsley and chives
 
• Preheat oven to 425F.
• Line a baking sheet with a sheet of aluminum foil, big enough to wrap around the fish.
• Spray the foil with cooking spray.
• Remove any loose scales from the fish by running the blade of a sharp knife from the tail end to the top.
• With kitchen shears cut off the fins.
• Trim the sides, it’s mostly just fat and bone.
• Wash the salmon under cold running water and pat dry with paper towel.
• Sprinkle the inside and out with salt and pepper.
• Place several lemon slices on the foil and lay the fish on the top.
• Fill the fish cavity with the sliced lemon and with dill sprigs.
• Place several more slices of lemon on top.
• Pour the white wine over the salmon
• Loosely wrap the fish in the foil.
• Place on a shallow pan and bake, allowing 5-10 minutes in the heat to penetrate foil and cook 10 minutes longer for every inch of fish thickness. My fish took 45 minutes, but I also baked two medium sized yams beside it.
• Meanwhile make the wine cream sauce.
• If the skin pulls away fairly easily and the flesh is opaque remove and unwrap the cooked fish. • Discard the lemon slices and the dill sprigs.
• With a sharp medium sized knife gently remove the skin and the dark flesh from the top.
• Slide a thin cutting board under the fish.
• Position a serving platter on top of the fish [upside down] and invert.
• Take away the cutting board, now you have the fish on the platter.
• Grasp the skeletal bone and gently pull it out.
• Next clean up the top, gently scraping off the skin and the dark flesh.
• Pour the Dill Wine Sauce or the hollandaise sauce over the fish
• Garnish with fresh lemon slices and the choice of herbs and serve.

DILL WINE SAUCE


This creamy sauce is equally delicious served over fish, pastas or some steamed vegetables such as green peas or green beans. Fresh herb is a crucial component. If no fresh dill was available, I would just replace the dill with another fresh herb or simply make a plain wine sauce.
 
DILL WINE SAUCE
2 Tbsp butter
2 Tbsp flour
1/2 cup milk
1/2 cup dry white wine
1/2 cup whipping cream
salt to taste
1 pinch of white pepper
1/4 cup chopped fresh dill
 
• In non stick fry pan, melt the butter over very low heat; stir in the flour and cook, stirring, for 1 minute.
• In a large measuring cup combine the milk, wine, cream, salt and pepper and gradually add to the roux in the fry pan; whisking all the while.
• Increase the heat to medium and cook until sauce is thickened.
• Remove from heat, stir in the dill and serve.

19.3.13

THE EASTER MENU

While growing up, Easter centered on the Easter ham and the Feltámadási Körmenet [Resurrection Procession]. Hungary was a secular country back in the fifties and sixties, but the annual Resurrection Procession used to have a huge turnout in Budapest. It was the one occasion people could gather en masse that didn't include some type of government enforced communist celebration but mostly because religion was suppressed by the state. So once a year Catholic Easter became a peaceful anti government demonstration. It wasn't an Easter Parade with funny hats, although some would disagree, because it included the bishop under a golden tent in full golden regalia carrying the golden monstrance with the Eucharist all around the Rózsák Terei Szent Erzsébet Templom with flags and the entire clergy in tow. As they passed, the people would make the sign of the cross. I suspect not many people stayed behind for the long mass that followed. Most of us were satisfied that thousands showed up to register their anti government feelings and then rushed home to eat the ham we smelt cooking since morning.

This thanks in no small part to my grandma, who never went to church and yet clung to the old customs, which included fasting on bread and water since the morning of Good Friday. I guess she had her own brand of religion and the rest of us just followed. My most emotional Easter moment was surrendering myself to the voracious feed of cold cooked ham, hard boiled eggs, kalács [yeasted bread loaf] and green onions. With that Easter was complete for me. Of course that was on the Saturday and what we ate on Easter Sunday I cannot recall; probably there was leftover ham and eggs, we kids always made ourselves sick on the chocolate the Easter bunny brought for us anyway. Easter Monday in Budapest held its own unique ups and downs for me, but that is an entirely different story.  

In Canada the hodgepodge of old customs and new preferences combined into a fairly nice celebratory meal. We have our Easter meal on Sunday: a mixture of hot and cold food items. If there is a large crowd and it makes sense to prepare two entrees, I cook a ham. Otherwise I don’t. I love ham, but not everyone in my family likes it. If you can’t cook the eggs in the ham stock, it makes no sense to serve plain hard boiled eggs for dinner. It may have made sense back in the days after a long winter with no fresh greens to serve green onions for Easter, but we have fresh green vegetables all year around and therefore green onions hold no significance for us. I do not recall a special dessert with our Easter ham, but here in Canada no celebration meal is complete without dessert. The challah, the cake, the stuffed eggs, and the French salad can all be prepared a day ahead. Stuff and roast the tenderloin in the afternoon and roast the asparagus just before the meal and in the meantime set the table and make the green pear salad. Happy Easter everyone!

MY EASTER MENU:

15.3.13

BABKA

This is for Peter somewhere in Hungary

When I saw Marcy Goldman's complex babka recipe in “A Treasury of Jewish Holiday Baking”, I decided to look for the recipe on line, thinking someone may have cracked it by now. Well sure enough there were numerous postings of it, Gourmet magazine, Cooks.com and most of the Jewish bakers including Rose Levy Beranbaum paid homage to Goldman’s babka. Indeed it is not only a superb babka, Goldman’s babka is a work of art.

At first I wondered why there were so many versions of it; always the same babka, but with different fillings. To be honest; I was less than impressed with Goldman’s fillings. I found all were too sweet for my palate and the chocolate ganache lacked the intensity if you can believe it. I think the addition of cinnamon weakened the expected chocolate-ness of the babka. So I left out the cinnamon from the filling and added it to the crumb coating instead. It worked. There is still a cinnamon flavour and aroma but there is also an intense chocolate experience and with the two distinct flavours separated they seem to work in harmony. I figured that half of Goldman’s recipe would make a substantial sized babka, so I cut the ingredients in half. At the end of the post I am including Goldman’s original list of ingredients.

In yeast baking, letting the first rise go too long is counterproductive. So I barely let the dough double the first time around. This in turn can produce a much loftier and yet structurally sound second rising.

I buttered the bottom and the sides of a round spring form baking pan, which should have made it easy to remove the babka. But I had to cut around it with a blunt knife and muster all my skill to extract the babka from the pan. There is the possibility of chocolate oozing out or the crumb topping fusing to the side of the pan. So my advice is to fully line the pan with parchment paper and butter it as well.

BABKA
Dough:
3/4 cup water
1 Tbsp rapid rise instant yeast
pinch of sugar
1 egg
1 egg yolk
1/2 tsp pure vanilla extract
1 drop pure almond extract
1/2 tsp fresh lemon juice
3/8 cup sugar
1/2 tsp salt
3 Tbsp milk powder
1/2 cup unsalted butter - softened in small pieces
1-1/2 cups bread flour
1-1/2 cups all purpose flour butter for greasing
Filling:
1/2 cup sifted cocoa
1 Tbsp instant coffee granules
3/4 cup sugar
1 pkg. vanilla sugar
1/8 cup melted butter
Egg Wash:
l egg yolk
Crumb Topping:
3 Tbsp unsalted butter
1/4 cup icing sugar
1/4 cup flour
1 tsp cinnamon

• In a large mixing bowl, whisk together water, yeast, and a pinch of sugar.
• Let stand about five minutes to allow yeast to swell and dissolve.
• Stir in the egg, egg yolk, vanilla, almond extract, lemon juice, sugar, salt and the milk powder. • Fold in the softened butter and flour.
• Mix the dough and then knead it as it becomes a mass [with a dough hook or by hand] for about 8 minutes. Dough will be very smooth and elastic.
• Place the dough in a well buttered bowl and place entire bowl and cover with a clean tea towel. • Allow to rise until for 45 minutes or until almost doubled in volume.
• Meanwhile line a large a 9 inch baking pan with parchment paper and generously butter the parchment.
• In a small bowl, combine the sifted cocoa, instant coffee granules, sugar and the vanilla sugar.
• Place the crumb topping ingredients in a small bowl and rub between the hands until well combined.
• On a lightly floured board, roll the dough into a rectangle.
• Spread the top with melted butter.
• Spread the cocoa mix all over the dough surface. Roll up in jelly roll style.
• Pinch the ends and place the rolled up dough in the prepared pan.
• Brush the top with egg yolk.
• Scatter the crumb coating over the top and set it to rise for 1.5 hours or until doubled in size.
• Preheat oven to 350 F.
• Bake the babka for 35-40 minutes or until medium brown in colour.
• Remove from the oven and place on the wire rack for 15 minutes.
• Remove babka from the baking pan and serve it on a platter.
• Yields 1 babka
 
Goldman’s original dough yields two babkas:
1 1/2 cups water
2 tablespoons yeast
pinch sugar
2 eggs
2 egg yolks
1 teaspoon vanilla
2 drops almond extract
1 teaspoon lemon juice
3/4 cup sugar
1 teaspoon salt
1/3 cup milk powder
1 cup unsalted butter - softened in small pieces
3 cups white bread flour
3 cups all purpose flour

14.3.13

STRAWBERRY YOGHURT CAKE

There was a brief time before Valentines Day that the strawberries were actually palatable, otherwise the last good quality strawberries we had were several months back in 2012. Still, I could not let go of my strawberry craving, so I broke down and bought another pound last Sunday. Thinking that it was still not the time for strawberry shortcakes, I made a strawberry yoghurt cake from my to-do file. I had a plan. If the strawberries were not flavorful enough; I was going to add a few pinches of strawberry jello mix to define the flavor. But as it turned out this wasn’t necessary. The strawberries had an intense flavor; I felt almost guilty crushing them up.
 
Indeed this is a lovely gelatinous cake, the strawberry layer set within 3 hours, but nevertheless an extra night gave it a chance to become an actual cake, not simply a gelatin dessert on a cake. 

STRAWBERRY YOGHURT CAKE
Cake Layer:
3 egg whites
smidgen of salt
4 Tbsp sugar 
4 Tbsp flour
1/4 tsp baking powder
Strawberry Layer:
1-1/4 cups whipping cream
1/4 cup sugar
1 vanilla sugar
2 cups plain 2% yogurt
1/2 cup sugar
1/2 tsp lemon zest [optional]
1 lb fresh strawberries
2 envelopes of plain gelatine
4 Tbsp water more strawberries for decoration [optional]
 
• Make the cake first.
• Preheat oven to 365 F
• Line a 9 inch spring form cake pan with parchment paper.
• Add smidgen of salt to the egg whites and beat them until fluffy.
• Add the sugar and beat few minutes more.
• Combine flour and baking powder and fold it into the egg white mixture by hand.
• Pour the cake batter into the prepared pan.
• Bake for about 10-15 minutes or until tooth pick inserted in the cake comes out clean. • Cool completely.
• Remove the parchment paper from the bottom of the cake and return the cake to the form. I washed the cake pan first.
• While the cake cools make the strawberry layer.
• Put 4 tbsp cold water in a small cooking pot, empty contents of 2 packages of gelatin envelops into it, mix it so there is no crumbs. Set aside for about 5 minutes.
• Whip the cream until dense, add sugar and whip for one more minute. Place it in the fridge.
• Next wash the strawberries, remove stems, put into blender and blend until liquid.
• Pour the pureed strawberries into a bowl.
• Add the yogurt, lemon zest and sugar to the strawberries and mix by hand until smooth. Set it aside.
• Place the cooking pot with the gelatin on the stove and lightly heat it, only until dissolved, do not let it boil!
• Remove from heat.
• Add to it about 1/2 cup of the strawberry yogurt mixture to the melted gelatin and mix well.
• Now pour the gelatin mixture into the remaining yogurt mixture.
• Gently fold the chilled whipped cream into the strawberry mixture until it looks like a strawberry smoothie.
• Pour the strawberry mixture on top of the cake. Filling will be liquid and that is ok.
• Refrigerate for 3 hours or best overnight.
• Remove spring form ring, decorate the cake with whipped cream and strawberries.

13.3.13

SKILLET SWEET AND SOUR PORK CHOPS

We love sweet and sour pork, but the meat is deep fried and the sauce contains a lot of sugar. Wanting a lighter alternative I looked on line and found a great recipe. I made it three times, the first time I added soya sauce, which was a mistake, because my sauce turned brown. Next to the flavours the beauty of this dish is its fresh colors. The second time I had no yellow bells. It tasted good with green peppers too, but I preferred it with yellow bells. The following time I made it I had plenty of yellow bells, but only one pork chop. [I ate scrambled eggs] This time I had four chops, but someone swiped one before I had time to make the sauce. Which is quite a feat considering the whole thing took only fifteen minutes to prepare. “Swiper no swiping!” High time I wrote down the recipe. Talking about Swiper doing his deeds, meanwhile “Almost Burden” that had the original recipe seems to have disappeared from the blogsphere. Where is Dora when you need her?
 
SKILLET SWEET AND SOUR PORK CHOPS 
4 boneless pork chops
1/2 red onion, sliced
1/2 yellow bell pepper, cut into long strips
1/2 cup frozen green peas
2+1 tbsp extra virgin olive oil
1/2 cup water
2 Tbsp rice wine vinegar
1-1/2 Tbsp sugar
1-1/2 Tbsp Heinz Ketchup
salt to taste
1/2 tsp Worcestershire sauce
1-1/2 tsp corn starch
1 Tbsp water
 
• Cut off the fat and wash the pork chops under cold running water.
• Wipe them dry with paper towels.
• Make sure the chops are the same thickness. Use a meat tenderizer to pound them to even thickness.
• Heat 2 Tbsp of olive oil in a non stick frying pan.
• Add the pork chops and pan fry until brown on both sides and cooked through [approximately 3 minutes on each side depending on the thickness of your chops].
• Remove the chops and set them aside
• Add 1 Tbsp of oil to the same frying pan.
• Add the onions, bell pepper strips and the green peas [in that order] and stir fry for a minute.
• With a slotted spoon remove the vegetables and set them aside.
• Add water, rice wine vinegar, sugar, ketchup, salt, Worcestershire sauce to the frying pan.
• In a small bowl, combine the cornstarch and 1 Tbsp of water.
• Add the corn starch water to the frying pan and bring to a boil.
• Simmer the sauce, stirring often until the sauce is bright red.
• Add the chops and then the reserved vegetables to the sauce and heat through.
• Serve immediately.

12.3.13

CHOCOLATE SWISS ROLL – CSOKOLÁDÉS TEKERCS

Decorated over the top, Liv had a lot of fun with this one. We melted far more chocolate than  necessary, but none went to waste.  This little cake did not last long.

CHOCOLATE SWISS ROLL 
6 eggs separated
3/4 cup sugar
2/3 cup cake flour
1/3 cup cocoa, sifted
2 Tbsp icing sugar
2 batches of stabilized whipped cream – the full recipe is here
56 g [2 oz or 2 squares] good quality baking chocolate or melting chocolate
parchment paper
1 small heavy Ziploc bag

• Melt the chocolate first. The method is here
• Next make the chocolate garnishes.
• Draw some designs on a sheet of white paper or cut and paste the enclosed design onto a word document and print only one sheet.
• Lay it on a tray and cover the entire tray with parchment paper.
• Place a heavy plastic bag inside a cup and with a cake spatula scoop a small amount of melted chocolate into your “piping bag”. Squeeze so the chocolate works its way to the tip.
• Pipe over the design you made.
• Gently move the design under the parchment paper until the parchment paper is all used up.
• Let the chocolate solidify and move the tray into the fridge to chill.
• Meanwhile make the chocolate roll.
• Beat the egg yolks and sugar until thick and lemon coloured.
• Stir the flour and the cocoa into the yolk mix.
• Wash the beaters and beat the egg whites until stiff peaks form.
• Gently incorporate the egg whites with the yolk mixture.
• Line a large, rimmed cookie sheet with parchment paper.
• Spray the parchment with cooking spray. Do not omit this step.
• Pour the batter onto the cookie sheet.
• Gently smooth out the top.
• Bake at 350F until the middle springs back.
• Scatter icing sugar on a clean tea towel, the same size as the cake.
• Carefully invert cake over sugar and peel away the base paper.
• Using towel to guide, roll up from the short side and leave to cool.
• When the cake is cooled down to room temperature, make the stabilized whipping cream.
• Carefully unroll cake.
• Spread the top with a thick layer of stabilized whipped cream.
• Re-roll the cake and place, seam-side down, on a long platter.
• Using a piping bag, pipe the remaining whipped cream on top of the cake.
• Decorate with the chocolate garnishes.


11.3.13

CREAMY MACARONI AND CHEESE

I don’t care what Martha or America’s Test Kitchen says. The best mac and cheese is cooked on the stovetop, not from a package mind you, but nevertheless it must not go into the oven. Just watch the video, the chef prepares an adult version of mac and cheese with the same principle.
 
Be sure to make the béchamel first. It can be made ahead of time and then warmed up just before it is added to the hot pasta. When making béchamel, clarify the butter first. This will cut the butter you need in half! Clarifying is just slowly cooking away the milk solids and ending up with butter fat. The butter fat will combine with double of its volume of flour. Otherwise the ordinary proportion of fat and flour in roux is 1:1. Clarifying butter only takes a few minutes, but the benefit far outweighs the time you will spend on it. Never add the cheese to the béchamel sauce. If cheese is brought to the boil it becomes a stringy mass. When making cheese sauce, the cheese is always added to the hot béchamel before serving; the same applies here.
 
Cook the pasta al dante and always cook it just before serving. If your pasta is tender or for some reason has to be reheated, it is best to save it for some other use. Soft pasta makes for very overcooked macaroni and cheese. If you want your pasta with lots of sauce, increase the béchamel and the cheese. I like it coated with sauce,  not swimming in it.
   

CREAMY MACARONI AND CHEESE
1/8 cup butter
1/4 cup flour
1-1/2 cups milk
1 pinch of nutmeg, freshly grated
2 cups elbow macaroni
2 cups sharp cheddar cheese, grated
freshly grated parmesan for garnish [optional]
 
• Melt the butter in a large pot over low medium heat.
• Slowly simmer until the milk solids are cooked away.
• Add the flour and continually stirring make a roux.
• Gradually whisk in the milk and bring the mixture to a simmer.
• Grate the nutmeg into the mixture.
• If you end up with chunks of flour, strain the sauce into a bowl and pour it back into the pot. • Bring a pot of salted water to a boil.
• Add the macaroni and boil until not quite tender.
• Meanwhile grate the cheddar cheese and set it aside.
• Drain and rinse with a little bit of hot running water. Do not soak or submerge the pasta in water. You want some starch to remain on the pasta.
• Add the hot pasta to the hot béchamel.
• Add the grated cheese and stir to combine.
• Heat it through and serve the mac and cheese immediately.
• Sprinkle the top with freshly grated parmesan cheese or not.
• 4 servings

6.3.13

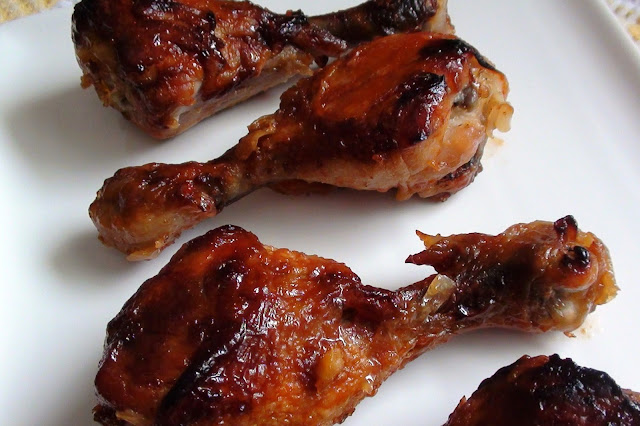
GLAZED DRUMSTICKS


I developed the skill of roasting succulent, crispy chicken breasts so well that we had it at least once a week. Then about a year ago the breast packs [with the skin on] started to disappear from my favourite market and I had to turn to drumstick packs. This called for improving the flavour and the texture of the drumsticks. I always enjoyed buffalo sauce roasted drumsticks, but they make a dreadful mess in the roasting pan. So I thought why not use less sauce? I now roast the drumsticks on a bed of sliced onions and when they are tender I brush them with a buffalo sauce inspired glaze and then just finish crisping them up. This way there is less sauce, but the chicken caramelizes and tastes just the same and the best part is it leaves a minimal mess in the roasting pan.

GLAZED DRUMSTICKS
6 chicken drumsticks
1 onion, sliced
salt and pepper to taste
Glaze:
1/8 cup ketchup
1/4 tsp Tabasco sauce
1 tsp onion flakes
1/2 Tbsp liquid honey
 
• Set the oven to 350F.
• Line a baking pan with parchment paper.
• Wash the drumstick and dry them with paper towels.
• Peel the onion and slice it.
• Scatter the onion slices on top in the parchment lined baking pan.
• Place the drumsticks on the top of the onions.
• Sprinkle with salt and pepper.
• Place a sheet of foil over the baking pan, sealing it well.
• Place the pan in the oven and roast for a couple of hours or until the top of the drumsticks are beginning to get a nice golden colour. The bottoms will still be just cooked.
• Turn the drumsticks over and reseal the pan with the foil.
• In about half an hour, remove the foil and discard.
• Brush the drumsticks with the glaze and put back into the oven to bake until the glaze has baked onto the skin.
• Turn the drumsticks over and glaze the tops.
• Bake until the tops are crispy and serve.

4.3.13

POTATO LEEK SOUP


Creamy delicious potato leek soup… It was unavoidable. I had leek, 2 cups of leftover potatoes and some good quality homemade stock. It was all calling me to make soup. True, it would have taken longer if I had to cook the potatoes. But as it happened soup was ready in record time.
 
The simplest way to puree hot soup is with an immersion blender. However, a free stand blender works even better. I have a powerful Osterizer Blender and it gives me a creamier, smoother texture than any immersion blender I ever used. The only thing you have to keep in mind is that pressure can blow the lid right off as hot food explodes out the top of the blender jar. The safe method of pureeing hot foods in a stand alone blender is fully explained following the recipe.

POTATO LEEK SOUP
2 Tbsp olive oil
2 cups thinly sliced leek
2 cups cooked potatoes
2 cups meat stock
2 tbsp flour
1/2 cup whole milk

• Heat the oil in a wide bottomed pot or a deep skillet
• Add the chopped leeks and sauté on medium heat for 2 minutes.
• Remove a couple of tablespoons of leeks to a small bowl and set aside for garnish.
• Add the cooked potatoes to the leeks and mash the potatoes down a little.
• Add the stock and bring it to a slow simmer.
• Place the flour in a small bowl and gradually whisk in the milk.
• Add the milk and bring it back to a simmer.
• Cook for 2 minutes on medium low heat, stirring until the soup thickens and the flour cooks.
• Puree with an immersion blender or follow my instruction and puree in a stand blender.
• Yields 2-3 servings.

2.3.13

MAPLE CAKE


When I spread on the icing… there are always birds fluttering inside of me. And Baked Explorations just keeps on giving. This cake was also adapted from my latest cake heroes; Matt Lewis and Renato Poliafito’s maple cupcakes recipe. It has 2 cups of real maple syrup in the batter, yup 2 cups, but looking at the recipe I instantly knew I wanted to make a cake and not cupcakes. Plus I opted to go without walnuts. I like the maple walnut combination, but crunchy walnuts don’t exactly fit the golden velvet image maple syrup conjures up for me. 

MAPLE CAKE
3 cups all purpose flour
1 Tbsp baking powder
1 tsp salt
1/2 cup + 2 Tbsp unsalted butter, room temperature
2 cups pure maple syrup (preferably Grade B)
3 large egg yolks
1 large egg
1-1/4 cups whole milk
 
• Preheat oven to 325°F.
• Line the bottom of two 9-inch cake pans with parchment paper.
• Spray the paper and the sides of the pan with cooking spray.
• Sift 3 cups flour, baking powder, and salt into medium bowl.
• Beat the butter and shortening until light and fluffy.
• Add maple syrup and beat until smooth, about 3 minutes.
• Add egg yolks and egg 1 at a time, beating until well blended after each addition.
• Beat in flour mixture in 3 additions alternately with milk. Once the flour is incorporated, do NOT beat any longer.
• Divide the batter equally between the prepared pans and smooth the tops.
• Bake cakes for 45 minutes or until the tester inserted into center comes out clean.
• Cool cakes in the pans on racks for 30 minutes.
• Run a small knife around sides of the cakes to loosen.
• Remove cakes from cake pans and place on a wire rack.
• Remove the parchment paper and cool the cakes completely.
• Meanwhile prepare the maple cream cheese frosting.
• Place one of the cake layers on the platter.
• Spoon 1 cup frosting over the top and spread evenly to the edge.
• Invert the second cake layer and place on the top.
• Crumb coat the entire cake; cover it all over with a thin coat of frosting.
• Place in the fridge for 1-2 hours to chill. [It took quite a while]
• Remove cake from the fridge and spread remaining frosting evenly over the top and the sides of the cake.
• Chill the cake thoroughly, overnight or at least for a couple of hours before slicing.
• Let it sit at room temperature for 30-40 minutes and then serve.

MAPLE CREAM CHEESE FROSTING


This recipe comes from Baked Explorations, but the method is mine. There are two things to keep in mind when making cream cheese frostings. First of all, the icing sugar should be well beaten in order to fully incorporate into the fat. Under beaten icing sugar will have a raw taste and sometimes grainy texture. This is why it is imperative to start with soft butter. The butter must be soft, but not melted, in order to beat the most air into it. The fluffier the butter, the more icing sugar will get incorporated and the two can be beaten up really well. Cream cheese poses an entirely different challenge. Cream cheese should be cold and should not be beaten, only blended. Beating cream cheese destroys its structure, in fact the more you beat cream cheese, the runnier it will get. Yes you can use light cream cheese, but this will not hold up as well in a cake. It might be fine to pipe it on the top of something, but to fill and to decorate an entire cake you really need full fat cream cheese. Making a cream cheese frosting reminds me of a dance, one two three, one two three… turn left and continue.
 
MAPLE CREAM CHEESE FROSTING
3 cups icing sugar
1/2 cup unsalted butter, soft
2 Tbsp pure maple syrup
1 large full fat 240g [8oz] package cream cheese, chilled
 
• Sift powdered sugar into medium bowl.
• Beat the soft butter until very, very fluffy. If the butter is not soft it will not get fluffy. Set it aside and come back to it when the butter is soft.
• Add the maple syrup and beat on high speed until fully incorporated.
• Lower the speed and start adding the sifted icing sugar 1/3 cup at a time.
• When the frosting begins to get thick, start adding about a tablespoon of cream cheese along with the icing sugar.
• With a rubber spatula occasionally scrape the sides of the bowl.
• You will run out of icing sugar first. At this point beat the frosting at high speed for about a minute or two.
• Lower the speed and gradually add the remaining cream cheese and beat to combine. 
• When all the cream cheese is incorporated, beat on high speed for a few seconds only.
• If all else fails, cover and refrigerate until the frosting has sufficient body to spread and to hold up without spreading.

Privacy & Cookies

This site uses cookies. By continuing to use this website, you agree to their use. To find out more, including how to control cookies, see here: Cookie Policy

Translate

me

My photo
It began with posting a few recipes on line for the family. "zsuzsa is in the kitchen" has more than 1000 Hungarian and International recipes. What started out as a private project turned into a well visited blog. The number of visitors long passed the two million mark. I organized the recipes into an on-line cookbook. On top of the page click on "ZSUZSA'S COOKBOOK". From there click on any of the chapters to access the recipes. For the archive just scroll to the bottom of the page. I am not profiting from my blog, so visitors are not harassed with advertising or flashy gadgets. The recipes are not broken up with photos at every step. Where needed the photos are placed following the recipe. Feel free to cut and paste my recipes for your own use. Publication is permitted as long as it is in your own words and with your own photographs. However, I would ask you for an acknowledgement and link-back to my blog. Happy cooking!