30.4.22

PARSNIP SOUP WITH CHIVES

This is a nice creamy soup for those who have to avoid dairy products. Yes it can be adapted for the vegan diet, notice I said diet… because it is so contrary to the workings of human physiology and so short of brain nutrients I cannot in good conscience endorse it. I used a pressure cooker, but the same soup can be cooked in a pot “slowly”. Conventional soup making takes time; with slow simmer and one must never let the soup, even a cream soup, to come to full rolling boil. A blender or a food processor is necessary. Stick blender does not work as well, you may have to force everything through a large sieve, a process I would not recommend. Adapted from foodgawker.
 
PARSNIP SOUP WITH CHIVES 
3 parsnips, trimmed and peeled 
2 garlic cloves 
1/2 cup cashews 
3 cups of rich homemade chicken stock 
1/8 cup extra virgin olive oil 
salt and pepper to taste 
fresh lemon juice to taste 
Garnish: 
fresh chives, chopped finely 
few cashews, chopped 

• Place the first six ingredients in the pressure cooker, lock and seal and bring up to high pressure. Reduce heat to medium low, maintaining medium pressure, and cook for 25 minutes. 
• Release the pressure according to user’s manual before removing the lid. 
• Or slow simmer ingredients in a regular pot with the lid on for about an hour. 
• At this point you may want to wait for the soup to cool somewhat. 
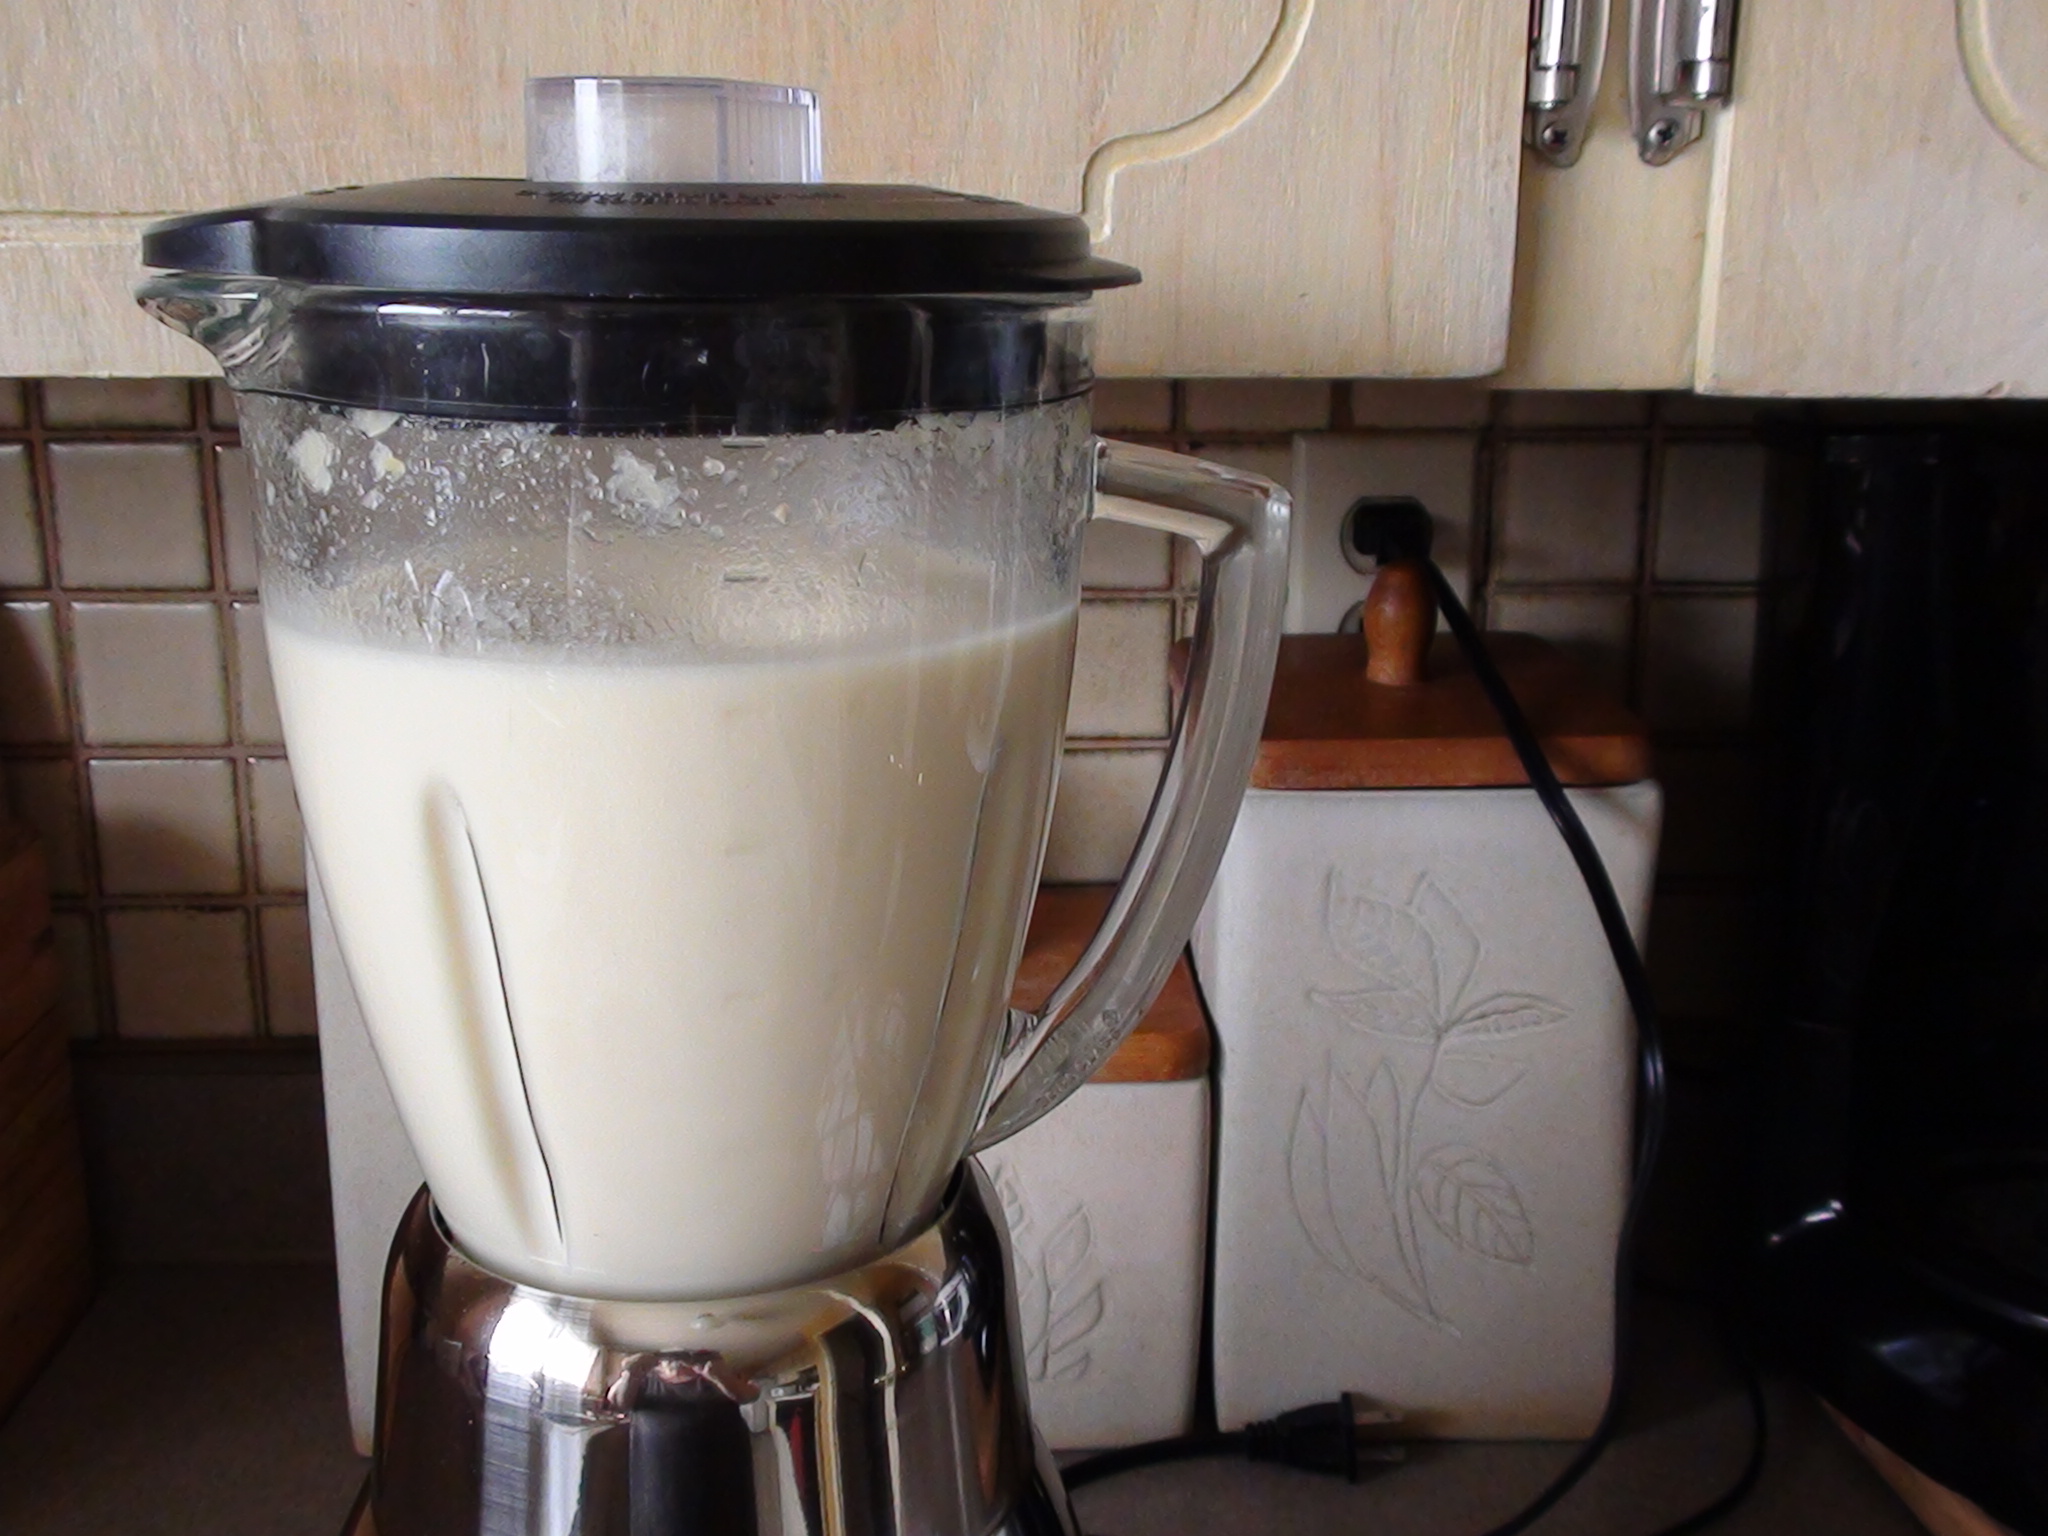
• Transfer to a blender to puree. Take care when pureeing hot ingredients. Do not fill the blender jar full or it will push up the cover and you have a huge mass to deal with. I pureed in two batches. 
• Pour pureed soup into a small pot adjust the salt and squeeze fresh lemon into the soup and adjust it to taste. You can always add more lemon juice but you cannot take it away. But please rinse the spoon between tastings… 
• Serve the soup and garnish with chopped chives and the crushed nuts.


27.4.22

PORK PATÉ IN PASTRY - PÁSTÉTOM TÉSZTÁBAN


The extra lean ground pork I get of late is a tad coarsely cut, and once I put it through the food processor, it looked very much like a paté… so I had to work with that. Initially I planned to make a pork tart of sorts. I must confess, the chunks of stuff the Brits put into their pork pie never appealed to me nor do I like the flavoring in French Canadian tortierre. Instead I drew from my Hungarian taste experience and it turned out to be a strangely satisfying dinner, actually several dinners with fresh greens… Starting with the simplest of ingredients this is as basic as a Hungarian pork paté can get. No brandy, no liver, no strange seasoning, just a happy accident, this did not come from the French influence at all.

PORK PATÉ IN PASTRY
Pork Filling:
1 crusty bun or the end slice of a French bread
olive oil to cover pan
250 g extra lean ground pork
1/2 onion, diced
1 tomato, peeled and chopped
1/2 yellow pepper, diced
2 tsp Hungarian Paprika
salt, ground pepper to taste
1 egg
2 cloves of garlic, mince
2 Tbsp flour
1/8 cup cold butter, cubed
Pastry:
1/2 cup lard, soft
1/8 cup butter, soft
1 1/2 cups flour
salt to taste
1 egg
1 extra egg for the egg wash

  • Make the filling first.
  • Run water over the crusty bun or the end slice of a French bread.
  • Squeeze out the water and crumple the soft bread into a mixing bowl and then set it aside.
  • Place a large non stick skillet on medium heat.
  • Cover the bottom with oil.
  • Add the ground pork and slowly cook, while breaking up the meat with a wooden spoon. When the meat is all white, add the onion and cook for a couple of minutes.
  • Add the tomato and the pepper.
  • Add the Hungarian Paprika, salt and ground pepper to taste.
  • Transfer to the food processor and pulse it a few times to make a paste.
  • Scoop the meat paste into the mixing bowl with the soaked bun bits.
  • Stir in the egg, minced garlic and the flour.
  • With clean hands combine the meat mixture to make a homogenous paste. Set it aside.
  • Next preheat the oven to 375F.
  • To make the pastry, beat the lard and the butter until very fluffy.
  • With a wooden spoon gently stir in the flour and the salt. Do not beat.
  • In a measuring cup, beat the egg.
  • Add the beaten egg and with a wooden spoon stir it into the flour mix.
  • Kneed until smooth dough forms.
  • Divide the dough into a slightly smaller and a larger part. 
  • On a floured board roll out the smaller dough and line a small bread pan. Let the dough slightly overhang the sides.
  • Pour the meat filling into the pastry lined bread pan.
  • Dot the top with the butter cubes.
  • Now roll out the larger dough on a floured board.
  • Place the dough over the bread pan sealing the pate and flute the edges.
  • Cut slits onto the top for the steam to escape.
  • Whip the extra egg with a fork.
  • Lightly! glaze the top and the fluted edge with the egg wash.
  • Place in a preheated oven and bake until paté is golden brown.
  • Remove from the oven and let the paté rest for 5-10 minutes before slicing.
  • Paté is nice hot or cold.

25.4.22

ALMOND FLOUR SHEET CAKE

Here is a lovely confection… though not for those who won’t follow instruction. There are a number of supplies required, 2 large rimmed sheet pans, parchment paper and unflavoured cooking spray. A large offset spatula is very useful to thinly spread the cake batter. The frosting is scant, but you don’t need more. The frosting should be ethereally thin between the thin, fragile cake layers. Don’t add extracts to the cake batter, and use only vanilla extract in the frosting. There is beauty in balance.

ALMOND FLOUR SHEET CAKE
Be sure to read the preceding paragraph.
Cake:
1 1/2 cups almond flour
1/2 cup cake flour
1/2 cup granulated sugar
3 eggs
6 egg whites
1 pinch cream of tartar
icing sugar for dusting
Vanilla Frosting:
1/2 cup unsalted butter, softened
1 1/2 cups icing sugar
1 tsp pure vanilla extract no more
1/4 cup whipping cream

  • Preheat the oven to 350F
  • Prepare two large, rimmed sheet pans:
  • Pray the sides with cooking spray and line the bottom of each sheet pan with parchment paper. Set aside.
  • In a large bowl whisk the almond flour and the cake flour. Set aside.
  • Next add a pinch of cream of tartar to 6 egg whites and beat until soft peaks form.
  • Gradually add 1/4 cup of sugar and continue beating until hard peaks form.
  • Set aside.
  • Add 3 whole eggs to the flour mixture and beat for 4 minutes.
  • Gradually and gently fold the beaten egg whites into the flour mixture with a wooden spoon.
  • Spray the parchment lined sheet pans with cooking spray.
  • Divide the cake batter between the prepared sheet pans.
  • Spread the batter evenly preferably with a large offset spatula. 
  • Bake the cakes one by one in the preheated oven.
  • When the top springs back remove the pan from the oven and put the second pan to bake.
  • Next lightly dust the top of the cake with icing sugar.
  • Place a clean kitchen towel over the pan.
  • Grasping the kitchen towel on both sides tautly over the pan, quickly turn it over.
  • The sheet cake is now resting on the kitchen towel. 
  • Gently lift off the sheet pan.
  • Immediately, carefully peel the parchment paper off the hot cake. It is crucial not to let the cake cool down with the parchment paper fused to the cake. Otherwise the cake will come off in clumps.
  • Before handling, let the cake cool down completely.
  • Very gently pull the cake with the kitchen towel onto a flat surface, perhaps an un-rimmed baking sheet or a stable sheet of cardboard.
  • As this cake is very fragile, it will help to chill the sheet cake before assembly.
  • Meanwhile prepare the vanilla frosting.
  • Beat the softened butter until soft and creamy.
  • Continue beating and gradually add the icing sugar.
  • Scrape down the sides and gradually add the whipping cream and the vanilla extract. Do not increase the suggested amount or change the extract.
  • Beat for 4 minutes longer or until very frothy.
  • Place the chilled sheet cakes on the counter and cut each cake into 4 equal pieces. Now you have 8 equal cake layers.
  • Spread each cake layer with the vanilla frosting.
  • The frosting will appear sparse, but you do not want ticker layers of frosting between the fragile cake layers. This cake does not need frosting on the side or any sort of decorating.
  • Chill before slicing.
  • Serve only at room temperature.


22.4.22

EGG BARLEY POTATOES - KRUMPLIS TARHONYA

Egg barley or ‘tarhonya’ in Hungarian, is an egg based pasta; a remnant of nomadic Hungarian ancestors' lifestyle. Dried pasta is ideal to carry in a pouch; it can be revived with water and cooked with a wide variety of ingredients to make a meal. Egg barley is still popular today, cooked with humble potatoes or served alongside stews and ragouts. Most Hungarians buy the dry version of egg barley, but the fresh homemade version definitely tastes better.
 
EGG BARLEY POTATOES
fresh egg barley from 2 eggs or 1 cup dry egg barley
oil to cover pan
1/2 cup diced onion
4 medium red potatoes, chopped [no starchy potatoes please]
1 garlic, minced
2 tomatoes, skinned and chopped
1 large yellow pepper, diced
salt and pepper to taste
water

  • Making egg barley fresh is easy and cooking with it saves time. Cooking dry egg barley is less work, but requires longer cooking. So it’s up to the individual what they consider convenience.
  • Make egg barley from 2 eggs.
  • Chop the potatoes fairly small and set it aside.
  • Cover a large nonstick skillet with oil.
  • Place the skillet on medium heat.
  • Add the egg barley and fry it, stirring it gently with a wooden spoon, until they turn light brown.
  • Add the diced onions and continue to fry, stirring, until the onions are soft.
  • Add water to cover the egg barley and slow simmer, stirring occasionally until the egg barley is half way cooked and most of the water is evaporated.
  • Add the chopped potatoes, garlic and the Hungarian Paprika and stir.
  • Add chopped tomatoes and the diced pepper.
  • Add salt and pepper to taste.
  • Add water just covering everything.
  • Bring it to a slow simmer and cook until the potatoes are tender.
  • Continue to add water as needed.
  • Adjust the salt and pepper to taste.
  • When completed, egg barley should not be dry or swimming in stock.
  • The egg barley is ready when everything is soft and glistening and you can see the bottom of the skillet. 


19.4.22

PUREE HOT FOOD IN THE BLENDER SAFELY


Keep in mind pressure can blow the lid right off as hot food explodes out the top of the blender jar. First there is a good chance you will burn your face and your neck and then there is the clean up. The only thing worse from cleaning up after the blender blowing off its lid from a jarful of hot soup is cleaning up after a blender full of raspberries. Safety is not a laughing matter. 

PUREE HOT FOOD IN THE BLENDER SAFELY
1. Pour the hot food into a heatproof pitcher or a large measuring cup. 
2. Plug in the blender and set the blender speed for slow. 
3. Pour about a 1/4 cup of hot food into the blender jar. 
4. Place the lid on. 
5. Insert the lid cap. 
6. Place your hand on the lid and the lid-cap and apply pressure to hold it down. 
7. With the other hand hit the puree button. 
8. After the start-up you can safely remove your hand from the lid and the lid-cap. 
9. Let the food puree to the desired consistency. 
10. Place your hand back on the lid and lid-cap and apply pressure to hold it down. 
11. With your other hand hit the fast speed button. 
12. After the start-up you can safely remove your hand from the lid and lid-cap. 
13. Keep the blender going and remove the lid-cap, but leave on the lid. 
14. Gradually start adding from the remaining hot food through the hole where the lid-cap used to be. Do not pour all the remaining hot food into the blender jar all at once. 
15. Keep the blender going until you are satisfied the hot food is thoroughly pureed. 
16. During the process the hot food will cool down a little, so you may consider reheating before serving.

12.4.22

EGGNOG MUFFINS

Oooh this is delicious! – exclaimed he when he bit into a muffin. I don’t know why he is so surprised when I feed him so well. But as they say don’t look a gift horse in the mouth and surely a compliment is just that. The rest of the muffins went into his stash he keeps in the freezer. What does he have in there? Slices of pies, squares, sweet buns and cookies… Come morning he selects one, heats it up in the microwave and eats it for breakfast. Well there are eggs in them! Besides he weighs the same as he did 55 years ago. 

As with all substitutions, by replacing buttermilk in my base recipe with eggnog albeit doctored with apple cider vinegar produced great, though fewer muffins; one less to be precise.

EGGNOG MUFFINS
1/2 cup eggnog
1 Tbsp apple cider vinegar
1/2 cup soft butter
4 Tbsp oil
3/4 cup sugar
2 eggs
1 tsp baking powder
1/2 tsp baking soda
2 tsp rum extract
1/2 cup Greek yogurt 10%
2 1/2 cups flour
1/2 tsp ground nutmeg
1 cup currants [optional]

  • The very first thing to do is to combine the eggnog and the apple cider vinegar in a small measuring cup. Set it aside.
  • Preheat oven to 425F.
  • Line a muffin tin with large size parchment liners. 
  • Next add the soft butter, oil, sugar, eggs, baking powder, baking soda and rum extract to a beater bowl and beat it fluffy.
  • Add the yogurt to the eggnog mixture.
  • Whisk the flour and the nutmeg.
  • Alternating, gradually add flour and the yogurt mixture to the butter mixture and stir it with a wooden spoon to combine. [From here on end don’t beat the batter]
  • Gently fold in the currants if using.
  • Divide the batter in the prepared muffin tin.
  • Pile the batter high, these muffins will only grow upward; they won’t spill out of the muffin cups. [I got 11 muffins.]
  • Bake the muffins in the preheated oven for 8 minutes.
  • Reduce the heat to 400F and bake 12 minutes longer.
  • Test for doneness with a sharp knife and bake 2-3 minutes longer if needed.
  • Remove muffin tin from the oven and place it on a wire rack.
  • Yields 11 muffins
  • 10.4.22

    VAS CUTLETS - VASI PECSENYE

    “Vasi Pecsenye” roughly translated; cutlets as made in Vas county. My darling is from Vas County, Hungary so I asked him if he remembered the Vasi cutlets.  Well no, he said, but he recalled hearing about it. It’s heavily seasoned with garlic and Hungarian Paprika. The slow frying lends itself to using slightly fattier cuts of meat. The instruction was to lather the cutlets with garlic cream before serving, but I thought with four Russian garlic cloves in the brine the meat will be garlicky enough. The cutlet was really very tasty, but in retrospect spreading them with garlic paste wouldn’t hurt. 

     VAS CUTLETS
      4 thin slices of boneless pork chops 
     Overnight Brine: 
    milk to cover meat 
    1 tsp salt 
    4 garlic cloves, crushed 
    Breading: 
    1/2 cup flour 
    oil for frying
    Garlic Paste:
    4 garlic cloves

    • Pound the cutlets with a meat tenderizer.
    • Cut into the fatty edge on the side.
    • Place the cutlets in a container with a well fitting lid. A well fitting lid is important; you don’t want all the other foods smell like garlic.
    • Add 1 tsp of salt and 4 cloves of crushed garlic to the container.
    • Pour on milk to cover the cutlets.
    • Put the lid on the container and place it in the fridge for the night.
    • When you are ready to fry the cutlets, remove from the brine and let them drain a bit on paper towel. Discard the brine.
    • Meanwhile whisk together the flour and the Hungarian Paprika.
    • Puree 4 garlic cloves and set it aside.
    • Then one by one dip the cutlets into the flour mix, coating well both sides.
    • In a large fry pan heat about an inch of oil on medium.
    • One by one lower the meat into the hot oil and fry them crispy on both sides. The cutlets would have absorbed a lot of moisture from the milk brine and will take a bit of time to crisp up. Occasionally loosen the cutlets from the bottom of the fry pan.
    • Sprinkle salt over the cutlets and serve them with garlic paste on the side.


    MID EASTERN FLATBREAD

    It seems every culture has its particular flatbread. Hunter-gatherer societies around 22,000 years ago already had the means to turn grains into flour and started baking on the open fire. This one is a Mid Eastern version of bread. The recipe makes such a lovely softdough, I ended up kneading it by hand; there was just no point using a beater.

    MID EASTERN FLATBREAD 
    Dough: 
    3 cups flour 
    2/3 cup warm milk 
    2/3 cup warm water 
    3 tsp instant dry yeast 
    1 3/4 tsp sugar 
    1 1/2 tsp salt 
    3 Tbsp olive oil 
    cooking oil for the pan 
    Topping: 
     butter
     
  • In a large mixing bowl, whisk flour with yeast and salt.
  • Add warm milk and water and stir until the liquids absorb.
  • Add olive oil and knead again for up to10 minutes until very smooth.
  • Shape the dough into a ball and place it in an olive oil greased bowl and flip over.
  • Cover with a clean kitchen towel and let it rise until doubled.
  • Place it on a large cutting board and cut into 6 parts.
  • Roll each piece into a ball, cover and let it rest for 20 minutes.
  • Set a large nonstick skillet on the stove, coat it with olive oil let it heat up on medium heat.
  • Sprinkle the cutting board sparingly with flour and using a roller, roll out the first flatbread.  
  • Cook until the top bubbles up in about 2-3minutes.
  • In the meantime roll out the next flatbread.
  • Flip the frying flatbread over, and lightly push down the sides with your spatula.
  • This will help the flatbread to rise up and to make a pocket in the middle.
  • When both sides have a nice colour, move the flatbread onto a heated plate.
  • Spread a sliver of butter on the top. It will quickly melt onto the hot flatbread.
  • Continue frying the flatbreads until all the dough is used up. But you do not need to oil the pan before the remaining flatbreads. 


  • 9.4.22

    TEMESVAR PORK - TEMESVÁRI SERTÉSSZELET

    This is a delicious Székely dish. Similar to paprikás, but bacon and fresh yellow beans are as essential as real Hungarian paprika. The recipe is easy and quick as long as the ingredients are at hand. Yellow beans are seasonal and perhaps not available everywhere. Though I have seen it in stores, we grow them in our backyard and I freeze a few dozen bags every summer. Fresh beans are the easiest thing to freeze; they are one of the few vegetables that don’t require blanching.  

    TEMESVAR PORK
    4 thin slices of boneless pork chops
    scant 1/4 cup flour
    1/4 cup oil
    2 thick slices of bacon
    1/2 onion, finely chopped
    1 yellow or red pepper, diced
    1 medium tomato, diced
    1 garlic clove minced
    1 cup hot water
    1 1/2 cups chopped yellow beans [fresh or frozen]
    1/2 cup sour cream, 14%
    1/2 cup water
    salt to taste

  • Pound out the pork chops very thin.
  • Sprinkle with salt on both sides.
  • Roll each slice into flour covering completely. Set aside.
  • Keep remaining flour for use later.
  • Dice the bacon.
  • Add the oil to an extra large, deep non stick skillet.
  • Add the diced bacon and on medium heat start to slow fry.
  • When the bacon begins to get a bit of color, push them to one corner and add the prepared pork chops. Continue to slow fry.
  • Slow fry the pork chops until both sides are lightly browned.
  • Transfer the pork cops to a plate and cover them with a lid.
  • Keep the bacon bits in the skillet and add the finely chopped onions.
  • Slow fry them for 2-3 minutes and then add the diced pepper and tomato and the minced garlic and continue to slow simmer occasionally stirring with a wooden spoon.
  • When the tomato is cooked down add the pork chops and the chopped yellow beans.
  • Add 1 cup of hot water and continue to slow simmer and cover with a lid.
  • Once the yellow beans are tender, uncover and stir in the Hungarian paprika.  
  • In a small bowl, combine 2 Tbsp from the reserved flour with 1/2 cup of sour cream. Stir in 1/2 cup of hot water. 
  • Pour the sour cream mixture into the simmering dish and cook for 3-4 minutes longer and serve.


    7.4.22

    RED ONION COLESLAW

    I made a small bowl of salad for two. I served it right of way and it was pleasantly sour. If you like add thinly sliced radishes or mix in a dollop of mayonnaise. To make it for a crowd, increase ingredients. The ratio is for every 2 parts of sugar add 3 parts of apple cider vinegar.

    RED ONION COLESLAW
    green cabbage
    celery
    2 Tbsp sugar
    3 Tbsp apple cider vinegar
    salt to taste

  • Using a very sharp knife, thinly slice green cabbage, celery and red onion.
  • Transfer all to an appropriate sized bowl.
  • Add the sugar, salt and the apple cider vinegar.
  • Whisk to combine.
  • Taste and add more sugar, salt or vinegar as needed. 
  • CREPE PEROGY


    I had some leftover mashed potatoes. I thought of making perogy, but that would not have made a dent in 2 cups of mashed potatoes. Perogy is also labor intensive so I opted for a casserole and replaced the perogy dough with thick crepes. Mashed potato and cheddar cheese oozing between soft layers of crepes proved to be so comforting… I made this dish several times since January. Now that this has made it into my general repertoire it was time to measure it out for prosperity. You will need at least three to four layers of crepes. I used an oversized non stick skillet to make the crepes. Since the parts are precooked, all this crepe perogy needs is a heat through and the cheese to melt.

    CREPE PEROGY
    1 1/2 to 2 cups leftover mashed potatoes
    Thick Crepe
    3 eggs, beaten
    1 1/2 cups flour
    1 cup + 2 Tbsp milk
    salt to taste
    cooking spray
    1 1/2 cups shredded Cheddar cheese

    • Preheat oven to 375F.
    • Make the thick crepe batter first.
    • Beat the eggs and gradually add flour while continuing to beat.
    • Gradually add the milk while continuing to beat.
    • Add salt to taste and combine.
    • To fry 4 thick crepes, place a large non stick skillet on the stove.
    • If you follow the instruction, your crepes will not stick or fall apart.
    • Spray the inside of the pan with cooking spray.
    • Turn the heat to medium.
    • Immediately ladle in 1/4 of the crape batter.
    • Don’t tilt the pan as you generally do when making thin crepes.
    • Let the crepe cook undisturbed until the top is no longer shiny.
    • With a spatula flip the crepe over and cook for a minute longer.
    • Transfer crepe to a dinner plate.
    • To fry the next crepe you do not need cooking spray. Just add the batter as before and continue cooking the crapes until all the batter is used up.
    • Next spray an ovenproof skillet with cooking spray.
    • Place one crepe inside the prepared skillet.
    • Next spread half the mashed potatoes on top.
    • Put the next crepe over the mashed potatoes and press it down gently.
    • Scatter 1/2 cup of cheese on top.
    • Lay another crepe over the cheese.
    • Spread the remaining mashed potatoes on top.
    • Place the last crepe over the mashed potatoes and press it down gently.
    • Scatter the remaining cheese on the top.
    • Bake the crepe perogy in the preheated oven until everything is heated through and the cheese melts and bubbly.


    5.4.22

    CLASSIC LEMON TARTS


    You can make your own tart shells or use frozen tart shells, but your tarts will not be as good as mine. My pastry dough is very pliable and easy to manipulate.

    CLASSIC LEMON TARTS
    1 batch of lemon curd
    1/2 batch of pie pastry

  • Make the lemon curd first.
  • Next make the pie pasty.
  • Preheat the oven to 400F.
  • You will need a very large cookie cutter. If you don’t have one, use the widest glass you can find for cutting the pastry.
  • Roll out the dough slightly thicker then you want the tarts to be.
  • Cut out a dozen pastry rounds. Reroll the dough if needed.
  • With a rolling pin enlarge the rounds to fit a large muffin tin with the rounds sticking up about half an inch.
  • Place the dough rounds into the ungreased muffin pan, and push down gently with your fingers so the dough is centered in the well. The pastry should be sticking out by about half and inch or more, because it will shrink during baking.
  • Using a fork prick the bottom of every tart shell.  Otherwise it will bubble up during baking.
  • To weigh the bottoms down, place 4-5 large dry beans into each tart shell.
  • Or you can use commercial tart shells.
  • Bake the tart shells in the preheated oven until the pastry edges are golden brown.
  • Remove tart shells from oven and let them cool down slightly.
  • Pick out the beans. It will be a finicky job, but necessary.
  • Let the tart shells cool to room temperature and fill the tarts with lemon curd.

  • BLUEBERRY PAN MUFFIN WITH LIQUOR

    Take any muffin batter and bake it in a parchment-lined square baking pan and you have a pan muffin. Use the first eleven ingredients from my standard muffin recipe and the outcome is certain. Enhanced with dried blueberries plumped in liquor, [vodka or scotch, I used scotch] and white chocolate chips and added rum extract and the pan muffin becomes a whole different divine. This pan baked muffin with a great crumb just proves that small muffins are simply not as good as large ones. 

    BLUEBERRY PAN MUFFIN WITH LIQUOR
    1/4 cup soft butter
    4 Tbsp oil
    3/4 cup sugar
    2 eggs
    2 1/2 cups flour
    1 tsp baking powder
    1/2 tsp baking soda
    1/2 tsp salt
    4 Tbsp fresh lemon juice
    1/2 cup + 4 Tbsp 3.25 buttermilk
    1/2 cup 14% sour cream
    1 Tbsp rum extract
    1/2 cup dried blueberries
    small amount of liquor for plumping up the dried blueberries
    1 cup white chocolate chips

    • Put the blueberries into a small cup and barely cover them with liquor. Set it aside for an hour or longer.
    • Next preheat oven to 425F.
    • Line a square baking pan with parchment paper. 
    • Add soft butter, oil, sugar, eggs, baking powder, baking soda and salt to a beater bowl and beat until fluffy.
    • In a measuring cup whisk together the sour cream, buttermilk and the rum extract.
    • Alternating, gradually add the flour and the sour cream mixture to the butter mixture. 
    • Stir it with a wooden spoon just to combine.
    • Add the blueberries, the white chocolate chips and any liquor remaining in the cup and gently fold them into the batter.
    • Transfer the batter into the prepared baking pan.
    • Bake in the preheated oven for 8 minutes.
    • Reduce heat to 400F and bake it until the cake tester comes out clean.
    • Remove pan from the oven and place it on a wire rack to cool.

    Privacy & Cookies

    This site uses cookies. By continuing to use this website, you agree to their use. To find out more, including how to control cookies, see here: Cookie Policy

    Translate

    me

    My photo
    It began with posting a few recipes on line for the family. "zsuzsa is in the kitchen" has more than 1000 Hungarian and International recipes. What started out as a private project turned into a well visited blog. The number of visitors long passed the two million mark. I organized the recipes into an on-line cookbook. On top of the page click on "ZSUZSA'S COOKBOOK". From there click on any of the chapters to access the recipes. For the archive just scroll to the bottom of the page. I am not profiting from my blog, so visitors are not harassed with advertising or flashy gadgets. The recipes are not broken up with photos at every step. Where needed the photos are placed following the recipe. Feel free to cut and paste my recipes for your own use. Publication is permitted as long as it is in your own words and with your own photographs. However, I would ask you for an acknowledgement and link-back to my blog. Happy cooking!