25.10.22

CREPES SUZETTE


Crepes Suzette is delightful. After my grandson and his partner left, I had a large unused thick and very much unsweetened orange juice in the fridge. Jimre drank it valiantly, and one day he said “maybe do something with this juice”. Hmm. I will make Crepe Suzette. He had some more orange juice after all. If using freshly squeezed orange juice, I estimate 12 oranges are plenty. 

Crepes Suzette 
1 batch of crepes 

Orange Sauce 
1/4 cup butter 
1/2 cup golden sugar 
2/3 cup pure orange juice 
2 tsp finely grated orange zest 
1 tsp finely grated lemon zest 
5 Tbsp Grand Marnier

  • Make a batch of crepes and set them aside.
  • Heat the butter and sugar in a deep non stick fry pan over low heat.
  • When the sugar is dissolved, turn the heat up to medium.  
  • As the mixture begins caramelize, start stirring.  
  • Add the orange juice, orange and lemon zests and let the mixture bubble for a few minutes until it thickens slightly.
  • Add the Grand Marnier and heat the sauce for a few seconds.
  • Remove pan from heat.
  • Spoon a tablespoon of sauce in the middle of a crepe and fold it into quarters.
  • Repeat with the rest of the crapes.
  • One by one add the folded crepes to the remaining sauce, turning them over to coat and pushing them aside to make room for the next crepe.
  • Put the pan with the crepes back on medium heat for a few minutes until the crepes are heated through.
  • Serve immediately.

22.10.22

APPLE SAUSAGE DRESSING

Not stuffing anything with this, so ‘dressing’ is a more appropriate word for a casserole made from bread, apples, and bits of mild flavored sausage. From basic ingredients I baked a pie plate of dressing and we had it with a nice bowl of mixed salad for supper the other night. Aside from the fresh parsley, every item came from my pantry. Even though I had fresh and dried sage at hand, I chose not to use them. When serving the dressing as a meal, mild seasoning is preferred. In my opinion the apple and pork sausage flavors would have been obliterated by sage.

Apple Sausage Dressing 
1/2 [250g] frozen pork sausage meat roll 
2 Tbsp butter 
1/2 onion, diced 
2 garlic cloves, minced 
6 sprigs of fresh Italian parsley, chopped finely 
2 apples, peeled and grated 
4 slices of potato bread, cubed 
sprinkling of thyme 
sprinkling of salt and pepper to taste 
1 egg cooking spray 

  • Preheat the oven to 350F.
  • Dice the onion, mince the garlic and set it aside.
  • Cube the bread and place it in a large mixing bowl.
  • Chop the fresh parsley and peal and grate the apple and set them aside.
  • Add the oil and butter to a large non stick skillet over medium heat.
  • When the butter melts add the sausage meat.
  • Cook the sausage meat, stirring and breaking it up with a wooden spoon, until soft and no longer pink.
  • Add the onion and cook for a few minutes until the onion softens and blends in with the sausage meat.
  • Remove skillet from the heat and add the sausage meat mixture to the bowl with the bread cubes.
  • Lightly combine the bread and the cooked sausage mixture.
  • Keep in mind the sausage is already salty, season with salt and pepper to taste.
  • In a small bowl lightly beat the egg.
  • Add the parsley and the grated apples and toss.
  • Finally add the beaten egg to the bowl and toss to coat.
  • Spray the pie plate with cooking spray and add the sausage mixture.
  • Place the dressing in the preheated oven and cover with foil.
  • Bake for 20-25 minutes.
  • Remove the foil and bake until the dressing is golden brown on the top.
  • 15.10.22

    TROPICAL CHIFFON CAKE

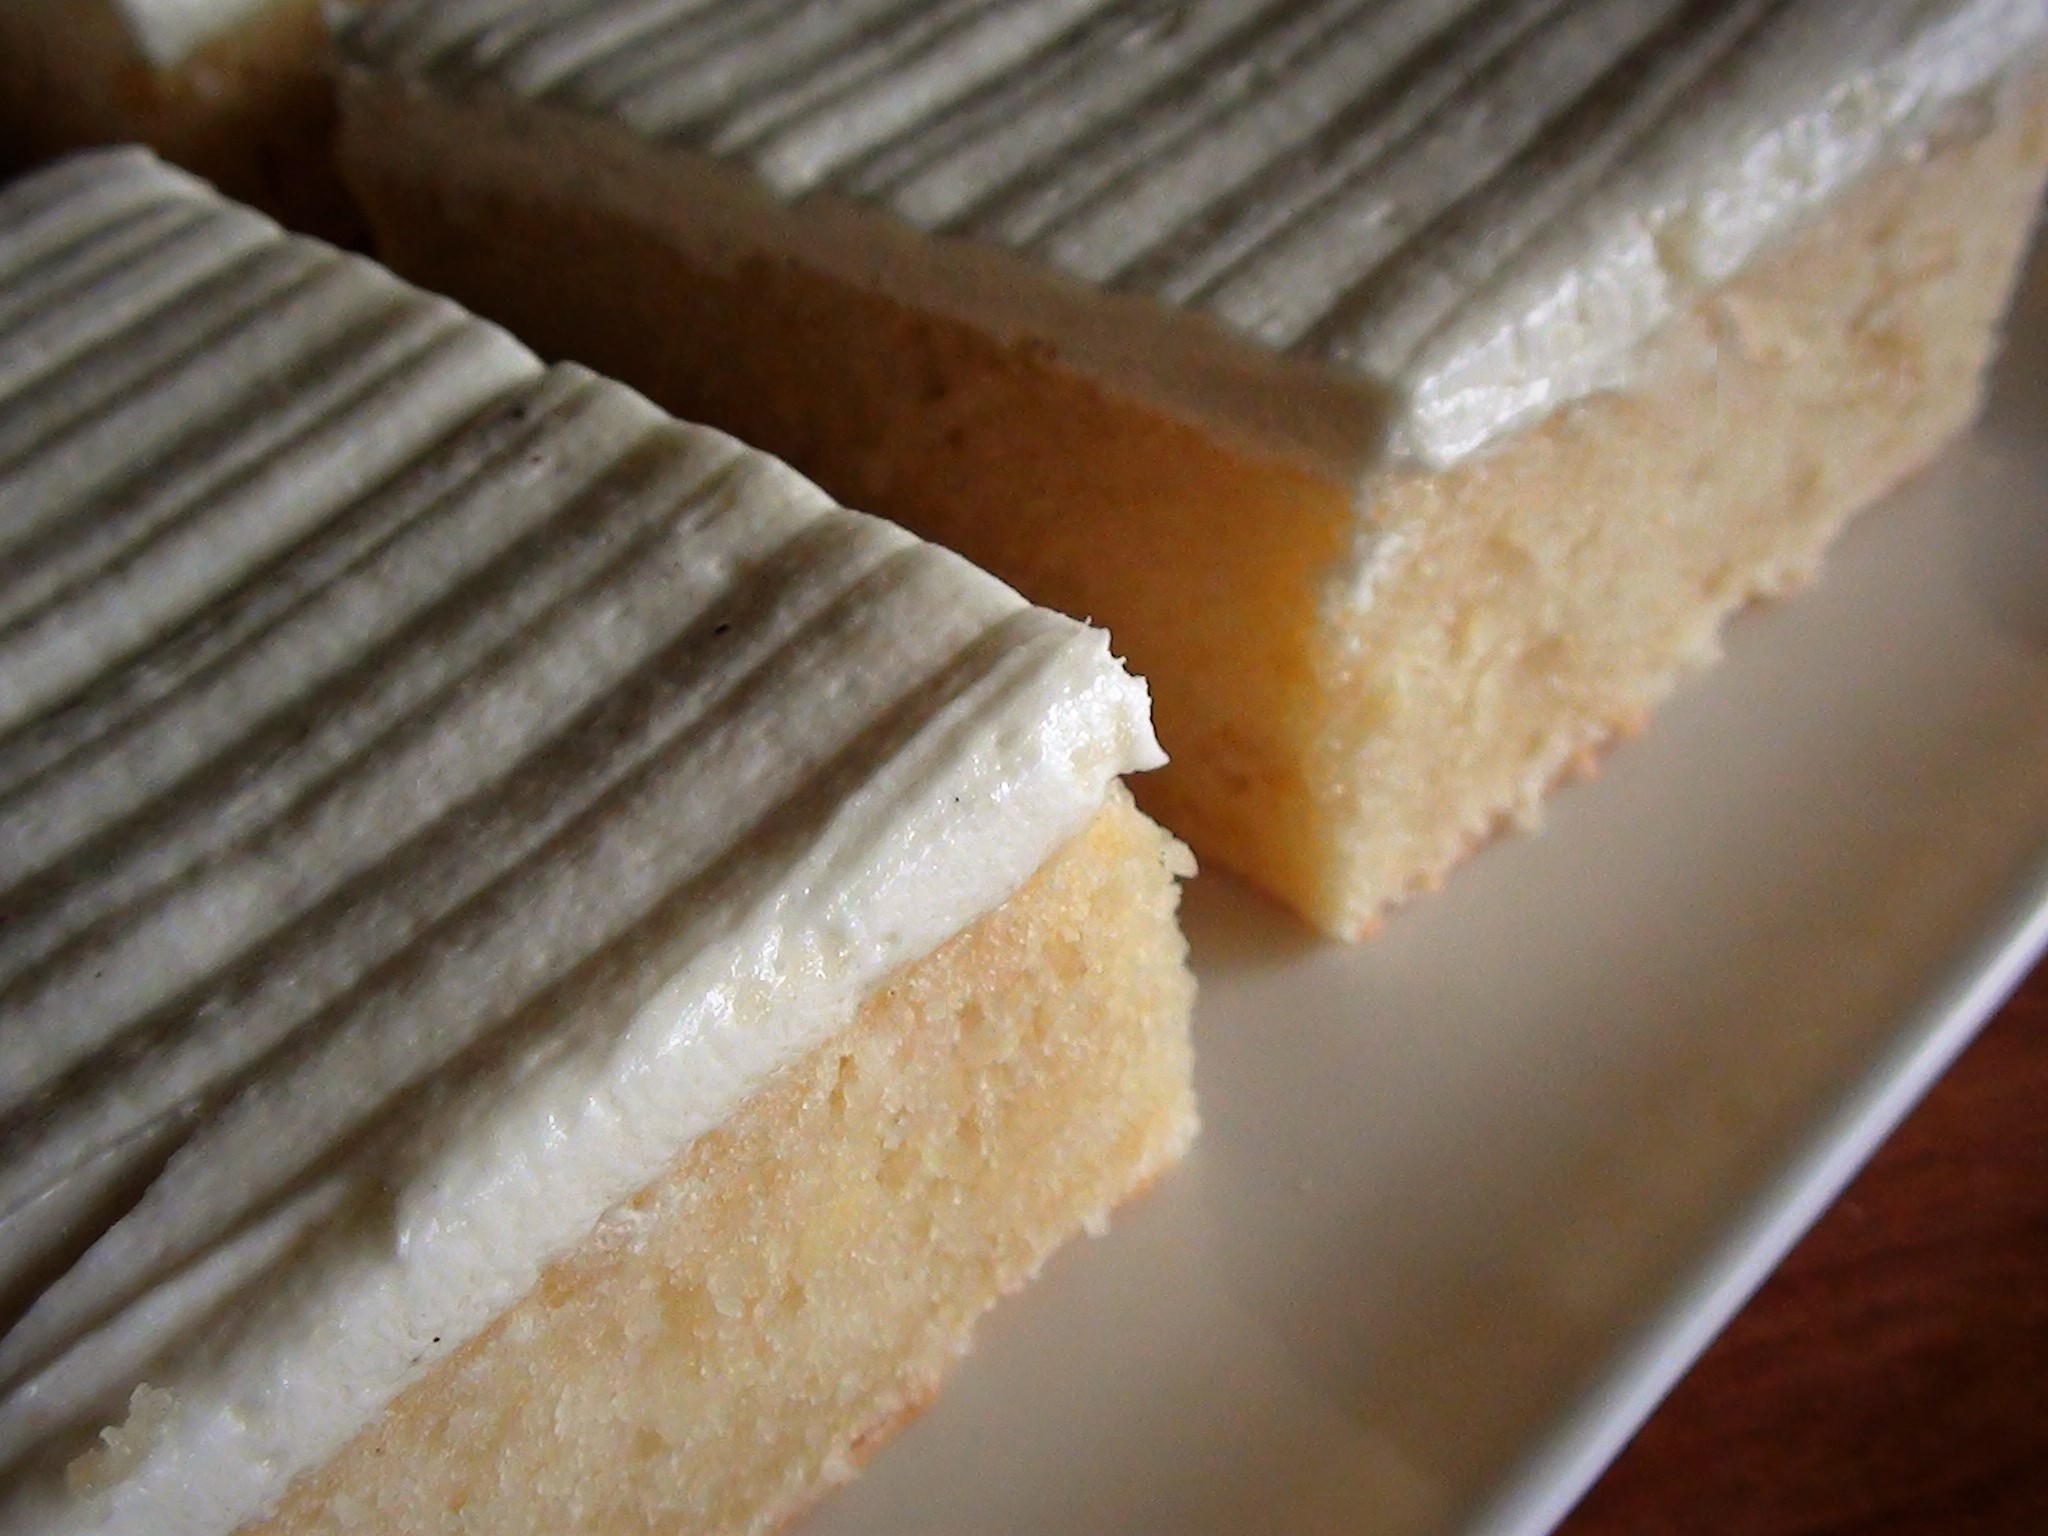
    I am still making cakes. We have to eat right? The last time I made this was back in 1971; our son, Peter was less than a year old. I recall the occasion I hastily made it for and the feeling of awe that the recipe actually worked for me. It comes more or less from my tattered 50+ years old Better Homes and Gardens Cookbook. When the kids were small I often made them tube cakes; they were less demanding to decorate. Especially during the 7 minute frosting trend. 

    According to current instructions we still have to bake the cake in an ungreased tube pan. Alas the cake does not always come out intact from an ungreased tube pan. Buttering the pan or painstakingly lining it with parchment just doesn’t work. The solution? I lightly spray the tube pan with unflavored cooking spay. Lightly! 

    The idea to turn the tube pan upside down over the neck of a glass bottle is a harebrained idea! Ten to one the tube pan will come crashing down and you will be picking cake bits from the floor. In truth as long as you place the tube pan on a wire rack to cool, the top of your cake will not be soggy. A number of traditional cooking practices just don’t make sense. Cooks do them, recipe books repeat them and people rarely realize they are holding onto ideas without ever questioning their validity.

    Tropical Chiffon Cake 
    2 1/4 cup sifted cake flour 
    1 1/2 cup sugar 
    3 tsp baking powder 
    1 tsp salt 
    1/2 cup vegetable oil 
    3/4 cup egg yolks, about 8 
    1 tsp grated orange peel 
    3/4 cup pure orange juice 
    2 tsp orange extract 
    1 cup egg whites, about 8 
    1/2 tsp cream of tartar 
    1 1/3 cups fine unsweetened coconut 

    White Chocolate Buttercream 
    1 1/2 cups unsalted butter, room temperature 
    1 tsp vanilla extract 
    1/2 tsp salt 
    5 cups icing sugar 
    1/6 cup whipping cream 
    1/2 cup melted and cooled white chocolate 

    Chocolate Drizzle 
    2 1oz pure chocolate squares 
    1/8 cup whipping cream 
    1 tsp of butter 

    • Preheat the oven to 325F. 
    • Sift flour, sugar, baking powder, and salt into bowl. 
    • Make well in center and add in order: oil, egg yolks, orange peel and orange juice and orange extract. 
    • Beat until satin smooth. 
    • Beat egg whites with cream of tartar to VERY STIFF peaks. 
    • Pour batter in thin stream evenly over entire surface of egg whites; fold in gently. 
    • Gently fold in the coconut. 
    • Just prior to baking, spray a 10 inch tube pan lightly with unflavored cooking spray. 
    • Fill the pan with the prepared cake batter and place it in the preheated oven for 55 minutes. 
    • Check with a cake tester or a sharp knife. If they come out clean, the cake is done. 
    • Transfer the tube pan to a wire rack to cool. 
    • While the cake cools, make the buttercream. 
    • Beat the butter with whisk attachment until smooth. 
    • Add the vanilla extract and salt and beat to combine. 
    • Gradually add half the icing sugar on low speed. 
    • Next add the heavy cream. 
    • Gradually add the remaining icing sugar and continue to beat on low speed until fully incorporated. 
    • Add the cooled melted white chocolate on a low speed and scrape down the sides and bottom of the bowl with a rubber spatula as needed. 
    • Beat the buttercream on high speed for 4 minutes until smooth and fluffy. 
    • If too thick, add cream, one tablespoon at a time. 
    • If too thin, add icing sugar, a quarter cup at a time. 
    • Cover with plastic wrap and set the buttercream aside. 
     • When the cake is at room temperature, gently move a dull knife around the perimeter of the pan to loosen the cake. 
    • Add a dab of frosting to a cake plate. This helps stick the cake onto the plate. 
    • Next, position the cake plate over the tube pan with the bottom layer on top. 
    • Holding on tight to both the plate and tube pan and invert. Now the cake rest on the plate and you can gently lift off the tube pan. 
    • Crumb coat the entire cake and chill for half an hour. 
    • Spread the remaining frosting over the cake using a large straight spatula. 
    • For a smooth finish, dip the spatula into hot water before smoothing the frosting. 
    • Rinse off the residue with hot running water between every swipe. 
    • To finish the cake you can decorate it with candied orange slices or scattering desiccated coconut on top. Since the cake was for a chocoholic, I simply melted 2 squares of pure chocolate with 1/8 cup of whipping cream, stirred in 1 tsp butter. I let the chocolate cool to room temperature and using a teaspoon I drizzled the chocolate over the cake.


    29.5.22

    EGGNOG CAKE BAR

    Are you going to keep this? It’s been here since Christmas. Said he when he picked up a small container labeled 1-1/2 cups eggnog from the top basket of the freezer. Give it to me. Said I, and put it on the counter to thaw. Then I looked for a recipe on line. Four eggs… that will do! Then I went about setting out the eggs and the butter to soften. I noticed right away the frosting would be too much so I put out half the butter the recipe called for. I didn’t see the copious amount of sugar, 2 whole cups, until I was into making it. We will half that of course. But that was not all I left out. I also left out half the oil… too much fat. Then I left out a whole teaspoon of salt, what was it to combat all the sugar? NO salt! It’s a cake. I also left out the vanilla extract. It would just muddle the eggnog flavour. What sort of chef wrote this recipe? Should I acknowledge the chef? Better Not. 

    After all that the cake bar turned out lovely! I used a rectangular cake pan, upon reflection I could have used a square pan. Would I make it again? I would if I lived long enough. But when I look over how many cakes I made during the last decade, I have to admit at seventy three… there is not much time left for repeats. Good thing the weather is nice and a food lover is coming over for a backyard visit today. The cake will be eaten. We relaxed a bit of late, I no longer wipe down everything that comes in the house and started to pick up my grocery orders instead of delivery, But compared to the majority we are still in lockdown. Covid of course is not yet done with humanity. I predict the coming fall will be particularly bad. Meanwhile here is my version of a delightful cake, it could come handy much later. I am always late... always, like now.

    EGGNOG CAKE BAR 
    Cake: 
    2/3 cup unsalted butter, soft 
    1/3 cup oil 
    1 cup sugar 
    4 eggs, room temperature
    2 cups cake flour 
    1 tsp baking powder 
    2/3 cup eggnog 
    Frosting: 
    1/3 cup butter, soft 
    1-1/2 cups icing sugar 
    2 Tbsp eggnog 

    • Preheat oven to 350F. 
    • Fully line a square baking pan. [I used a rectangular cake pan]
    • Add the butter, oil and sugar to the beater bowl and beat until soft and fluffy.
    • Add the eggs one by one, fully incorporating after each one. 
    • In a separate bowl whisk together the cake flour and baking powder. 
    • Lower the speed of your beater and begin to add the cake flour mixture alternating with the eggnog. 
    • When fully incorporated, scrape down the sides of the beater bowl, increase the speed and give it half a minute of beating. 
    • Pour the cake batter into the prepared pan and smooth out the top with an offset spatula. Place in the preheated oven and bake until top has a resistance when touched. 
    • Remove cake from the oven and place on a wire rack to cool. 
    • When the cake is fully cooled down, prepare the frosting. If you make it ahead, be sure to whip it again before frosting the cake. 
    • In a clean beater bowl whip the butter and icing sugar to a fluffy consistency. 
    • Add the eggnog gradually, beating well after each addition. 
    • Whip it well and spread the frosting on top of the cake.

    26.5.22

    FRIEND'S EAR - BARÁTFÜLE

    Which one is it, barátfüle or derelye? People talk about barátfüle and derelye interchangeably while others insist they are two completely different dishes. It turns out they are. Even the names reflect that. I was familiar with the kneaded dough version and thought the name difference was simply a regional preference. Then I discovered breaded barátfüle from potato dough. I already had a derelye recipe and henceforth I will refer to the breaded version as barátfüle. Anyway, that’s the one shaped like an ear. 

    I made barátfüle today. For filling I used [apricot] lekvár; a slow cooked, thick fruit jam. Commercial jams and jams made with certo are much too runny for barátfüle. However making a small amount of lekvár is easy; just slow cook a bit of fresh or frozen fruit with sugar. 

    My barátfüle turned out completely different from what I expected. I thought the lekvár will make it overly sweet… but the potato pasta and the apricot lekvár sang in complete harmony; each part complementing the other. I was hooked. I started with three pieces… then for the rest of the afternoon I kept going back for one more.

    What is Lekvár? 

    Since most food blogs got it wrong, what Google says about Hungarian lekvár is also wrong. 

    1. Lekvár is a thick jam. It does not spread or run like other jams. 
    2. Lekvár can be made from every fruit grown in the continental climate zone, not only plums. 
    3. Cannot make lekvár from prunes, aka dried fruits. 
    4. Lekvár can contain a small amount of fresh lemon juice, but there is no water or juice in lekvár. 

    FRIEND'S EAR
    4 cups cooked and mashed potatoes 
    2 cups flour 
    1 egg 
    1/2 tsp salt 
    1 tsp sugar 
    Filling: less than 1 cup apricot lekvár 
    Breading: 
    2 Tbsp oil 
    1 cup fine breadcrumbs 

    • Cook the unpeeled potatoes until easily pierced with a knife. 
    • Peel and mash until smooth. 
    • Let it cool down completely. 
    • Meanwhile heat a large non stick skillet on medium heat. 
    • Add the oil and the breadcrumbs and give it a stir with a wooden spoon. 
    • The oil will clump into the breadcrumbs, but keep stirring. 
    • When the breadcrumbs are uniform, remove skillet from the heat and set it aside. 
    • The residual heat will complete the toasting and this way the breadcrumbs can stay in the skillet without burning. 
    • Add the flour, egg, salt, and the sugar to the cooled down mashed potatoes. 
    • Combine until smooth dough forms. 
    • Transfer the dough to a well floured surface and roll it out 1/4 inch thick. 
    • Using a very large cookie cutter cut circles. 
    • Remove the dough between the circles and set it aside for re-rolling. 
    • Place a chunk of thick lekvár in the middle of each circle. 
    • Using a small brush lightly wet the perimeter of only half of the circle. 
    • Fold the other half over it and press down with a finger to close forming the ear shape... [or the perogy or whatever you want to call it] 
    • To further reinforce the edge I like to press it down with a small fork. 
    • I transferred each batch of ears to a floured tray. While you work with the remaining dough you don’t want them to stick to the tray. 
    • Next bring a large pot of water to full rolling boil. 
    • With a slotted spoon one by one lower up to eight ears into the water. 
    • Using a fork I gently move a fork along the bottom of the pot making sure that no ear will stick to the pot. • When all the ears come to the surface, cook three to four minutes longer. 
    • One by one lift them out and transfer them to the skillet with the toasted breadcrumbs immediately! 
    • Gently turn them over, shaking the skillet until every ear is covered with breadcrumbs. 
    • Repeat the cooking and rolling into the breadcrumbs until you run out of ears. 
    • This does not need sugar sprinkled on top; the barátfüle is perfect without it. 
    • My recipe yielded a total of 24 ears. For half the amount, cut the potatoes and the flour in half, but leave the rest of the ingredients as they are. Use a whole egg etc. This a forgiving dough…


    21.5.22

    FILLET OF PORK - NATÚR SZELET


    This is my lazy day breaded pork chop. The natúr szelet is also one of the components of the iconic Erdélyi Fatányéros. I keep telling myself to gather a few people and make a traditional Fatányéros. I had it a few times in restaurants, but it always looked like a lot of work. Picture it! Three variously prepared fried meats arranged in a circle on a large wooden tray with an omelet and and a slice of bacon pinned through with a pocket knife, and the various sides, the salads and pickles spilling all around the meats. Google fails to impress with visual clues... they don't make the Fatányéros like they used to. So until I do it up right, you just have to take my word for it. In the meantime here is one from Fatányéros.

    FILLET OF PORK 
    4 lean boneless pork steaks 
    1 cup flour 
    oil to fry 
    salt to taste pepper to taste 

    • Trim off all the fat and lay a couple of steaks on a cutting board. 
    • Cover with plastic wrap. 
    • Pound out very thin with a meat tenderizer. 
    • Season both sides with salt to taste. 
    • Add the flour to a square baking pan. Since the fillets are large, the handiest for this purpose is a square baking pan. 
    • One by one dip the pork fillets into the flour, fully covering on both sides. 
    • Transfer fillets to a dry tray. 
    • Place the largest skillet on medium heat. I use a heavy stainless steel skillet, but you can use a wide bottomed heavy pot too, something suitable for deep frying. 
    • Add about an inch of oil to the pan and heat it up. 
    • Gently slide the fillets into the hot oil and fry them to a nice golden colour. 
    • Sprinkle with ground pepper to taste.

    15.5.22

    HOW TO DIVIDE A BONE-IN HAM


    A large bone in ham can feed a lot of people. A whole ham no longer works for us, and buying it in bits can get expensive. When ham is on sale before a major holiday, I bring home a large ham and carve it up. Not one bit of the ham goes to waste.
     
    The bone is wrapped up for stock. Larger cuts are packed for roasting and steakettes. From the fattier parts I cut cubed ham for pasta dishes. The fatty small bits are ground up in the food processor for several dishes. The leftover fat is rendered and put in a plastic tub for various ham based dishes. Everything is portioned out, labelled and packed into the freezer.

    11.5.22

    CRISPY COD MEDALLIONS


    For this I buy frozen wild pacific cod. They come in chunky strips which I cut into cubes. Cod is very soft and falls apart easily. The secret to making cod medallions is to cube the frozen cod chunks 10-15 minutes after they are taken out of the deepfreeze. After this they will rapidly thaw so use them as soon as you can. Dip them into beaten eggs, roll them into Panco, deep fry them and serve immediately. That’s all there is to crispy cod medallions. 

    CRISPY COD MEDALLIONS 
    2 pieces of FROZEN wild pacific cod 
    1 beaten egg Panco [Japanese breadcrumbs] 
    oil for deep frying 
    salt to taste 

    • Let the frozen cod chunks sit on the counter for 15-20 minutes. 
    • Cut them still frozen into cubes. 
    • In a small bowl beat the egg with a fork. 
    • Dip the cubed cod into the egg wash. 
    • Roll them into Panco, making sure they are fully covered. 
    • Gently drop them into the hot oil and fry them to golden crispy. Panco browns pretty fast so don’t over fry. 
    • Sprinkle with salt to taste and serve immediately.

    10.5.22

    MUSHROOM SAUCE - GOMBÁS SZÓSZ

    This luxurious sauce is not to be confused with stroganoff. The delicate complexity comes from white wine. I used less wine than the recipe called for; I think just a hint of wine is better. Toss it through cooked pasta or serve it with roasted meats. The wine of course can be replaced with water in which case the heavy cream will become dominant. I wouldn't add stock though, it would only muddy the delicate flavour and making it “lighter” would be a shame. 

    MUSHROOM SAUCE 
    2 cups of mushrooms 
    1 Tbsp oil 
    2 Tbsp butter 
    1/4 cup minced onions 
    salt to taste 
    sprinkling of dried basil 
    2 Tbsp water 
    1/8 cup medium dry white wine 
    1 Tbsp flour 
    1/3 cup heavy cream 
    water as needed 

    • Place a non stick skillet on medium heat. 
    • Add the oil and the butter. 
    • Add the onions sauté until translucent. 
    • Slice the mushrooms and add to the skillet. 
    • Salt it to taste and add the basil and 2 Tbsp water. 
    • Sauté mushrooms 3 to 4 minutes. 
    • Stir in the flour and then the white wine. 
    • Heat it through. 
    • Next stir in the cream and heat it through. 
    • Finally add a bit of water to make sauce consistency. 
    • Heat it through and serve immediately.

    5.5.22

    NUTMEG BANANA CAKE BAR

    This cake bar is so easy to make and yet so soft and delicious! For flavoring use only nutmeg. On its own the nutmeg adds a second layer of flavour to the banana. It does not muddy the flavour cinnamon and vanilla extract would have. The full fat Greek yoghurt enhances both cake and frosting. One more thing I should mention. This is a convenient one bowl cake. Still it is a good idea to follow the recipe; dumping the ingredients into the bowl at the same time can produce all sorts of challenges. 
     
    NUTMEG BANANA CAKE BAR 
    1/2 cup softened butter 
    11/4 cups sugar 
    2 ripe bananas 
    3 eggs 
    2 cups cake flour 
    1/2 tsp nutmeg 
    1 tsp baking soda 
    1/2 cup plain 10% Greek yogurt 
    1 batch of Yogurt Frosting 

    • Preheat the oven to 350F. 
    • Fully line a 9 inch square baking pan. 
    • Beat the soft butter with the sugar until fluffy. 
    • One by one add the bananas, beating after each addition. 
    • One by one add the eggs, beating after each addition. 
    • Add the nutmeg and the baking soda and beat to combine. 
    • Gradually add the cake flour and the yogurt and beat to combine. 
    • Transfer the batter into the prepared baking pan. 
    • Place in the preheated oven for 30 minutes or until done. 
    • Let the cake cool completely on a wire rack. 
    • In the meantime prepare the Yogurt Frosting. 
    • Spread the frosting on the top, slice and serve.

    YOGURT FROSTING

    The texture is just as velvety and the flavour is every bit as tangy as if we used cream cheese. Yogurt is a great alternative. It is less stable than cream cheese, so it is best to add the yogurt gradually and as needed. For the same reason anything less than 10% fat content could pose a challenge, in which case adding the yoghurt bit by bit is especially important. Notice the absence of flavoring, not even a drop of vanilla. Since Yogurt Frosting will most likely be pared with either dense or strong flavored cakes it then makes sense not to compete with cake flavour.  
     
    YOGURT FROSTING 
    1/2 cup soft butter 
    2 cups icing sugar 
    1/4 cup or less 10% plain Greek yogurt 

    • Beat the soft butter until frothy. 
    • Gradually add the icing sugar and beat the mixture for 4 minutes. If at any time the mixture becomes too stiff to beat, add a tablespoon of yoghurt to loosen it. 
    • Gradually add more from the yogurt and only beat to combine. Do not overbeat; this will make the frosting runny. You may not need to add the entire 1/4 cup of yogurt. Just add enough for spreadable consistency.

    4.5.22

    HUNGARIAN GARLIC RIBS – FOKHAGYMAS OLDALAS

    If the crowd to the Annual Ribfest at Riverside Park is any indicator, Canadians love pork ribs! Of course they never had the best, Hungarian ribs; ribs the way our grandmothers used to make them. It was never slathered with paprika sauce or with sauerkraut. Sauerkraut ribs are actually German and it doesn’t make it a Hungarian dish if your Hungarian friend or relation made it that way. Shared mistaken factual assumption is a pet peeve of mine… If a Hungarian makes pizza, it doesn’t make pizza Hungarian… right? The sauce on ribs is only to give some flavor to bland ribs and Hungarian ribs are anything but bland. And take that slow cooker away from here that is no way to cook anything… ever. 

    The three requirements to roasting Hungarian ribs are; pre-salting, lard and roasting covered at 300 degrees Fahrenheit. I don’t list garlic, because garlic is a given; no ribs of any kind should ever be prepared without it. 

    Hungarian ribs are generally short ribs, unfortunately short ribs are not always available. I had a strip of long rib and a smaller piece of short rib and I made these two beauties yesterday. I am not sure how we like it more, hot out of the oven or cold… with a piece of rustic white bread and a crunchy dill pickle. Oh and don’t throw away the lard drippings… have a zsíroskenyér or jazz up the roux for a főzelék

    HUNGARIAN GARLIC RIBS 
    fresh pork ribs or fully defrosted  
    salt 
    garlic
    lard 

    • Depending on size, it may take longer than overnight to fully defrost in the fridge. 
    • Wash and pat dry with paper towels. Be mindful not to cross contaminate, wash the sink, hands and utensils with hot soapy water. Juice from raw meat must not come into contact with other foods not destined for the pot or the oven. 
    • Place the meat on a tray. 
    • Salt both side of the ribs and sat them on the counter for at least 2 but no longer than 4 hours. 
    • Peel several cloves of garlic and cut them into slivers. 
    • Transfer the salted ribs to a clean roasting pan. 
    • Slice into the meaty parts and slide the garlic slivers inside. 
    • Top the ribs with bits of lard; I used 1/4 of a cup for mine. 
    • Fully cover with a lid or with aluminum foil and place in the oven. 
    • Turn the oven to 300F and leave it for a couple of hours. 
    • After two hours check on the ribs every hour until they have roasted to a nice golden colour. Mine took 3 hours. More ribs take longer roasting time. 
    • Do NOT increase oven temperature. 
    • Do NOT remove covering except for checking the progress. 
    • When ribs are done, remove from the oven and with the lid on let them rest for 10 minutes before serving.

    2.5.22

    CSONGRAD MEATBITES - CSONGRÁDI APRÓHÚS

    Call it Brassói or Csongrádi, not quite sure what came first or if there is even a difference, apróhús or bite sized pieces of meat, originates from the southeast part of Hungary. Since Brassó, the city, was taken away and Csongrád, the county, remained in Hungary, lets just call the dish Csongrádi! If any of this doesn’t make sense, check out the Treaty of Trianon and the city of Brassó. None of this is a personal whim of mine, after all, one of my Hungarian cookbooks also calls the dish Csongrádi, There it is on page 37 of the 2nd addition of "Bogrács és kukta". Furthermore it calls not for beef or veal, the recipe calls for pork meat.

    The inspiration could have been leftover pörkölt or maybe a scant amount of pork. I have seen recipes that are 50-50, but in truth the proportion of meat to potato overwhelmingly favors the potato. I have been making a breaded version for years, but it’s more a pretend than the real thing. I had a nice piece of tenderloin so I thought it was time to make an authentic Csongrádi for a change.

    CSONGRAD MEATBITES 
    1 1/4 cup diced pork tenderloin 
    1/2 cup chopped onions 
    1 small tomato, peeled and chopped 
    6 red potatoes, peeled and sliced 
    1/8 cup lard 
    salt and pepper to taste 
    1/2 tsp Hungarian Paprika [mostly for colour] 
    Oil for deep frying 

    • Prep the meat, onion, tomato and the potatoes first. 
    • Melt the lard in a small non stick fry pan. 
    • Add the diced tenderloin and sauté on medium heat, stirring, until the meat is no longer pink on the outside. 
    • Add the onions and continue to sauté until the onions are soft. 
    • Add the tomato and the seasoning and continue to sauté until most of the liquid is absorbed, but do not let it go dry. 
     • For tougher meats you may have to add a bit of water several times until the meat is tender. Finish the same way, let most of the liquid absorbed but do not let it go dry. 
    • Cover the meat bits and set them aside. 
    • Fill a larger pot with hot water and bring it to a full boil. 
    • Add the potato slices to the boiling water. 
    • Let the water come back to boil and cook the potato slices for 3 minutes. 
    • Fully drain the potatoes. 
    • Heat the oil in your deep fryer, mine is just a large, heavy pot. 
    • Put on a pair of long oven mitts before adding the still hot potatoes to the hot oil. 
    • Trust me on this; I had burns from the hot oil splattering up to my hands. 
    • Once the potatoes are added remove the oven mitts. 
    • With a large long handed wire strainer, gently stir the potato slices moving to fry them evenly to a golden hue. 
    • Using the wire strainer scoop the potatoes into a paper towel lined bowl. • Sprinkle salt, add the prepared meat bits and toss lightly. 
    • Eat it with pickles or sauerkraut. 
    • Yields 2 generous servings.

    30.4.22

    PARSNIP SOUP WITH CHIVES

    This is a nice creamy soup for those who have to avoid dairy products. Yes it can be adapted for the vegan diet, notice I said diet… because it is so contrary to the workings of human physiology and so short of brain nutrients I cannot in good conscience endorse it. I used a pressure cooker, but the same soup can be cooked in a pot “slowly”. Conventional soup making takes time; with slow simmer and one must never let the soup, even a cream soup, to come to full rolling boil. A blender or a food processor is necessary. Stick blender does not work as well, you may have to force everything through a large sieve, a process I would not recommend. Adapted from foodgawker.
     
    PARSNIP SOUP WITH CHIVES 
    3 parsnips, trimmed and peeled 
    2 garlic cloves 
    1/2 cup cashews 
    3 cups of rich homemade chicken stock 
    1/8 cup extra virgin olive oil 
    salt and pepper to taste 
    fresh lemon juice to taste 
    Garnish: 
    fresh chives, chopped finely 
    few cashews, chopped 

    • Place the first six ingredients in the pressure cooker, lock and seal and bring up to high pressure. Reduce heat to medium low, maintaining medium pressure, and cook for 25 minutes. 
    • Release the pressure according to user’s manual before removing the lid. 
    • Or slow simmer ingredients in a regular pot with the lid on for about an hour. 
    • At this point you may want to wait for the soup to cool somewhat. 
    • Transfer to a blender to puree. Take care when pureeing hot ingredients. Do not fill the blender jar full or it will push up the cover and you have a huge mass to deal with. I pureed in two batches. 
    • Pour pureed soup into a small pot adjust the salt and squeeze fresh lemon into the soup and adjust it to taste. You can always add more lemon juice but you cannot take it away. But please rinse the spoon between tastings… 
    • Serve the soup and garnish with chopped chives and the crushed nuts.


    27.4.22

    PORK PATÉ IN PASTRY - PÁSTÉTOM TÉSZTÁBAN


    The extra lean ground pork I get of late is a tad coarsely cut, and once I put it through the food processor, it looked very much like a paté… so I had to work with that. Initially I planned to make a pork tart of sorts. I must confess, the chunks of stuff the Brits put into their pork pie never appealed to me nor do I like the flavoring in French Canadian tortierre. Instead I drew from my Hungarian taste experience and it turned out to be a strangely satisfying dinner, actually several dinners with fresh greens… Starting with the simplest of ingredients this is as basic as a Hungarian pork paté can get. No brandy, no liver, no strange seasoning, just a happy accident, this did not come from the French influence at all.

    PORK PATÉ IN PASTRY
    Pork Filling:
    1 crusty bun or the end slice of a French bread
    olive oil to cover pan
    250 g extra lean ground pork
    1/2 onion, diced
    1 tomato, peeled and chopped
    1/2 yellow pepper, diced
    2 tsp Hungarian Paprika
    salt, ground pepper to taste
    1 egg
    2 cloves of garlic, mince
    2 Tbsp flour
    1/8 cup cold butter, cubed
    Pastry:
    1/2 cup lard, soft
    1/8 cup butter, soft
    1 1/2 cups flour
    salt to taste
    1 egg
    1 extra egg for the egg wash

    • Make the filling first.
    • Run water over the crusty bun or the end slice of a French bread.
    • Squeeze out the water and crumple the soft bread into a mixing bowl and then set it aside.
    • Place a large non stick skillet on medium heat.
    • Cover the bottom with oil.
    • Add the ground pork and slowly cook, while breaking up the meat with a wooden spoon. When the meat is all white, add the onion and cook for a couple of minutes.
    • Add the tomato and the pepper.
    • Add the Hungarian Paprika, salt and ground pepper to taste.
    • Transfer to the food processor and pulse it a few times to make a paste.
    • Scoop the meat paste into the mixing bowl with the soaked bun bits.
    • Stir in the egg, minced garlic and the flour.
    • With clean hands combine the meat mixture to make a homogenous paste. Set it aside.
    • Next preheat the oven to 375F.
    • To make the pastry, beat the lard and the butter until very fluffy.
    • With a wooden spoon gently stir in the flour and the salt. Do not beat.
    • In a measuring cup, beat the egg.
    • Add the beaten egg and with a wooden spoon stir it into the flour mix.
    • Kneed until smooth dough forms.
    • Divide the dough into a slightly smaller and a larger part. 
    • On a floured board roll out the smaller dough and line a small bread pan. Let the dough slightly overhang the sides.
    • Pour the meat filling into the pastry lined bread pan.
    • Dot the top with the butter cubes.
    • Now roll out the larger dough on a floured board.
    • Place the dough over the bread pan sealing the pate and flute the edges.
    • Cut slits onto the top for the steam to escape.
    • Whip the extra egg with a fork.
    • Lightly! glaze the top and the fluted edge with the egg wash.
    • Place in a preheated oven and bake until paté is golden brown.
    • Remove from the oven and let the paté rest for 5-10 minutes before slicing.
    • Paté is nice hot or cold.

    25.4.22

    ALMOND FLOUR SHEET CAKE

    Here is a lovely confection… though not for those who won’t follow instruction. There are a number of supplies required, 2 large rimmed sheet pans, parchment paper and unflavoured cooking spray. A large offset spatula is very useful to thinly spread the cake batter. The frosting is scant, but you don’t need more. The frosting should be ethereally thin between the thin, fragile cake layers. Don’t add extracts to the cake batter, and use only vanilla extract in the frosting. There is beauty in balance.

    ALMOND FLOUR SHEET CAKE
    Be sure to read the preceding paragraph.
    Cake:
    1 1/2 cups almond flour
    1/2 cup cake flour
    1/2 cup granulated sugar
    3 eggs
    6 egg whites
    1 pinch cream of tartar
    icing sugar for dusting
    Vanilla Frosting:
    1/2 cup unsalted butter, softened
    1 1/2 cups icing sugar
    1 tsp pure vanilla extract no more
    1/4 cup whipping cream

    • Preheat the oven to 350F
    • Prepare two large, rimmed sheet pans:
    • Pray the sides with cooking spray and line the bottom of each sheet pan with parchment paper. Set aside.
    • In a large bowl whisk the almond flour and the cake flour. Set aside.
    • Next add a pinch of cream of tartar to 6 egg whites and beat until soft peaks form.
    • Gradually add 1/4 cup of sugar and continue beating until hard peaks form.
    • Set aside.
    • Add 3 whole eggs to the flour mixture and beat for 4 minutes.
    • Gradually and gently fold the beaten egg whites into the flour mixture with a wooden spoon.
    • Spray the parchment lined sheet pans with cooking spray.
    • Divide the cake batter between the prepared sheet pans.
    • Spread the batter evenly preferably with a large offset spatula. 
    • Bake the cakes one by one in the preheated oven.
    • When the top springs back remove the pan from the oven and put the second pan to bake.
    • Next lightly dust the top of the cake with icing sugar.
    • Place a clean kitchen towel over the pan.
    • Grasping the kitchen towel on both sides tautly over the pan, quickly turn it over.
    • The sheet cake is now resting on the kitchen towel. 
    • Gently lift off the sheet pan.
    • Immediately, carefully peel the parchment paper off the hot cake. It is crucial not to let the cake cool down with the parchment paper fused to the cake. Otherwise the cake will come off in clumps.
    • Before handling, let the cake cool down completely.
    • Very gently pull the cake with the kitchen towel onto a flat surface, perhaps an un-rimmed baking sheet or a stable sheet of cardboard.
    • As this cake is very fragile, it will help to chill the sheet cake before assembly.
    • Meanwhile prepare the vanilla frosting.
    • Beat the softened butter until soft and creamy.
    • Continue beating and gradually add the icing sugar.
    • Scrape down the sides and gradually add the whipping cream and the vanilla extract. Do not increase the suggested amount or change the extract.
    • Beat for 4 minutes longer or until very frothy.
    • Place the chilled sheet cakes on the counter and cut each cake into 4 equal pieces. Now you have 8 equal cake layers.
    • Spread each cake layer with the vanilla frosting.
    • The frosting will appear sparse, but you do not want ticker layers of frosting between the fragile cake layers. This cake does not need frosting on the side or any sort of decorating.
    • Chill before slicing.
    • Serve only at room temperature.


    22.4.22

    EGG BARLEY POTATOES - KRUMPLIS TARHONYA

    Egg barley or ‘tarhonya’ in Hungarian, is an egg based pasta; a remnant of nomadic Hungarian ancestors' lifestyle. Dried pasta is ideal to carry in a pouch; it can be revived with water and cooked with a wide variety of ingredients to make a meal. Egg barley is still popular today, cooked with humble potatoes or served alongside stews and ragouts. Most Hungarians buy the dry version of egg barley, but the fresh homemade version definitely tastes better.
     
    EGG BARLEY POTATOES
    fresh egg barley from 2 eggs or 1 cup dry egg barley
    oil to cover pan
    1/2 cup diced onion
    4 medium red potatoes, chopped [no starchy potatoes please]
    1 garlic, minced
    2 tomatoes, skinned and chopped
    1 large yellow pepper, diced
    salt and pepper to taste
    water

    • Making egg barley fresh is easy and cooking with it saves time. Cooking dry egg barley is less work, but requires longer cooking. So it’s up to the individual what they consider convenience.
    • Make egg barley from 2 eggs.
    • Chop the potatoes fairly small and set it aside.
    • Cover a large nonstick skillet with oil.
    • Place the skillet on medium heat.
    • Add the egg barley and fry it, stirring it gently with a wooden spoon, until they turn light brown.
    • Add the diced onions and continue to fry, stirring, until the onions are soft.
    • Add water to cover the egg barley and slow simmer, stirring occasionally until the egg barley is half way cooked and most of the water is evaporated.
    • Add the chopped potatoes, garlic and the Hungarian Paprika and stir.
    • Add chopped tomatoes and the diced pepper.
    • Add salt and pepper to taste.
    • Add water just covering everything.
    • Bring it to a slow simmer and cook until the potatoes are tender.
    • Continue to add water as needed.
    • Adjust the salt and pepper to taste.
    • When completed, egg barley should not be dry or swimming in stock.
    • The egg barley is ready when everything is soft and glistening and you can see the bottom of the skillet. 


    Privacy & Cookies

    This site uses cookies. By continuing to use this website, you agree to their use. To find out more, including how to control cookies, see here: Cookie Policy

    Translate

    me

    My photo
    It began with posting a few recipes on line for the family. "zsuzsa is in the kitchen" has more than 1000 Hungarian and International recipes. What started out as a private project turned into a well visited blog. The number of visitors long passed the two million mark. I organized the recipes into an on-line cookbook. On top of the page click on "ZSUZSA'S COOKBOOK". From there click on any of the chapters to access the recipes. For the archive just scroll to the bottom of the page. I am not profiting from my blog, so visitors are not harassed with advertising or flashy gadgets. The recipes are not broken up with photos at every step. Where needed the photos are placed following the recipe. Feel free to cut and paste my recipes for your own use. Publication is permitted as long as it is in your own words and with your own photographs. However, I would ask you for an acknowledgement and link-back to my blog. Happy cooking!