30.11.12

GREEN PEAS STEW - ZÖLDBORSÓ FŐZELÉK


The most successful főzelék made from a frozen vegetable has to be green peas stew. When I was a kid Grandma only made them in season and she always cooked the peas in water, never in milk. In actual fact we had no frozen peas in those days, not even in Budapest

Főzelék dishes are comforting, filling and uniquely Hungarian. When I was a kid we used to eat it with a tükörtojás, eggs sunny side up, and believe me after a long winter when we finally got to have some fresh green peas it was always a treat. I added a considerable amount of finely chopped fresh parsley at the end. The fresh parsley enhanced the flavor and made the dish taste fresher; in fact it made me forget these were frozen peas. 

Green Peas Stew cooked in water

GREEN PEAS STEW
3 cups green peas
3/8 cup butter [do not reduce amount]
3 tbsp flour
salt to taste
3 cups cold milk [I used 1%]
1 tsp sugar
1/2 cup fresh parsley
 
• Melt the butter on medium heat in a medium sized dutch pot.
• Add the frozen peas and heat the peas, stirring for a couple of minutes. The peas will be still frozen, just a little bit less so.
• Sprinkle the flour over the peas and stir to combine.
• Add salt to taste.
• Pour in the cold milk and bring it to a slow simmer.
• Simmer slowly, stirring continuously for 4-5 minutes.
• Adjust the salt and add the sugar.
• Finally stir in the chopped fresh parsley, cover and let the stew rest for 4-5 minutes and serve.


26.11.12

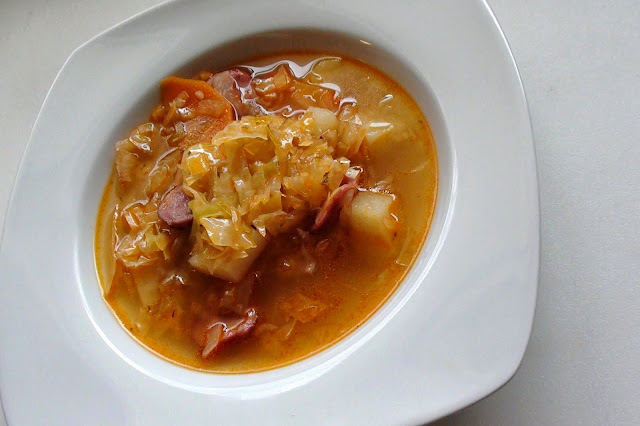
CABBAGE SOUP


The most important component of cabbage soup is probably the bacon. The bacon complements the cabbage and rounds out the flavours. Although some well smoked pork meat can be used instead, I still think bacon is the best for this soup. I added some Ukrainian sausage as well, but this is optional and does not alter the soup’s flavour significantly. You can use water, but homemade chicken or pork stock is preferable.

CABBAGE SOUP 
4 cups chopped cabbage
2 red potatoes
1 large carrot
2-3 thick slices of bacon, chopped small
2 Tbsp extra virgin olive oil
1/2 cup diced onions
salt to taste
1 clove of garlic, finely chopped
1/2 tsp thyme
sprinkling of caraway seeds
pepper to taste
1-1/2 tsp Hungarian paprika
4 cups chicken or pork stock
1/2 ring of Ukrainian sausage, sliced [optional]
 
• Chop the cabbage, peel and dice the potatoes, peel and slice the carrot and set them aside.
• Chop up the bacon into small bits.
• Add the bacon bits to a large saucepan and slow fry on medium heat until lightly browned.
• With a slotted spoon remove the bacon to a paper towel lined plate and set it aside.
• Discard the bacon fat.
• Place 2 Tbsp of extra virgin olive oil in the pot.
• Add the onions and sauté until translucent.
• Add the cabbage, the potatoes and the carrot.
• Sprinkle with salt sparingly, the stock will have salt in it already.
• Add the garlic, thyme, sprinkling of caraway seeds, ground pepper and sauté for a couple of minutes stirring continuously.
• Stir in the paprika and immediately add the stock.
• Bring it to a boil and then reduce heat and cover the pot.
• Slowly simmer the soup until the potatoes are soft.
• Add the reserved bacon and the sausage rings.
• Cover and remove from heat.
• Let the soup sit for 15 minutes. Do not lift lid.
• Adjust salt and seasoning and serve with sour cream and a slice of homey bread.
• 4 servings

25.11.12

PANKO CRUSTED PARMESAN PORK CHOPS


Just when you thought I made all the varieties of breaded pork chops here is a new one. This one is a fusion recipe and not in any one in particular. Well maybe the method can be attributed to Italian cooking, but that is all. It is quick and I think the method would be excellent when serving up a larger amount all at once. There is an added bonus too, very little oil is required and even less remains in the chops. I don’t think much oil is absorbed in the first place, and even that small amount is left behind in the baking dish. The parmesan flavour is certainly faint and I use the good stuff. Maybe that is why. Those tiny granules they sell in shakers are artificially flavoured and probably give a stronger flavour, but then that stuff would give the chops an artificial flavour as well. I don’t pre-salt my breaded cutlets. I always sprinkle with a little salt before serving. I use less salt that way and the flavour I find is better. 
 
PANKO CRUSTED PARMESAN PORK CHOPS
1 egg, whisked
1 cup Panko crumbs
1/2 cup grated Parmigiano Reggiano cheese
2 thick boneless, center cut pork chops
pepper to taste
3 Tbsp extra virgin olive oil for frying
salt to taste
 
• Preheat the oven to 400F.
• Trim off all the fat from the chops and pound them out fairly thin with a meat tenderizer.
• Sprinkle them with pepper to taste and set them aside.
• You will need three shallow dishes or plates, pasta plates work rather well for this, and set them on the counter side by side.
• Grate the parmesan cheese into the first dish.
• Add the egg to the next and whisk it well with a fork to combine the white and the yolk and then some. In other works whisk up the egg pretty well.
• Place the Panko in the last dish.
• Now add the chops, one at a time, to the grated parmesan, pressing it to adhere to the meat on both sides.
• Next dip the chops into the egg, coating it with the egg all over.
• Finally place the chops into the Panko, coating both sides completely and pressing the Panko to adhere.
• On medium heat slowly heat up the olive oil. Don’t be tempted to heat it up on high heat, give it your time, you don’t want the Panko coating to scorch.
• Add the chops to the well heated pan and slow fry them on medium heat until they are golden brown on both sides.
• Now transfer the chops to an ungreased ovenproof dish and bake them for ten minutes.
• When you remove the chops, the dish will have a layer of oil in it. Transfer the chops to a paper towel lined platter to soak up any remaining oil.
• Sprinkle the top with salt and serve immediately.

CHOCOLATE BANANA MUFFINS

These soft and lofty muffins were adapted from Nigella.com. The first time I made them I could only get 7 descent sized muffins. I don’t like small muffins; they are drier than the large ones. Just think about it! Proportionately there is more surface area than soft inside in a small muffin. In any case muffins don’t qualify as health foods. A doughnut has actually less calories than a muffin or a bagel. If you want portion control, have half a muffin. If you want healthy, have a banana. I also replaced the oil with shortening. 

I really dislike paper liners. They stick to the muffins and make them fall apart when the paper is removed. I only use parchment muffin liners. Buttering and flouring the cupcake tins is an equally bad idea. It creates a white pasty layer on the surface of the muffins and this looks especially bad on the dark ones. Use unflavoured cooking spray instead. The muffins slide out and cleanup is a breeze. If I run out of cooking spray, I generously butter the muffin tins, but I don’t dust with flour.
 
CHOCOLATE BANANA MUFFINS
4 overripe bananas
2/3 cup shortening
3 eggs
1 cup light brown sugar
2-3/8 cups flour
1/4 cup unsweetened cocoa, sifted
1-1/3 tsp baking soda
unflavoured cooking spray
 
• Preheat the oven to 400F.
• Mash the bananas with a potato masher or with a freestanding mixer.
• Still beating and mashing, add the shortening followed by the eggs and sugar.
• In a separate bowl whisk together the flour, cocoa powder and the baking soda.
• Gradually fold into the banana mixture.
• Spray a large muffin tin with unflavoured cooking spray and spoon the batter into the prepared muffin tin.
• Bake in the preheated oven for 20 minutes.
• Remove from the oven and lift up the muffins on one side and let them slightly cool in the muffin tin.
• Serve warm with butter.
• When cooled down, pack remaining muffins in a plastic container and freeze for use later. 

24.11.12

NUTELLA SHORTBREAD COOKIES


This recipe comes from Patisseries, Sweet and delicious recipes from great Canadian pastry chefs by James MacDougall. On Page 43 there is an Empire Belgian Cookies recipe. As much as I adore the cookies with jam and lemon butter, and yes, I will make these too, I used these buttery, melt in the mouth cookies to make nutella shortbread for the nutella lover in the family.
  
NUTELLA SHORTBREAD COOKIES
1 cup unsalted butter, room temperature
1/2 Tbsp vanilla extract
1/2 cup sugar
2-1/8 cups cake and pastry flour
1/2 tsp baking soda
1/2 tsp salt
Nutella [use the real thing please]
 
• Preheat oven to 350F.
• Line a baking sheet with parchment paper.
• In a large bowl, cream butter, vanilla and sugar together.
• Sift dry ingredients and add to the butter mixture.
• Mix to combine.
• Divide dough in half, and wrap and chill for two hours.
Place one half of the cookie dough on a well floured board.
• Dust the rolling pin with flour and roll the dough to 1/4 inch thickness.
• Cut circles with a medium sized cookie cutter.
• Reroll the scraps and roll and cut again until most of the dough is used up.
• Place the cookies on the prepared baking sheet and bake for 12 minutes.
• Remove from the oven and let rest on pan for 5 minutes.
• When cookies have set, move to a wire rack to cool completely.
• Repeat the process with the remaining dough.
• Pair the cookies according to size and shape.
• Place a spoonful of nutella on half of the cookies and spread almost to the edge.
• Place the remaining cookies on the top.

23.11.12

ZSUZSA’S APPLE DISH


This is a very pleasant apple dish when you want something quick and light. We had it the other day, just for the pleasure of it and because our golden delicious apples are extra delicious this year. I concocted it years ago during a particularly lengthy heartburn episode. This is an inherited weakness tied to stress and digestion. My dad was a dental technician and I watched him for years working away in his lab, doubled over in pain, with a large bottle of Salvus by his side. The Salvus Víz was for the heartburn. Back in the days it came in what looked like a wine bottle. Anyone not knowing the truth would have thought Apa had a drinking problem. I am more of a baking soda girl. Luckily this does not happen often, but when it does, even water gives me heartburn. There have been times in my life when I practically lived on this dish. Even if everything fails me, there is still my apple dish; lovely and comforting.

ZSUZSA’S APPLE DISH
2 golden delicious apples
1 Tbsp sugar sprinkling of cinnamon [almost nothing]
2 tsp flour
1 tsp butter light sprinkling of light flaky cereal [ nothing robust or heavy]
 
• Wash, peel, core and slice the apples.
• Place in a medium sized bowl.
• Add the sugar, flour, a light sprinkling of cinnamon, and gently toss with the hands.
• Transfer to a microwavable serving dish.
• Dot the top with butter, and microwave for 1-1/2 to 2 minutes.
• Sprinkle with a light corn flakey cereal, I used Honey Bunches of Oats. [In my opinion bran flakes would be too robust.]
• Serve warm.

22.11.12

PORK CHOPS WITH APPLE STUFFING


These are soft and succulent with a stuffing that has mild apple flavour. I serve them with mashed potatoes. If you prepare more of the filling, it can be baked separately in a well buttered casserole dish. Keep in mind the stuffing on its own requires significantly shorter baking time.

PORK CHOPS WITH APPLE STUFFING
2 boneless thick cut pork chops
2 Tbsp olive oil
2 Tbsp butter
Apple Filling:
2 Tbsp olive oil
1/2 cup diced onions
1/2 granny smith apple, diced
2 garlic cloves, diced
2 slices of deli style medium rye bread cut into croutons
1/4 cup chopped fresh parsley
1/4 tsp marjoram
salt and pepper to taste
1 egg
 
• Preheat the oven to 375F.
• Cut a pocket into each chop and lightly pound both sides with a meat tenderizer.
• On medium heat, sauté the onions in 2 Tbsp olive oil until translucent.
• Meanwhile add the diced apple, garlic, croutons, parsley and marjoram to a mixing bowl.
• Add the soft onions, salt and pepper to taste and mix to combine.
• In a small bowl whisk the egg with a fork until the yolk and the white combines.
• Add the egg to the bowl and stir to coat the stuffing evenly
• Fill the chops pocket with the stuffing all the way to the edge.
• Add 2 Tbsp olive oil and 2 Tbsp butter to an ovenproof skillet.
• Place it on the stove on medium heat and melt the butter.
• Add the stuffed pork chops to the skillet.
• Sprinkle with salt and secure each chop with toothpicks.
• Slow fry the chops for 2 minutes. Do not flip over.
• Remove the skillet from heat and cover with a well fitting ovenproof lid or with aluminum foil.
• Place the covered skillet in the oven and bake at 375F until the chops are cooked through. The top will look cooked and the bottoms will have a nice golden color.
• Remove the skillet from the oven, discard toothpicks and carefully flip over the chops.
• Cover again and place the skillet back in the oven until both sides have a nice golden color.
• Do not let the chops dry out, these chops will not take long to prepare.

21.11.12

CREAM OF BROCCOLI SOUP


I instinctively knew I will like this broccoli soup. I played around with the quantities, needing less, but basically it's the same soup as on Food and Thrift. This now replaces my own cream of broccoli soup. My old one had cream in it, and you know me, I am not apt to sacrifice flavour for lowering the fat content. So you can imagine how good this soup is. 
 
CREAM OF BROCCOLI SOUP
2 Tbsp butter
1onion, chopped
1 stalk celery, chopped
4 cups broccoli florets
3 Tbsp butter
2 Tbsp flour
1 cup 1% milk
 
• Melt 2 tablespoons butter in medium sized stock pot, and sauté the onions and celery until tender.
• Add the broccoli florets and the broth, cover and simmer for 10 minutes.
• Reserve a few of the broccoli florets and then pour the soup into a blender, filling the pitcher no more than halfway full.
• Hold down the lid of the blender with a folded kitchen towel, and carefully start the blender, using a few quick pulses to get the soup moving before leaving it on to puree. Puree in batches until smooth and pour into a clean pot. Alternately, you can use a stick blender and puree the soup right in the cooking pot.
• In small saucepan, over medium-heat melt 3 tablespoons butter, stir in the flour and add the milk.
• Stir it until thick and bubbly, and add to soup.
• Add the reserved broccoli florets, season with pepper and serve.

20.11.12

FLOYDA'S BUTTERSCOTCH BROWNIES


My old Prince George neighbour Ellen Huget used to make the most delicious butterscotch brownies. I lost Ellen’s recipe years ago and every recipe I tried since was either too sweet or too dense for our liking. That is up until I happened onto a family website and I saw the recipe to these “not-too-sweet butterscotch brownies” by Floyda Mabel Steiner McClure. Oh my, I think I found Ellen’s butterscotch brownies! Floyda’s recipe called for dusting with icing sugar and ice cream. I put a caramel icing on the top, because that is how Ellen used to serve hers. Well if truth be told Ellen also put in currants, but I didn’t dare put that into an afterschool snack. Apple slices on a separate plate and “nothing touching” is as far as I can venture. With many thanks to the McClure family for sharing their heirloom butterscotch brownie; Floyda’s butterscotch brownies are nothing short of perfect.
 
FLOYDA'S BUTTERSCOTCH BROWNIES 
7/8 cup flour
1/4 tsp baking powder
3/8 tsp salt
1/2 cup salted butter
3/4 cup brown sugar
2 eggs, well beaten
1/2 tsp vanilla
1 cup chopped walnuts or 1/2 cup currants (optional)
1 batch caramel icing
 
• Preheat oven to 350 degrees.
• Grease a 9" or 8" round or square pan.
• Sift flour with baking powder and salt.
• In a separate bowl, cream butter and add sugar gradually to blend thoroughly.
• Stir in eggs and vanilla to butter/sugar mixture.
• Then stir in sifted ingredients.
• Add nuts if desired.
• Batter will be fairly smooth and thin.
• Spread batter in greased pan, bake at 350 for 20 minutes.
• Meanwhile prepare the caramel icing.
• Check the brownie for doneness with a toothpick. If toothpick is dry, remove brownies from oven.
• Cool and using an offset spatula spread the caramel icing over the top.
• Cut into 16 squares and serve.

CARAMEL ICING


I used this icing recipe for years, ever since Jean Pare’s 150 Delicious squares came out in 1985. I tried many recipes from the book over the years and even kept a few. But the caramel icing has become a standby for my cookies as in this case I used it to finish up a small batch of butterscotch bars. Not light enough for finishing cakes, but a perfect icing for cookies and squares. It pipes well, not overly sweet and the preparation is simple. I added the sour cream to balance the sugar, but otherwise this one is Jean Pare’s recipe from page 65.
 
CARAMEL ICING
1/4 cup butter, salted
1/2 cup brown sugar
2 Tbsp milk
1 Tbsp sour cream
1 cup icing sugar
 
• Combine butter, sugar and milk in saucepan.
• Bring to boil and simmer 2 minutes.
• Cool.
• Stir in icing sugar.
• Add the sour cream and beat until fluffy.
• Smooth over bars. 

17.11.12

BEET AND CARROT SLAW

Even if you are not a raw beetroot fan, you will like this salad. There is something irresistible in these colourful, julienned vegetables. A food processor shredder saves time, especially if you make a large bowl of it, but it’s not that difficult to julienne with a sharp chef’s knife either. I sat down to the kitchen table and chopped away on a cutting board, it was easier then to get the food processor out and do a wash up afterwards. In no time I had the carrots and beets julienned. The flavouring has the right amount of tanginess and is not too sour.
 
BEET AND CARROT SLAW 
2 large carrots, julienned
1 large or two long skinny beets, julienned
1/2 cup finely diced red onion
1/2 cup roughly chopped fresh parsley
2 Tbsp fresh lemon juice
1 Tbsp red wine vinegar
1 clove garlic, minced
salt and pepper to taste
1 tsp cumin seeds
1 tsp sugar
1/4 tsp Hungarian paprika
1/4 cup olive oil
 
• Place the carrots, beets, onions and parsley in a salad bowl.
• Add the lemon juice, vinegar, garlic and salt and pepper to taste.
• Set it aside.
• In a small skillet, toast the cumin seeds on medium heat until fragrant, for about 3 minutes.
• Add the cumin, sugar and the paprika to the bowl.
• Drizzle with the olive oil and toss. Yields 6 cups

13.11.12

FROSTED SOFT SUGAR COOKIES


It is the shortening and the sour cream that makes these cookies so soft. Don’t use light sour cream, it will add extra moisture without substance and the cookies will not work out.
 
FROSTED SOFT SUGAR COOKIES
3-1/4 cups flour
1/4 tsp baking soda
1/2 tsp salt
1/2 cup shortening
1 cup sugar
1 egg
1-1/2 tsp pure vanilla extract
3/4 cup 14% sour cream
1 batch of vanilla buttercream cookie frosting
candy sprinkles
 
• Preheat the oven to 375F.
• Line a large baking sheet with parchment paper.
• Whisk together flour, baking soda, and salt in medium bowl. Set aside.
• Combine shortening, sugar, egg, and vanilla in a large bowl, beat for 2 minutes.
• Add the sour cream and half of the dry ingredients. Stir with a wooden spoon.
• Stir in remaining dry ingredients.
• With oiled hands roll dough into 1-inch balls and place on the prepared baking sheet about 3 inches apart.
• Dip the bottom of a glass into flour; press dough down to about 1/2-inch thickness.
• Bake from 10 to 11 minutes.
• Check the cookies, when the bottoms are beginning to have a light blond color, remove them from the oven.
• Remove from oven and allow cookies to solidify on the baking sheet.
• Then transfer cookies to cooling racks with a metal spatula.
• Cool completely.
• Meanwhile prepare the vanilla buttercream cookie frosting.
• Spread on the cookies, and drop candy sprinkles on the top.

VANILLA BUTTERCREAM COOKIE FROSTING


This is an easy recipe and the one and only requirement is long beating. It should be smooth and taste only vanilla. If you can taste the icing sugar, the icing needs to be beaten longer. An electric beater, preferably a standing one, is a necessity. I would not attempt to beat this frosting by hand; the flavour would not develop properly.
 
6 Tbsp butter, room temperature but not melted
3 cups sifted icing sugar
3 Tbsp milk
1 tsp or more pure vanilla extract
 
• Beat the butter in a large bowl until very creamy.
• Gradually add the icing sugar, milk and 1 teaspoon of vanilla; beat on low until blended.
• Add more vanilla extract if the frosting is too thick.
• Beat on medium until frosting is light and fluffy.
• Taste it; if you can detect icing sugar, increase the speed to maximum and beat it until the vanilla flavour fully develops.

12.11.12

WHITE CHOCOLATE DIPPED MOLASSES COOKIES


Photo by Olivia

Very delicious, but I may not make these for awhile. I made a batch of molasses cookies a while back and they didn’t turn out the way I thought they should have, but I posted them anyway. Then Eva made it and hers were perfect. I had some suggestions and I made it again and still my cookies were not what they should have been. In the meantime Jim said they were yucky and too spicy, also I didn’t want them caved in or flat. And yes, I agreed the baking soda was too much, I could taste it. I made several half batches, I divided one egg, I whisked it, I measured it out in grams, and I divided again EXACTLY. This has to be the last half batch I thought yesterday; it was my fourth try after all. It’s a pretty big statement from a perfectionist, but I almost had enough of these cookies. I still don’t know the reason for my molasses cookie woes. It could have been the fact that I sifted the flour before measuring with the half cup ‘scoop and sweep’ method. In other words, there may not have been enough flour in my previous cookies. Perhaps I beat too much air into the dough. Maybe I didn’t chill it long enough. Maybe I lost that magic touch. As I kept playing with the recipe and feeding it to the pail under the sink, a slightly different recipe evolved. I ended up using un-sifted cake and pastry flour and added an additional 2 tablespoons of all purpose. I reduced the salt and the baking soda and replaced the spices with the milder pumpkin pie spice. It made a soft yet stable dough that rolls without flour or chilling. Finally, finally all the effort got paid off. These are nicely rounded and soft and chewy and crinkled and mildly spiced. Taking Elisabeth’s cue we dipped them into white chocolate. also I had precious help yesterday… and in the end that may have made all the difference.
 
WHITE CHOCOLATE DIPPED MOLASSES COOKIES
2 cups cake and pastry flour, unsifted
2 Tbsp all purpose flour
2 tsp baking soda
1-1/2 tsp pumpkin pie spice*
1/2 tsp salt
3/4 cup shortening
1 cup sugar
1/4 cup molasses
1 large egg
1 pkg. white Baker’s chocolate [6 squares] or you can use white dipping chocolate: it is cheaper and easier to handle, but not as richly white chocolaty as good quality white baking chocolate.
 
• Preheat the oven to 350F.
• Line a baking sheet with parchment paper.
• In a medium bowl, combine the flours, baking soda, pumpkin pie spice and salt; set it aside.
• In a separate bowl beat the shortening and sugar until fluffy.
• Beat in the molasses and the egg and beat it on low speed just until just combined.
• Gradually add the flour mixture beating the batter all the while.
• Form the dough into 36 balls.
• Arrange the balls leaving at least 2 inches apart on the prepared baking sheet.
• Ever so lightly press down on each ball with your three middle fingers.
• Bake for 8 minutes in the preheated oven.
• The cookies will be still soft when you take them out of the oven.
• Let them solidify on the baking sheet and then transfer to a wire rack to cool.
• Place clean parchment paper or wax paper on top of the counter. You will place the chocolate dipped cookies on these. The white chocolate will solidify at room temperature and will not stick to the parchment or wax paper.
• Next bring water to boil in the bottom pot of a double boiler [or in a small pot with a small stainless steal bowl placed on top]. If using a bowl, make sure the bottom of the bowl does not touch the boiling water.
• Add half of the chopped white chocolates to the bowl.
• Stirring with a metal spoon, melt the white chocolate almost completely.
• Promptly remove the top pot or the bowl from the heat and place it on a trivet.
• Add the remaining chopped white chocolate to the bowl, stirring until all the chocolate melts in the residual heat.
• Dip half of the cookies into the hot melted chocolate and place them on the prepared parchment or wax papers to solidify.
Yields 36 cookies
 
*If you can’t get pumpkin pie spice replace with a mix of 1/2 tsp cinnamon and 1/4 tsp [each] of ginger, nutmeg, allspice and cloves.
Photo by Olivia

9.11.12

SPICY SLAW

How Asian this slaw is debatable, probably not very Asian without the peanut dressing. Adapted from The Gardener’s Cottage Spicy Asian Slaw, at least it’s still spicy thanks to the dressing I made for it with the red pepper flakes. The recipe makes a large bowl of slaw, more than enough for 6-8 people. This went really well with the Egg Bread I made for lunch today.
 
SPICY SLAW
2 cups thinly sliced red cabbage
2 cups thinly sliced green cabbage
2 cups julienned carrots
2 Tbsp chopped fresh parsley
1/2 cup raw unsalted peanuts
1/2 cup dried cranberries
 
• Wash all the vegetables and peel the carrot.
• Dry them with paper towel.
• Slice the red and green cabbage as thinly as possible, discarding the core and thick sections.
• Julienne the carrots and chop the parsley.
• Place all ingredients in a large salad bowl and sprinkle with spicy salad dressing.
• Toss and serve.

SPICY SALAD DRESSING

Well it is… spicy for me. I was making an Asian inspired Spicy Slaw and then I saw the peanut butter dressing. As much as the slaw appealed to me, the dressing, which basically drives the flavours home, did not. So I took a bowl and began to concoct my version of hot [actually pretty mild] salad dressing for the slaw. It really surprised me what I put into the bowl, it is clear now that I have a predominantly European palate, certainly not an Asian one. I am interested to see how the two will come together. This recipe makes a pretty small amount of dressing, but I found it was just the right amount to flavour the large bowl of slaw I was making.

SPICY SALAD DRESSING
1 Tbsp extra virgin olive oil
2 tsp white vine vinegar
1 tsp apple cider vinegar
1 tsp sugar
1 pinch Dijon mustard
3 Tbsp water
1 pinch onion salt
1 tsp Herbs de Provencale [Epicure]
1/2 tsp thyme
1/2 tsp marjoram
1 pinch of red pepper flakes
 
• Measure the ingredients into a small bowl.
• Whisk to combine and set aside for a couple hours so the flavours can mingle.
• Whisk together just before pouring over the salad and serve promptly.

8.11.12

ROASTED TURKEY WINGS


If for the sake of tradition, and who’s anyway, you insist on roasting the turkey whole, you owe it yourself to roast one turkey leg and one wing just once to see what an enormous difference roasting a deconstructed turkey would be. I refuse to roast a turkey the Norman Rockwell way. [Scroll down for the image] These turkey wings were lightly brined in salt and then roasted in a deep ovenproof pot in the oven. They turned out crispy, tender, succulent and absolutely delicious. Not at all how turkey wings end up when the bird is stuffed and roasted whole.

ROASTED TURKEY WINGS
whole turkey wings
sprinkling of salt
deep ovenproof pot
drizzle of extra virgin olive oil
aluminum foil

Please Note: It is important to roast the wings in a deep pot, as the wings crisp up; they tend to splatter.
 
• Place the wings on a platter, lightly sprinkle with salt and set aside for a couple of hours to brine.
• Preheat the oven to 350F.
• Lightly drizzle the bottom of a deep ovenproof pot with olive oil.
• Place the wings in the pot and seal down the pot securely with aluminum foil.
• Place in the preheated oven and roast until wings are very tender. I roasted 2 wings and it took me 2-1/2 hours at 350F. It could take longer if you roast more than two wings.
• Remove the foil and discard. With a large fork, turn the wings over to coat them with the juices.
• Roast the wings for a little while longer, turning them over once so they nicely crisp up on both sides. This took me 80 minutes, but it could take less or more time depending on the size and on the number of wings roasting. Count on 1 large wing for each person.

Norman Rockwell, Freedom from Want

HUNGARIAN CABBAGE SALAD – NYERS KÁPOSZTASALÁTA

This is the original Hungarian cabbage salad, the simple, elemental cabbage salad our grandmothers used to make. The only variant I have seen growing up was shredding or thinly slicing the cabbage. Old recipes mention adding caraway seeds, but we never had it like that, in general kids don’t care for visible caraway seeds. Salt, sugar and vinegar is all you need to make this. “Make a pleasant vinegar-brine with a little sugar” was all that the recipe ever said, and how much of it was left to the good cook. Except that good cooks make a lot of bad dishes during their lifetime. You really have to be a chemist or at least understand how stuff works and the only way you ever get there with unscientific means is with trial and error. Trial and error of course produces some pretty unpalatable stuff in the kitchen. And the mistakes are much more noticeable in a pared down, simple dish such as this one. Follow this and you will get a pleasant vinegary pucker free cabbage salad.

If I serve it right after pouring the brine on the cabbage, I taste it and sometimes sprinkle an additional teaspoon of vinegar over the salad. But if I make a lot of it or serve it several hours later, I don’t add extra vinegar, because it does get a little sourer in a few hours. The sugar used here is minimal; too much sugar would just kill the balance of flavours. Use ordinary white vinegar for this. The vinegar in Hungary is 20%, in North America it is 5 or 7%. I prefer the 5% vinegar and that is what I use in all my recipes. If the vinegar you use is stronger than 5%, you will have to adjust the recipe and use less vinegar according to the percentage. Don’t increase the salt; the amount listed is all you need to make the cabbage sweat and it is just the right amount to salt the salad. Anymore and you will have to rinse some of the salt off and this will ruin the texture of the cabbage and make it soggy. Wash the chunk of cabbage you intend to slice or shred, but then dry it off completely with a clean kitchen towel. The cabbage has to be dry before you slice it. Sprinkling a little olive oil on it is a possibility but only at the table.

HUNGARIAN CABBAGE SALAD
5 cups very thinly sliced green cabbage
1/4 tsp salt
1 bay leaf
Brine:
2/3 cup cold water
1 Tbsp sugar [not heaping Tbsp]
Tbsp 5% white vinegar

• Wash a section of a green cabbage that will yield 5 cups sliced, omitting the core and thick sections.
• Dry it with a kitchen towel thoroughly.
• With a very sharp knife, slice the cabbage section as thinly as possible.
• Place 5 cups of sliced cabbage in a salad bowl.
• Sprinkle with 1/4 tsp of salt and toss to combine.
• Slip 1 bay leaf under the salted cabbage.
• Set it aside for 1 to 2 hours. The salt will sweat the cabbage.
• Meanwhile combine the brine ingredients.
• When the cabbage is ready, sprinkle it with the brine and toss to combine.
• May be served immediately or covered and refrigerated to be used later.

6.11.12

HOMEMADE PRUNE JUICE


Let me just start with this, I don’t trust the food industry. Most juices are made from concentrate, unless of course the label says 100% fruit juice. But I have yet to find 100% prune juice. The prune juice Jim drinks has been giving me the willies so I decided to lure him over to the homemade stuff. It worked, and now all I have to do is keep up with the demand and come next fall dry every blessed prune that grows on the tree. I seriously doubt I will have enough prunes for this year. Commercially dried prunes are soaked in sulphites so it’s debatable if using them would be an improvement over the store bought juice. So let’s just hope I have enough bottles with dried prunes on the shelves downstairs for part of the year.

The process is easy and the ingredient list is short. All you need is dried prunes, boiled water and a sweetening of choice. Oh and a blender. I sweetened mine with La Bona Vita English Toffee syrup; remember I wanted to lure him over to homemade. The following recipe makes exactly 4 cups or 1 litre of prune juice.
 
HOMEMADE PRUNE JUICE
1 cup pitted dried, prunes
sterilized water
3 Tbsp sweetener of choice

• Boil 5 cups of water for 5 minutes.
• Put 1 cup of dry prunes into a heat proof glass jar.
• Add enough of the boiled water to cover prunes.
• Cover the prunes and set aside the remaining water for use later.
• Let the prunes soak for 24 hours.
• Pour the prunes and the soaking liquid into a blender.
• Puree until smooth.
• Place a fine sieve over a 4 cup/1 litre measuring cup.
• Force the prune-puree though the sieve. Discard solids.
• Top up the prune-puree to 4 cups from the reserved water and stir.
• Sweeten with the sweetener of choice.
• Pour the prune juice into a sterilized jar with a well fitting lid and refrigerate.
• Homemade prune juice keeps in the refrigerator for 1 week.

5.11.12

ITALIAN LEMON COOKIES


I always favored crispy cookies but when I saw these I knew I had to give them a try. I thought the icing was a bit scant so I doubled it. Once the icing solidifies the cookies can be packed between layers of waxed paper.  The lemon flavour is ever so subtle... The recipe makes 40 good sized cookies. 

ITALIAN LEMON COOKIES
1 cup shortening
1-1/4 cups sugar
4 eggs
1/3 cup plus 2 Tbsp sour cream
2 1/4 tsp lemon extract
1 tsp vanilla extract
grated zest of 1 lemon
4-1/2 cups all-purpose flour
4-1/2 tsp baking powder
1 batch of cookie icing
1 Tbsp of fresh lemon juice

• Preheat the oven to 350F.
• Beat together shortening and sugar in medium bowl until light.
• Add the eggs, sour cream, lemon extract, vanilla extract, and lemon zest; beat until well combined, scraping down the sides of the bowl.
• Combine the flour and baking powder; add to the shortening mixture gradually and beat until fully combined. Do not overbeat.
• Shape the dough into 40 balls, using about 1 level Tbsp for each.
• Arrange about 1 inch apart on a parchment paper-lined cookie sheets.
• Bake for 10 to 12 minutes, until the bottom is lightly browned.
• Do not over bake, cookies will be soft.
• Remove from the oven and let the cookies solidify in the pan.
• Transfer to a wire rack and let cookies cool.
• Meanwhile make the cookie icing, but omit the vanilla extract and flavour it with 1 Tbsp of fresh lemon juice.
• Dip the tops of cookies into the lemon flavoured cookie icing.
• Let the icing set until dry to the touch. But go ahead, have one right of way.
• Yields 4 dozen cookies

COOKIE ICING


Use this icing as is or as a thin, semi transparent glaze over cookies and other baked goods. For a thin glaze, add more warm milk, [drip by drip] keeping in mind that for glazing you will probably need half of the suggested amount. Configure it into the liquids if you add liquid food colouring.
 
COOKIE ICING
2 cups icing sugar, sifted
2 Tbsp warm milk
1/2 Tbsp pure vanilla extract
1/2 Tbsp fresh lemon juice
 
• Combine sifted icing sugar and warm milk.
• Whip until smooth and slightly thick.
• Add the vanilla extract and the lemon juice.
• Beat to combine.
 

Privacy & Cookies

This site uses cookies. By continuing to use this website, you agree to their use. To find out more, including how to control cookies, see here: Cookie Policy

Translate

me

My photo
It began with posting a few recipes on line for the family. "zsuzsa is in the kitchen" has more than 1000 Hungarian and International recipes. What started out as a private project turned into a well visited blog. The number of visitors long passed the two million mark. I organized the recipes into an on-line cookbook. On top of the page click on "ZSUZSA'S COOKBOOK". From there click on any of the chapters to access the recipes. For the archive just scroll to the bottom of the page. I am not profiting from my blog, so visitors are not harassed with advertising or flashy gadgets. The recipes are not broken up with photos at every step. Where needed the photos are placed following the recipe. Feel free to cut and paste my recipes for your own use. Publication is permitted as long as it is in your own words and with your own photographs. However, I would ask you for an acknowledgement and link-back to my blog. Happy cooking!