28.8.11

MUSHROOM STEW - GOMBAPÖRKÖLT

My dad had a second cousin from his father’s side somewhere near Ecser. [Ecser is just outside of Budapest.] “Ecseri Ernő”, as we called him, was the teacher of a tiny village near the village of Ecser. He was also a bachelor, but as it turned out Ecseri Ernő was also a resourceful cook. It was a Sunday and the little panzio where he ate during the week was closed. Then dad and I show up. [I may have been ten at the most, in those days few people had a telephone. We had one, we lived in Pest, but I am sure Ecseri Ernő didn’t have a telephone.] Keep in mind that Hungarians don’t go visiting without sitting down to a meal together. So Ecseri Ernő grabbed a wicker basket and we sat out for the woods to pick mushrooms for ebéd. [the midday main meal] Only Ecseri Ernő picked, he new his mushrooms, because I lived to tell the tale. We went back to his place with a huge basket of wildly colourful and differently shaped mushrooms. Ecseri Ernő proceeded to clean them and then made us the best gombapörkölt I ever tasted. I think the more types of mushrooms can go into the pot the better. That was the first time I had gombapörkölt and I thought it was phenomenal.

Some people call it gomba goulash, which is misleading because goulash is a soup and gombapörkölt is a stew. Gombapörkölt is also fast, low cal and delicious. The one thing to keep in mind is not to overcook the mushrooms and to add only little water to the dish, because the mushrooms will release a fair amount of liquid on their own. Basically you cook a small lecsó [tomato-pepper ragout] before adding the mushrooms. Cook them for a short time only and the dish is ready. I don’t add garlic to this dish, garlic would overpower the mushrooms. Serve gombapörkölt with rice or nokedli and with a nice dollop of sour cream.

MUSHROOM STEW
2 Tbsp olive oil
1 onion, diced
2 tomatoes, chopped
1 yellow bell pepper, chopped
1 Tbsp Hungarian paprika
1 lb large mushrooms,
1/4 cup water or stock
salt and pepper to taste

• Heat the oil in a large skillet over medium high heat.
• Add the onions and slowly cook until soft.
• Add the tomatoes and the bell pepper.
• Stir in the Hungarian paprika.
• Slowly cook until peppers are soft and the tomatoes have nicely reduced.
• Meanwhile clean the mushrooms and chop them into 6 or 9 pieces depending on their size.
• Add the mushrooms and about a 1/4 cup of water or stock.
• Cover the pot and slowly cook for 5 minutes.
• If you end up with too much liquid, remove the mushrooms and set them aside.
• Bring the remaining ragout to the boil and continue cooking until ragout reduces sufficiently.
• Return the mushrooms and heat through.
• Adjust seasoning and serve with sour cream.


27.8.11

CHOCOLATE GANACHE

Ganache is a French term referring to the smooth, velvety mixture of chocolate and cream. The proportions can vary, but the basic form is equal weights of chocolate and cream. The quality of  ganache of course depends on the quality of chocolate used. It is important to use good quality, pure chocolate. Do not use chocolate that has vegetable fat listed as an ingredient. If the cake is to be refrigerated, chill the cake first. This will ensure that the ganache will not lose its shine when the cake is placed in the refrigerator. To cover a cake, crumb coat it with a thin layer of ganache and then chill until the crumb coat has set. Then place the cake on a wire rack over a catch tray and quickly pour the ganache over it. Ganache can be made in the microwave, but with half a pound of good quality chocolate I prefer to control the melting process so I use a saucepan. Leftover ganache can be strained and used for making truffles. This recipe makes about 1 cup of ganache, enough to frost a 9 inch cake.

CHOCOLATE GANACHE
1 cup heavy whipping cream
8 squares [8oz] of semi-sweet chocolate

• Bring 1 cup of heavy whipping cream to boil.
• Lower heat and stir in 8 squares or 8 oz of semisweet chocolate broken into bits.
• Stir briskly until melted and smooth and then remove from heat.
• The ganache will thicken as it cools.
• Use the ganache right of way.

LEMON CURD

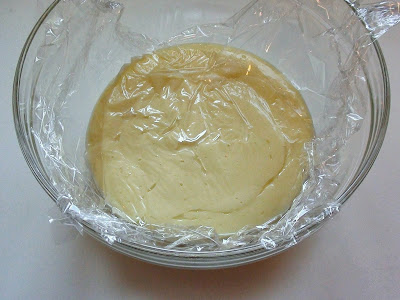
This is a wonderfully stable lemon curd. I took the pictures right after I strained it into the bowl, and already it was thick and spreadable. Cover it with plastic wrap placing the wrap right on the curd. When it cools you can fill a cake with it, make luscious lemon tarts or use it as a spread. Every way it will be delicious.

Always use fresh-squeezed lemon juice. Cold lemons are easier to grate. Remove the zest only; avoid the white pith. Don’t make the zest ahead of time. Zest loses moisture if it sits too long. Juice the lemons after the zest has been removed. Rolling the whole lemon on the counter and lightly pressing on it will produce more juice.

LEMON CURD
zest of 1-1/2 lemons
3/4 cup sugar
2 Tbsp unsalted butter, room temperature
3 eggs
1 egg yolk
1/4 cup fresh lemon juice

• Fill a medium sized pot halfway with water.
• Place the pot on the stove and bring the water to boiling.
• Meanwhile remove the zest from the lemons, but avoid the white pith.
• Cream the butter and the sugar and add the lemon zest.
• Add the eggs, one at a time, to the butter.
• Pour in the lemon juice and mix to combine.
• Place a stainless steal bowl over the boiling water.
• Pour the mixture into the stainless steel bowl.
• Cook over low heat for 10 minutes, whisking constantly.
• Bring the mixture to just below simmer at 170F.
• Remove from heat, strain through a fine sieve.
• Cover with plastic wrap immediately.
• Let curd cool.

PAN POACHED SALMON

A blogger friend, from Switzerland has been telling me to soak fish in Japanese cooking sake for a while now. Yesterday I finally ran over to the Asian store. I found out they carry no Japanese sake,  but the lady assured me that Chinese cooking wine is exactly the same as Japanese sake. So I got a bottle of this Chinese equivalent. I went home and soaked two sockeye strips in Chinese cooking wine. Then I ran down to the garden for shallots, got some parsley and a bit of dill. I made a bed of green in a non stick fry pan, laid the salmon strips on top, added some water, covered the pan and quickly poached the most delicious salmon strips ever! For the first time last night I made salmon that didn’t smell up the entire house. The texture was lovely and the taste was delicious. For a fish hater like me, preparing fish with Chinese cooking wine opened up a whole new world of possibilities. The lady said to just pour in a tablespoon of this stuff into every fishy stir-fry and it will take the fishiness away. I just might begin to look forward to Fridays.

PAN POACHED SALMON
2 salmon strips or fillets
1/2 cup Chinese cooking wine or Japanese sake
1 Tbsp olive oil
2 shallots or green onions including stalks
sprigs of fresh dill and fresh parsley
3/4 cup of water

• Soak the salmon in for 1/2 hour in Chinese cooking wine.
• Peel and chop the shallots, wash the fresh dill and parsley and chop into 2-3 inch lengths.
• To a non stick fry pan add 1 Tbsp olive oil.
• Add the shallots, dill and parsley and turn on the heat.
• Lay the marinated salmon with skin side down over the greens.
• Season the fish with salt and pepper.
• Pour the water beside the fish, cover and poach for 4-5 minutes.
• Start checking for doneness early, the fish will be ready rather quickly, and there is a fine line between just done and overdone. I still can’t believe how good this turned out to be.

24.8.11

FINE SOUP NOODLES – CÉRNAMETÉLT

This was everybody’s favourite on Sundays. Large mounds of fine soup noodles in the middle of the soup plate. You can make this ahead of time, cook it, drain it and in the following 2 to 3 days warm up what you need with a bit of boiling water or very hot soup stock, drain and serve it. Cookbooks will tell you this can be dried and stored. For sure, you can dry it and store it, but at the expense of quality. I think if you make the effort, you might as well eat this fresh. Remember, never store fine soup noodles IN the soup. Always keep fine noodles and soup separate until the meal. Sometimes the meat, vegetables and the noodles are placed on large serving platter and the rich golden soup is served up on its own in the soup tureen. These noodles can be made from all purpose white flour, but you will have better result with bread flour. Of course Hungarian strudel flour is the best. Make this once and you will never want to eat commercial soup noodles again.

FINE SOUP NOODLES
1 cup bread flour
sprinkling of salt
1 egg
2 Tbsp water
all purpose flour for rolling

• Combine flour and salt.
• Add the egg and the water and knead until dough forms.
• Wrap the dough in plastic and let it rest for 30 minutes.
• Come back to it and you will have a much easier time kneading the dough once the gluten has developed a little. I call this my wrist saving step.
• Then kneed the dough until very smooth and elastic.
• Wrap the dough in plastic again and let it rest for 30 more minutes. This will relax the dough and make it even more pliable.
• After the second rest, roll out the dough, PAPER THIN, into a very large circle.
• There is no need to flour the board; just keep rotating it 90 degrees and roll.
• Let this dry on a clean tablecloth for 20 minutes. This is a crucial step, do not omit. The dough will be quite leathery by then.
• Now lightly sprinkle the top of the dough with flour and spread it all over with your hands.
• Roll the dough up in jellyroll fashion and with a chef’s knife cut into very fine strands; as fine as you are able.
• Cut a few strands and then separate stands and place on a clean tablecloth in a single layer. You may have to mix a tiny bit of flour into the strands so as not to stick, but go easy, because the added flour can dry the noodles quite rapidly, and you don’t want them to break up before cooking.
• Cook the noodles in salted water until tender.
• Drain.
• Portion out the hot noodles on warm soup plates and ladle the hot soup over the top. Jó étvágyat!

  Never got it as fine as my mother

23.8.11

HUNGARIAN FILLED PASTA – DERELYE

Hungarian derelye has a close resemblance to Italian ravioli in its smooth, thin dough and method of preparation. Derelye is most often filled with Hungarian plum lekvár and less often with sweetened túró, and walnut or poppy seed fillings. Plum lekvár  is so thick, the spoon can stand up in it, which makes it the perfect filling for derelye. I prefer derelye with sweetened túró or with a filling made from finely ground walnuts. As and alternative to túró I included a cottage cheese filling with the recipe. Derelye is sometimes rolled into buttery, toasted breadcrumbs, but I prefer mine lightly buttered with only a tiny amount of toasted breadcrumbs and icing sugar sprinkled on top. This recipe will yield 3-4 servings. If you don’t intend to use up all the dough, omit the salt, because salt will turn the dough brown. Otherwise wrap the unused portion in plastic and refrigerate it for the following day. I used a pasta roller, but the dough can be rolled out just as easily by hand. Watch the lady on the video preparing traditional plum derelye the old fashioned way.

HUNGARIAN FILLED PASTA
Pasta:
3 cups flour
4 eggs
pinch of salt
1 egg white
2+1 Tbsp butter
1/2 cup fine breadcrumbs
icing sugar for sprinkling
Cottage Cheese Filling:
This cottage cheese filling is a nice alternative if túró is not available.
2 cups dry cottage cheese
4 Tbsp cream cheese
4 Tbsp 14% sour cream
5 Tbsp sugar
1/2 tsp grated lemon zest
1 egg yolk
1-2 Tbsp semolina, only if needed

• Combine 3 cups flour, 4 eggs and salt and kneed it smooth and velvety into fairly firm dough.
• Shape into a ball, wrap in plastic and let it rest for 30 minutes. This will make the dough soft and easy to roll out.
• In the meantime prepare the cottage cheese filling.
• Crush the dry curd cottage cheese in the food processor.
• Add the rest of the ingredients except the semolina.
• Press pulse a few times.
• Transfer the mixture to a mixing bowl.
• If needed, stir in 1-2 Tbsp of semolina.
• Set aside.
• Roll the dough out very thinly, and cover the other half with a clean kitchen towel.
• Dot one half with a teaspoon of filling 1-1/2 inches apart at regular intervals.
• Whisk together 1 teaspoon of water with the egg white. Reserve the yolk for the filling.
• Brush the dough between the heaps of filling with the egg white mixture.
• Remove the cloth and fold the other half of the dough over the filling.
• Press down firmly in between the heaps of filling.
• Cut into separate squares, each containing one heap of filling, using a pasta cutter.
• Cook in boiling water in a covered saucepan for 8-10 minutes.
• Meanwhile lightly toast 1/2 cup fine breadcrumbs in 2 Tbsp of butter until golden.
• Stir it often, breadcrumbs burn easily.
• When the pasta squares are cooked transfer them to a sieve to drain.
• Place in a serving bowl and pour 1 Tbsp melted butter on the top.
• Serve hot sprinkled with a bit of breadcrumb mixture and dust it with icing sugar.


22.8.11

BREADED EGGPLANTS- RÁNTOTT PADLIZSÁN

Eggplant or aubergine in English, back home we called it padlizsán, but it is also known as török paradicsom. As kids we were all fussy eaters, my grandmother and my mom were always discouraged from adding new or “strange” dishes to their repertoires. We ate eggplants breaded and fried end of story. To this day I like it that way the best. This can be a great snack food, a side dish or a topping over a főzelék [vegetable stew]. If you have a garden, don’t let the eggplants grow too large. At the supermarket always pick the lightest of eggplants. These have less seeds inside thus making them less bitter.

BREADED EGGPLANTS
2 medium eggplants
salt
1/4 cup flour
1 well-beaten eggs
1/2 cup fine breadcrumbs
oil for frying

• Cut off the ends and peel two medium egg plants.
• Slice them 1/2 inch thick.
• Sprinkle with salt, and toss. Set aside for 30 minutes. This will draw out the bitter juices.
• Meanwhile place the flour, the egg, and the breadcrumbs on 3 separate plates.
• Beat the egg with a fork until slightly frothy.
• Squeeze the eggplant slices, then rinse and pat dry with paper towels.
• One by one dip each slice into the flour; coat well.
• Next dip them in the beaten egg; coat well.
• Finally dip them in the breadcrumbs, coating well.
• In a non stick fry pan place 1/2 inch of oil.
• Heat the oil to medium hot and one by one drop in the eggplant slices. The oil is hot enough when it bubbles around the eggplants. Do not crowd the pan. Flip only once.
• Place a paper towel lined plate and a thong [or a large slotted spoon] nearby, the eggplants fry up rapidly. There is no time to pick them out with a fork.
• When each slice is golden and crispy, quickly remove with the thong and place on the paper towel.
• Serve breaded eggplants immediately.

21.8.11

PANCO CRUSTED WHITE FISH FILLETS

Who would have thought I would come up with a recipe all by my sweet self for white fish? Thank you, thank you, there is no need for the applause! I dipped only one side into the egg wash and the Panco Flakes, because there really isn’t time to get both sides crunchy, not without overcooking the fish that is. The bottom will be swimming in butter anyway and that too will enhance the overall flavour and the complexity of textures. It’s buttery on the bottom and delightfully crunchy on the top with flakey fish in the middle. I asked my husband what he thought of it. He said it didn’t taste like fish. Haha, that was the whole point!

PANCO CRUSTED WHITE FISH FILLETS
3-4 white fish filets
2 Tbsp cold butter, chopped into small chunks
salt and pepper to taste
1 egg
1/4 cup of Panco Flakes [Japanese style bread crumbs]
cooking spray

• Preheat the oven to 375F.
• Wash the fish fillets and pat dry with paper towels.
• Salt and pepper to taste.
• Line a rimmed metal baking pan with parchment paper.
• Scatter the butter over the parchment.
• In a small bowl whisk one egg.
• Place the whisked egg on a plate.
• Place the Panco Flakes on another plate.
• One by one slide the fish filets over the egg wash. Try not to get egg wash on the other side.
• Place the fillet into the Panco Flakes with the egg wash side down.
• Place the fillets on the butter with the bare side down and with the Panco Flakes on the top.
• Lightly spray the top with cooking spray. This will help to crisp up the Panco Flakes.
• Bake for 8 minutes, then remove and serve.

19.8.11

BREAD IN COAT – BUNDÁSKENYÉR

Well in a fashion. Bundáskenyér is the savoury, Hungarian version of french toast. It was never a breakfast food while I was growing up, we always had it on its own for vacsora [evening snack] or as a topping over some vegetable dish for the main meal we had at noon. You just have to wonder sometimes who writes those “Hungarian” recipes in English…

We used to deep fry bundáskenyér in about and inch of vegetable oil. It puffed up from the added milk and got rather crispy from the frying and the taste was, well you need bread baked in a wood-fired hearth and leavened with natural starter to know what it might have tasted like. Bundáskenyér was so good you needn’t put anything on it; in fact it used to jazz up the most mundane of vegetable stews. I can’t get the same bread so I seldom fry it; I tend to bake my version of bundáskenyér in the oven on parchment paper. I do not add milk to the eggs though, because the type of sourdough we have here would get soggy with the added milk, so I just forgo the milk and dip the bread in eggs; one egg per slice. Baked bundáskenyér makes a great snack if spread with sour cream and topped with grated cheese and it’s also nice with hummus or tzatziki.

BREAD IN COAT
3 eggs
3 slices of white sourdough bread
parchment paper
cooking spray

• Preheat the oven to 375F.
• Line the baking sheet with parchment paper.
• Whisk the eggs together.
• One by one dip the sourdough slices into the egg wash coating well.
• Spray the parchment paper with cooking spray.
• Arrange the bread slices on the paper not touching.
• Bake until one side is golden, and then turn over.
• When both sides are nicely browned remove from the oven and serve.   

18.8.11

CABBAGE IN TOMATOES - PARADICSOMOS KÁPOSZTA

This dish can be delicious. It can be, but not always is. So don’t overcook the cabbage and most importantly watch the seasoning. How much salt and sugar to add is not easy to determine, it all depends on the acidity and sodium content of the tomato sauce. I prefer a milder homemade tomato sauce, hence I only add 1-1/2 Tbsp sugar to the pot, but say a commercial marinara sauce could require 4 Tbsp of sugar or more. My advice is to add the salt and the sugar very gradually. You can always add more to it, but you cannot remove it once it's added. My grandma used to make it pretty sweet to encourage us kids to eat it, but in reality paradicsomos káposzta should not be a sweet dish; just a hint of sweetness is required to balance out the acidity of the tomato sauce. Grandma put bundás zsemle on the top for us; it’s a savoury type of French-toast fried in oil. Nowadays I prefer mine with a pair of European wieners.

CABBAGE IN TOMATOES
4 cups of thinly sliced white cabbage
4 Tbsp olive oil
1/2 onion, diced
salt to taste
1/2 tsp caraway seeds
1/8 cup flour
1 cup good chicken stock
3/4 cup tomato sauce
sugar to taste

• Slice the white cabbage and set aside.
• Place 4 Tbsp olive oil in the pot and add the diced onions.
• Sauté the onions until transparent.
• Add the sliced cabbage and salt to taste.
• Add the caraway seeds.
• Slowly sauté the cabbage, stirring often to al dante.
• Stir in the flour and quickly add the chicken stock.
• Stir to combine.
• Add the tomato sauce, stir and bring to slow simmer.
• Bit by bit add sugar to taste.
• Cover and let dish rest for half an hour.
• Reheat and serve with European wieners.
  

17.8.11

CABBAGE ROLLS - TÖLTÖTT KÁPOSZTA

Great aunt Lizi’s impact on my life pretty much ran the spectrum. She was responsible for our meeting with Jim back in 1967 and then years later she thought me how to make cabbage rolls and beigli. The rest of her influence was less beneficial to my well being and may God forgive her for the misery she caused the family on both sides of the world. I have to admit she was an excellent cook and once I watched her make cabbage rolls. Today [thirty odd years later] I finally measured it out and wrote it down. 

Authentic Hungarian cabbage rolls are made with Hungarian paprika and sauerkraut. Sometimes I wish fusion recipes would not make claims of authenticity. Because cooking the rolls in tomato sauce or in tomato juice, adding much too much rice or using ground beef in any proportion is not the Hungarian way. 

You may cook Hungarian cabbage rolls in a large pot and watch them devotedly or put them in the oven and let them develop on their own. I use a deep roasting pan. Some type of smoked pork piece is always beneficial. This time I bought a nice strip of smoked ribs. When all else fails, a chopped up ham steak will work too. Hungarian recipes generally call for entire heads of sour cabbage, in which case the cabbage has to be rinsed otherwise the dish will be unpleasantly sour. But if we combine fresh cabbage with wine sauerkraut, the cabbage rolls will always have the right amount of pungency. Add salt only to the filling because the sauerkraut and the smoked pork adds plenty of salt to the dish.

Assemble and cook the cabbage rolls on day one. Let them cool and keep them chilled overnight. The following day make the paprika roux, stir it into the dish and let it cook in the oven for a couple of hours longer. After that the cabbage rolls are ready for serving. Eat it with a thick slice of rustic bread and sour cream. No you may not butter the bread.

CABBAGE ROLLS
1 head of cabbage 
1/4 cup Basmati rice
3 Tbsp oil
1 onion diced
2-1/2 lb lean ground pork 
3 cloves of garlic, diced
1 lb chopped smoked ribs or diced ham
1/2 tsp marjoram
1/2 tsp caraway seeds
salt and ground pepper to taste
1-2 Tbsp Hungarian paprika
2 eggs
8 cups sauerkraut
2 peppers, chopped
3-4 fresh medium tomatoes, skin removed and chopped
4 Tbsp oil
4 Tbsp flour
3 Tbsp Hungarian paprika
1 tsp hot Hungarian paprika
14 % sour cream

• Put a large pot of water on the stove and bring it to boil.
• Remove the leaves from the cabbage until the leaves are too small for rolling up. The instruction for removing the leaves is found HERE.
• Add the cabbage leaves to the pot and bring to a simmer. 
• Set the remaining cabbage aside for use later.
• Meanwhile place the rice and 1 cup of water in a small pot and bring it to boil.
• Cook the rice until half done.
• Pour off the water and set the rice aside for use later.
• When the cabbage leaves are soft enough to roll, remove from the stock and set them aside to cool. 
• Do not discard the cabbage stock, you will need it later.  
• Next dice a large onion and place it in a non stick fry pan with 3 Tbsp oil.
• Gently sauté the onions until they are very soft.
• Place the ground pork in a large bowl.
• Add the half cooked rice.
• Add the soft onions and the diced garlic.
• Add the marjoram, caraway seeds, salt and pepper and 1 Tbsp Hungarian paprika.
• Add the 2 eggs.
• With clean hands combine the meat with the onions, spices and the eggs until filling is the same throughout.
• Next slice the remaining head of cabbage you set aside into strips and set them aside.
• Before rolling, cut away a little bit from the thick stems off the cooked leaves with the small knife for easier rolling. 
• Take a cabbage leaf and place a small handful of stuffing inside and wrap it up like a burrito.
• Place the cabbage roll on a tray temporarily.
• Repeat until all the stuffing is wrapped inside the cabbage leaves.
• Now you can begin the layering.
• Scatter 4 cups of sauerkraut in the pan.
• Add the fresh cabbage strips you made earlier and mix it into the sauerkraut.
• Place the smoked ribs or the diced ham on top of the sauerkraut.
• Arrange the cabbage rolls on the top.
• Add the pepper chunks and the tomatoes.
• Scatter another 4 cups of sauerkraut over everything.
• Add enough cabbage stock to cover the last layer of cabbage roll. Discard the rest.
• Place the pan in a 350F oven, cover with foil and cook for 4 hours.
• Remove from the oven and let it cool.
• With a slotted spoon transfer the cabbage rolls and the ribs into a smaller pot and cover.
• Pour the cabbage with the broth into a separate bowl and cover.
• Place everything in the fridge for the night.
• The following day make a roux in a nonstick skillet from 4 Tbsp of oil and 4 Tbsp of flour.
• Remove from the heat and stir in 3 Tbsp of sweet and 1 tsp of hot Hungarian paprika.
• Stir the paprika roux into the bowl with the cabbage.
• Taste and adjust the salt. 
• Transfer half of the thickened cabbage back into the pan the cabbage rolls were cooked in.
• Lay the ribs and the cabbage rolls on the top.
• Cover with the remaining cabbage and the remaining broth.
• Place in preheated 350F oven for 2 hours.
• Serve the cabbage rolls with sour cream and rustic white bread.

The half cooked rice

Filling ingredients

The filling is ready

Lay a bit of filling inside the cabbage leaf

Fold up the cabbage leaf around the filling like a burrito

Distribute the smoked ribs

Add the cabbage rolls

Top with fresh pepper chunks and tomatoes

Cover everyting with sauerkraut 

Make the roux

Add the layers again


Bake for 2 hours longer and cabbage rolls are ready

15.8.11

WAX BEAN SOUP - FRISS SÁRGABAB LEVES

Soup vegetables should be cooked tender; never crunchy. But simply dropped in the broth, vegetables become limp, lifeless and grey. The Hungarian way to cook soup vegetables is to sauté the vegetables in oil before the stock or the water is added. There is no paprika in this soup and yet the broth has a lovely orange color. That comes from the carrot slices, as you sauté the carrots they release carotene. All the vegetables seem to become more vibrant when cooked with this method. I added a bit of leftover ham to the soup at the end, but this is optional. [Sausage would overpower the delicate flavours.]

WAX BEAN SOUP
2 carrots
2 parsnips
1 cup green or wax beans
1/2 onion
2 cloves of garlic
1/2 pkg. flat leaf parsley
3 cups meat stock

• Slice the carrots, parsnip, kohlrabi, green beans, and whatever else fresh vegetables you happen to have on hand. Slice thinly.
• Dice the onion if needed and mince the garlic.
• Finely chop half a package of fresh wide leaf parsley.
• Heat 2-3 Tbsp olive oil in large pot over medium-high heat.
• Add the diced onion, the minced garlic and all the sliced vegetables to the pot.
• Finally add the chopped parsley and sprinkle with salt.
• Stir to coat the vegetables with the oil and sauté for five minutes or so.
• Add a little stock to prevent browning.
• When the vegetables are brightly coloured, pour in the stock.
• Adjust the salt and season with freshly ground pepper.
• Bring to boil, cover and slow cook until vegetables are tender.
• Remove from heat and let soup rest for 15 minutes before serving.

APRICOT UPSIDE DOWN CAKE

Upside down cake mania is upon us once again. It raises its heavy head in Kamloops about the time the apricots and peaches are ripening. Diehards will continue well into the plum season, not me, I never made an upside down plum cake. I’m talking about that heavy nonsense people call cake that has to be doused with whipped cream and then the next day gets tossed into the trash. This year, dear friends, I took it upon myself to rid the world of heavy upside down cakes and set out to develop a more palatable version. I felt the pressure to keep the flavour, but the texture definitely needed improvement and a lot of it. Jim enjoyed my several intermittent failures and was rather disappointed when the one before my last attempt was declared a failure. [You mean you won’t make THAT again?] But just as well, because number 5 turned out to be the keeper.

This recipe will work provided you follow the instructions faithfully. The texture is wonderfully soft yet stable; in fact it’s so pleasant, it can be eaten without the whipped cream. I baked mine in 7 inch spring form pans. It made a bit of a mess in my oven, so next time I will place a drip pan on the lower rack to catch whatever wants to leak out of the pans. A regular cake pan will work too, but then be sure to line the whole pan with parchment paper.

APRICOT UPSIDE DOWN CAKE
10-12 apricots
1 cup buttermilk
6 egg whites
2 tsp vanilla extract
2 1/4 cups cake flour
1 3/4 cups sugar
4 tsp baking powder
1 tsp salt
1/4 cup butter
1/2 cup vegetable shortening
2 cups sweet whipped cream [optional]

• Preheat oven to 350 F.
• Fully line two round cake pans with parchment paper.
• Spray the bottom and the sides generously with cooking spray.
• Wash the apricots, cut them in half and remove the stones.
• Lay the apricots with cut side up inside the two cake pans.
• In a small bowl whisk together the buttermilk, eggs whites and vanilla extract. Set aside.
• Whisk together the cake flour, sugar, baking powder and the salt.
• Rub the butter and the shortening into the flour mix until mixture resembles wet sand.
• Add half of the buttermilk mixture and beat at medium speed for 1-1/2 minutes.
• Add remaining buttermilk mixture and beat for an additional 30 seconds only.
• Divide the batter evenly between the cake pans and pour on top of the apricots.
• Gently smooth out the batter and bake for 50 minutes, or until toothpick inserted into the center comes out clean.
• Let the cake rest for 30 minutes before serving.
• Cover the cake pan with the cake plate and invert the cake onto the plate. The cake is now right side up.
• Oh what the hack, serve it with the whipped cream.
• This upside down cake will be as nice the following days as it was the day you made it.

14.8.11

HOMEMADE ICE TEA

Silicon dioxide is a sand like compound and works as an anti-caking agent. And that is what you are drinking in your brand name ice teas, along with a “good host” of other goodies no doubt. Homemade ice tea is not only better for you, the taste is vastly superior. Measure and make a note of everything you put into the tea, so you can make it again, and rate the flavour so you can remember what to do differently next time. Sure you have to make it the day before and it will take up room in the fridge, [but so does pop and beer] but come on, why slush brown sand into your glass when you can have real ice tea? There are infinite flavours of teas and you can use the sweetener you like or not sweeten it at all. Loose tea leaves are the best, but tea bags work too. Just be sure to remove the string and the tag attached to the tea bag. Black tea is very good; any black tea will work as long as the leaves are large. You can make a quick brew and pour the hot tea over a couple trays of ice cubes. Make sure the pitcher is not glass and can withstand the hot tea without cracking. Made this way the ice tea can be ready in half an hour. However the overnight method gives a finer quality of ice tea.
HOMEMADE ICE TEA
2 Tbsp loose leaf black tea
water
1/2-1 cup sugar
lemon or orange wedges

• Place a large fine sieve over a medium sized metal pot.
• Put 2 Tbsp of loose leaf tea or 2 teabags in the sieve.
• Bring the cattle of water to full boil.
• Pour the boiling water over the tea leaves and fill the pot.
• Let the tea steep for 5 minutes.
• Lift off the sieve and discard the tea leaves.
• Let the tea cool.
• When the tea is lukewarm pour the tea into a glass pitcher.
• Add cold water to fill up the pitcher.
• Sweeten the tea sparingly with sugar, honey or with Splenda. Keep in mind that chilled tea requires less sweetener.
• Add lemon slices and place in the fridge overnight.
• Next day add 3-4 ice cubes to a tall glass and pour in some tea.
• Now wasn’t it worth the wait?


WAX BEANS GOULASH - SÁRGABAB GULYÁS

Fresh wax beans from the garden… they are so good right now. The following dish is a flavourful change after days of steamed or stewed beans. I prepare it similarly to paprikás krumpli, except I use wax beans instead of potatoes. I served it with chicken fingers last night, but you can also add sausage slices near the end.

I cook wax beans in a large pot. The large pot transfers the heat more evenly to the beans and since the beans are stirred repeatedly they are less likely to fall apart when they are not stacked several inches deep in the saucepan. I used Roma tomatoes and pepper chunks from the freezer, but fresh pepper and tomatoes are even better. The beans should be cooked tender with almost no resistance when bit into. But tasty, tasty, these are very tasty.

WAX BEANS GOULASH
1 medium onion, finely chopped
1/8 cup olive oil
1 fresh pepper, diced
4 medium tomatoes, skin removed
salt
3 large handful of fresh wax beans, chopped
1-2 Tbsp Hungarian paprika
Ground pepper to taste
2 Tbsp flour
2/3 cup sour cream [14%]
extra sour cream for serving

• Wash and drain the wax beans.
• Cut off ends, and chop to one inch lengths.
• Finely chop the onions.
• Place a large bottomed pot on the stove.
• Add the oil, the chopped onions and sprinkle with salt
• Sauté on medium heat until onions are soft.
• Add the tomatoes and the pepper chunks.
• Add the wax beans and the stir in the Hungarian paprika.
• Add 1 cup of water and bring to boil.
• Reduce to simmer and cover the pot.
• When the beans are almost tender, uncover.
• Continue to simmer until the liquid is reduced by half.
• Place the lid back on the pot and maintain a very slow simmer.
• Now place 2 Tbsp flour in a non stick fry pan over medium heat.
• Keep stirring the flour until it begins to get a little color, but not burnt.
• Take the fry pan off the heat and stir the flour into the beans.
• Adjust the salt and sprinkle with ground pepper.
• Add the sour cream and stir to combine.
• Bring to a boil, remove from heat and cover.
• Let the goulash rest for ten minutes before serving. This will allow the flavours to merge.
• Serve the wax bean goulash with a dollop of sour cream.


Privacy & Cookies

This site uses cookies. By continuing to use this website, you agree to their use. To find out more, including how to control cookies, see here: Cookie Policy

Translate

me

My photo
It began with posting a few recipes on line for the family. "zsuzsa is in the kitchen" has more than 1000 Hungarian and International recipes. What started out as a private project turned into a well visited blog. The number of visitors long passed the two million mark. I organized the recipes into an on-line cookbook. On top of the page click on "ZSUZSA'S COOKBOOK". From there click on any of the chapters to access the recipes. For the archive just scroll to the bottom of the page. I am not profiting from my blog, so visitors are not harassed with advertising or flashy gadgets. The recipes are not broken up with photos at every step. Where needed the photos are placed following the recipe. Feel free to cut and paste my recipes for your own use. Publication is permitted as long as it is in your own words and with your own photographs. However, I would ask you for an acknowledgement and link-back to my blog. Happy cooking!